

Hello mate. Are you working on a project that requires the use of a temperature sensor, DS18B20 with Arduino or do you want to know how the temperature sensor works? well, you are at the right place. In this article, we’ll go over how to function, use, and interface an Arduino with a Ds18b20 temperature Sensor in a step-by-step detailed guide. Hence, I hope you find this useful. We at Techatronic have already uploaded several Arduino Tutorials and detailed project guides related to Arduino which will be useful to learn the basics and programming of Arduino.
What is the DS18B20 Temperature Sensor?
The DS18B20 temperature sensor is a 3-pin(VCC, GND, and Data) digital sensor. this is able to read temperatures in the range of -55oC to 125oC (-67oF to 257oF) with an error of ±0.5%. Also, this sensor uses a single-wire protocol to communicate and share data which can be varied from 9-bit to 12-bit.
This sensor is available in two packages which are a normal sensor and a Waterproof sensor. A waterproof sensor is very useful when you need to read the temperatures of any liquids.
The waterproof temperature sensor can be used in many areas ranging from DIY projects and products. In fact, this sensor is used in many end products for consumers such as thermostats, Industrial thermometers, and many more.

How DS18B20 Temperature Sensor Works?
The temperature sensor uses the Data pin to communicate with the host since the pin is connected directly with an independent microprocessor inside the sensor. The sensor measures and stores the values in its in-built memory.
The DS18B20 uses only one pin to work with Arduino. with a different configuration, the need of using VCC can be removed. this is done by using the data pin to communicate as well as supply power.

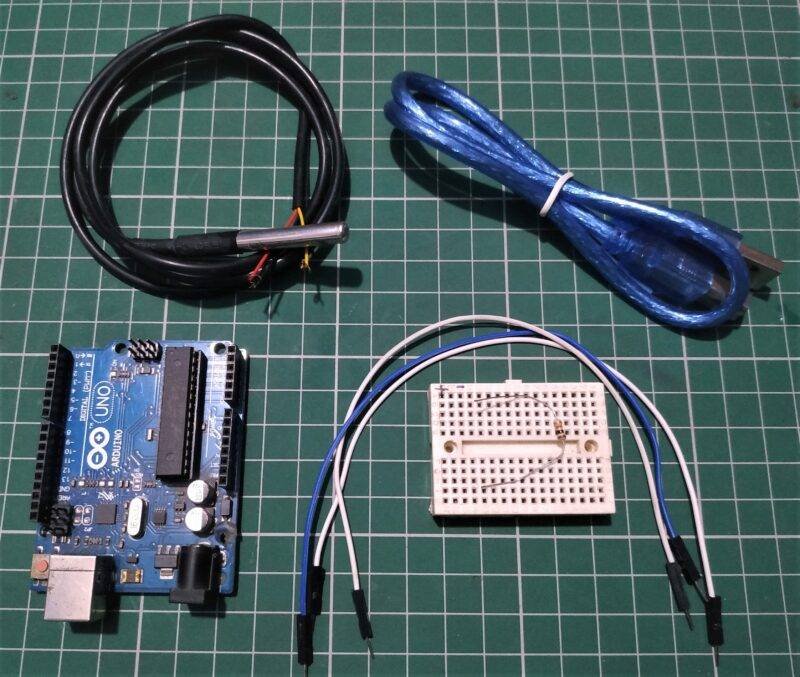
Components Required
| DS18B20 Temperature sensor | BUY LINK |
| Arduino uno | BUY LINK |
| Breadboard | BUY LINK |
| Jumper wires | BUY LINK |
| 10-ohm-resistor | BUY LINK |
| USB cable to connect Arduino UNO with Computer | BUY LINK |
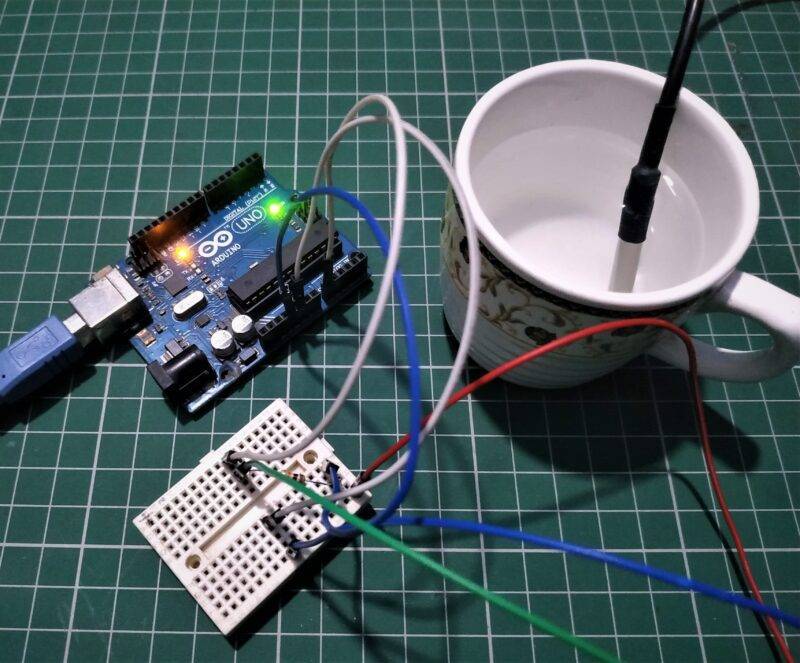
Using Temperature Sensor DS18B20 With Arduino Circuit Diagram
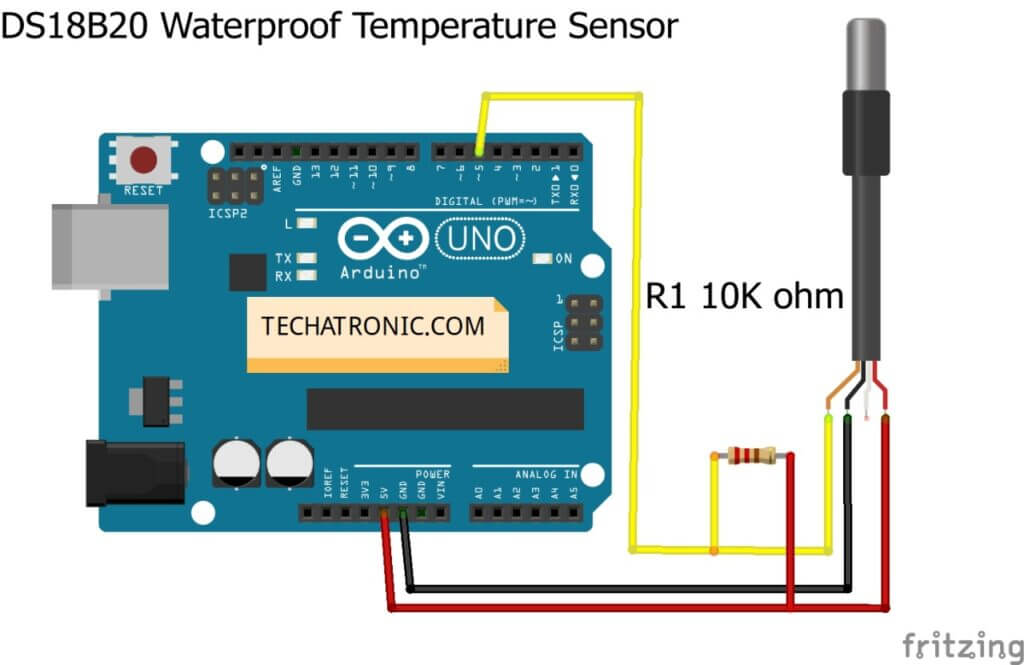
| Arduino UNO | 10k ohm Resistor | DS18B20 waterproof Temp. Sensor |
| D5 Pin | Terminal 1 | Orange Colour Wire |
| ( +5V ) | Terminal 2 | Red Colour Wire |
| GND | Black Colour Wire |
Circuit Designing
- VCC of the sensor to 5Vof Arduino UNO.
- GND of the sensor to GND of Arduino UNO.
- Connect the Data pin of the sensor to D5 of Arduino UNO.
- Short the VCC with the Data pin using a 10K-ohm resistor.
Using Temperature Sensor DS18B20 With Arduino Code
NOTE:- you need to install two Arduino Ds18B20 libraries before uploading the below code in your Arduino IDE. Download the OneWire Library from HERE and also the Dallas Temperature library from HERE.
// TECHATRONIC.COM

 // OneWire LIBRARY
 // https://github.com/PaulStoffregen/OneWire
 // DallasTemperature LIBRARY
 // https://github.com/milesburton/Arduino-Temperature-Control-Library
 #include <OneWire.h>
 #include <DallasTemperature.h>
 #define ONE_WIRE_BUS 5
 OneWire oneWire(ONE_WIRE_BUS);
 DallasTemperature sensors(&oneWire);
  float Celcius=0;
  float Fahrenheit=0;
 void setup(void)
 {
  Serial.begin(9600);
  sensors.begin();
 }
 void loop(void)
 {
  sensors.requestTemperatures();
  Celcius=sensors.getTempCByIndex(0);
  Fahrenheit=sensors.toFahrenheit(Celcius);
  Serial.print(" C ");
  Serial.print(Celcius);
  Serial.print(" F ");
  Serial.println(Fahrenheit);
  delay(1000);
 }
After uploading the code, Open Serial Monitor in Arduino IDE to view the generated output of this code. a new window like the one below will open, which will show the respective temperature readings.


Process of including library
- Click on Include Library > Add ZIP Library
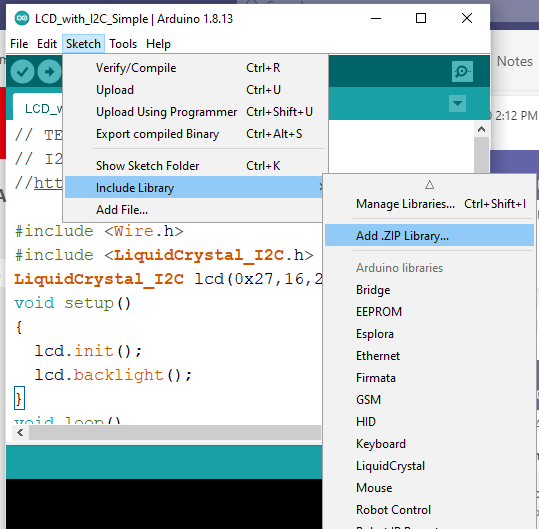
2. Click on the download folder
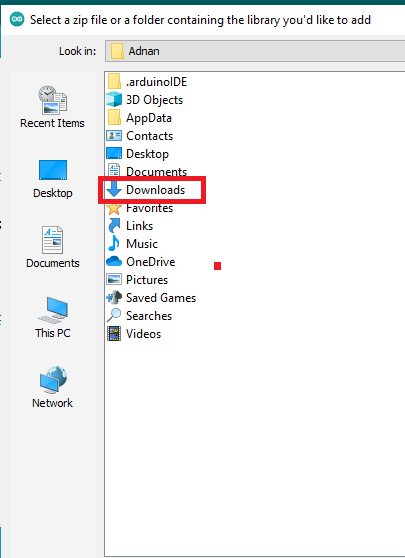
3. Select the library

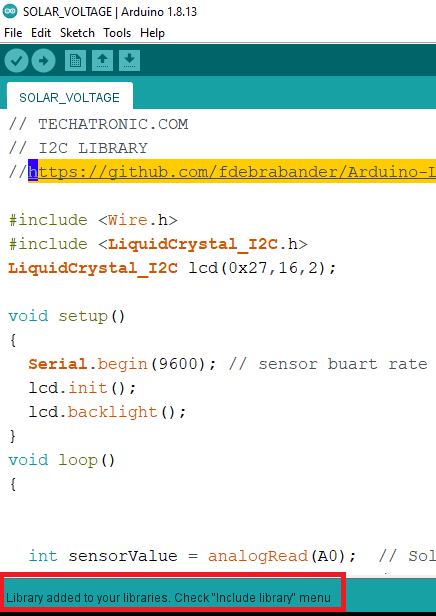
4. Now your library is added to your libraries.
I hope you will find this article helpful. If you have any queries or want to give any feedback, please comment below.