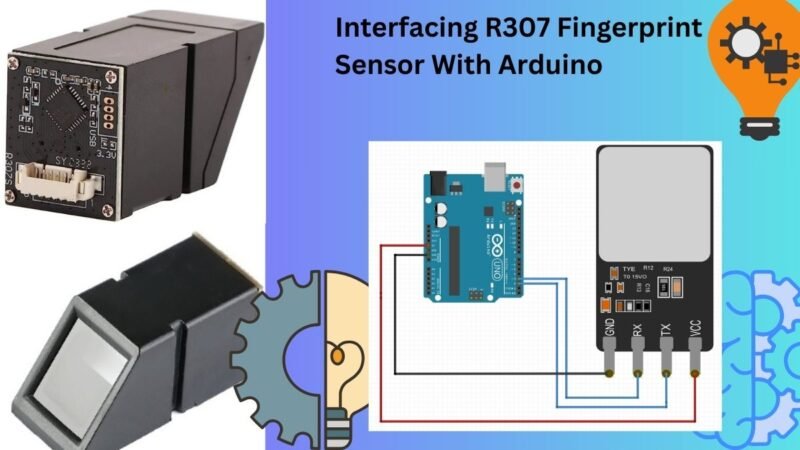
Interfacing R307 Fingerprint Sensor With Arduino
Hello everyone, welcome back to Techatronic. Today we are going to Interfacing R307 Fingerprint Sensor With Arduino. In this era the importance of fingerprint is very important. Every person on this Earth has a unique finger print and this makes it very easy to identify someone on behalf of their finger print.

In this tutorial, we are going to show how to add your fingerprint into the sensor with a particular set of codes and then we will match that fingerprint with a separate set of codes and try to show the results through serial monitor. We are using UART interface. This R307 fingerprint sensor can store upto 1000 different fingerprints.
Introduction
In this tutorial we are going for interface R307 Fingerprint Sensor With Arduino and you are going to learn about different libraries and how to use them in your code. R307 fingerprint sensor is and optical fingerprint sensor which can capture the image of fingertip and store in its own in-built memory.
We have covered it in detail about the working of R307 Fingerprint sensor with Arduino. For Serial communication we are using UART because it supports this interface which makes it compatible with Arduino, ESP32, Raspberry Pi, etc.
Components Required
- Arduino Uno
- R307 Fingerprint Sensor
- Jumper wires
- breadboard
R307 Fingerprint Sensor
It is an optical sensor and with the help of built-in memory could store up to 1000 different fingerprints. It can easily be integrated with Arduino, Raspberry Pi, ESP32 etc. The R307 Fingerprint sensor is widely used in security purposes.
R307 Fingerprint Sensor with Arduino has many functions like image processing, mathematical algorithms to match the finger prints, high capacity FLASH chips and much more. It operates on voltage level between 4.2V ~ 6.0V.
To operate on this module we have to upload code two times, first set of code is used to take the finger prints. To store the finger print you have to provide a numerical ID between 1 to 127 with the particular finger prints. When you provide these two requirements then the module store your fingerprints in the memory.
And the second set of code is used to recognize the fingerprint. If the fingerprint doesn’t match with the stored fingerprint then the R307 fingerprint sensor throw and error in the serial monitor. The R307 fingerprint sensor has capacity to store 1000 different fingerprint with precision. That is why it is used at many important places and in security.
This sensor works on a library which built by Adafruit and its a very powerful and precise library. The code is written in C language but the Adafruit library makes it very simple. A library is a set of predefined functions which helps you to write better and faster code with precision.
The R307 fingerprint sensor with Arduino scans the surface of the finger and creates an image of the patterns of the fingertip. The processor processes the image information and converts into the bits and store within the in-built memory.
When a person scans his finger on the sensor then again the sensor creates an image of the fingertip patterns and then compare this new pattern with the stored pattern in the memory. And on the basis of comparison the sensor gives output as valid or invalid.
Application of R307 Fingerprint Sensor with Arduino
The R307 fingerprint sensor has a wide variety of uses in the commercial, non-commercial and industrial uses. Here are some uses given below.
- Government Systems
- Banking Systems
- ATM Systems
- Security Systems
- Door Locks
- Attendance
- Hospital Systems
Specifications:-
- Model: R307 Fingerprint Sensor
- Supply Voltage: 4.2V ~ 6.0V
- Image Input Time: <0.3 seconds
- Resolution: 500 DPI
- Operating Current: <100mA
- Interface: UART/TTL
- Weight: 12g
- Fingerprint Capacity: upto 1000 unique fingerprints
- Operating Humidity: 40% to 85%
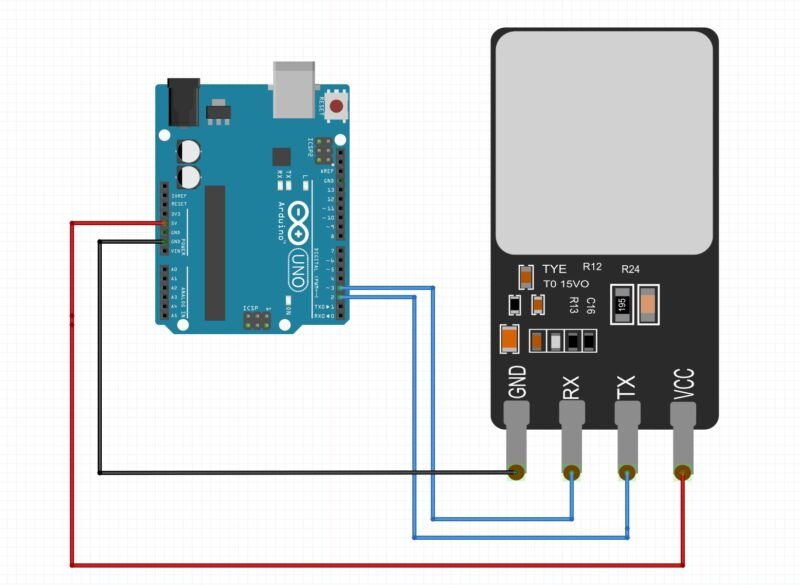
R307 Fingerprint Sensor With Arduino Circuit Diagram

| Arduino Uno | R307 Fingerprint Sensor |
| 5V | VCC |
| GND | GND |
| D2 | TX |
| D3 | RX |
Circuit connections for Interfacing R307 Fingerprint Sensor with Arduino
The circuit interface is really simple, connect the 5v pin of Arduino Uno with VCC pin of sensor, GND pin of Arduino to GND pin of sensor. Connect D2 and D3 pin of Arduino to TX and RX pin of sensor. That’s it. Isn’t it simple. Now, lets code it.
R307 Fingerprint Sensor with Arduino Code
To make the code work you have to download the Adafruit library for R307 Fingerprint sensor. To download click on sketch > include library > Manage Libraries > type “Adafruit_Fingerprint.h> in search box and download. And make sure to add this library in starting of your code.
Fingerprint Enroll Code:-
Click on file > examples > Adafruit Fingerprint Sensor Library > Select the “enroll” from the multiple examples.
Upload the “enroll” code to the Arduino
#include <Adafruit_Fingerprint.h>


#if (defined(__AVR__) || defined(ESP8266)) && !defined(__AVR_ATmega2560__)
// For UNO and others without hardware serial, we must use software serial...
// pin #2 is IN from sensor (GREEN wire)
// pin #3 is OUT from arduino  (WHITE wire)
// Set up the serial port to use softwareserial..
SoftwareSerial mySerial(2, 3);

#else
// On Leonardo/M0/etc, others with hardware serial, use hardware serial!
// #0 is green wire, #1 is white
#define mySerial Serial1

#endif


Adafruit_Fingerprint finger = Adafruit_Fingerprint(&mySerial);

uint8_t id;

void setup()
{
  Serial.begin(9600);
  while (!Serial);  // For Yun/Leo/Micro/Zero/...
  delay(100);
  Serial.println("\n\nAdafruit Fingerprint sensor enrollment");

  // set the data rate for the sensor serial port
  finger.begin(57600);

  if (finger.verifyPassword()) {
    Serial.println("Found fingerprint sensor!");
  } else {
    Serial.println("Did not find fingerprint sensor :(");
    while (1) { delay(1); }
  }

  Serial.println(F("Reading sensor parameters"));
  finger.getParameters();
  Serial.print(F("Status: 0x"));
Serial.println(finger.status_reg, HEX);
  Serial.print(F("Sys ID: 0x"));
Serial.println(finger.system_id, HEX);
  Serial.print(F("Capacity: "));
Serial.println(finger.capacity);
  Serial.print(F("Security level: "));
Serial.println(finger.security_level);
  Serial.print(F("Device address: "));
Serial.println(finger.device_addr, HEX);
  Serial.print(F("Packet len: "));
Serial.println(finger.packet_len);
  Serial.print(F("Baud rate: "));
Serial.println(finger.baud_rate);
}

uint8_t readnumber(void) {
  uint8_t num = 0;

  while (num == 0) {
    while (! Serial.available());
    num = Serial.parseInt();
  }
  return num;
}

void loop()                     // run over and over again
{
  Serial.println("Ready to enroll a fingerprint!");
  Serial.println("Please type in the ID # (from 1 to 127) you want to save this finger as...");
  id = readnumber();
  if (id == 0) {// ID #0 not allowed, try again!
     return;
  }
  Serial.print("Enrolling ID #");
  Serial.println(id);

  while (!  getFingerprintEnroll() );
}

uint8_t getFingerprintEnroll() {

  int p = -1;
  Serial.print("Waiting for valid finger to enroll as #");
Serial.println(id);
  while (p != FINGERPRINT_OK) {
    p = finger.getImage();
    switch (p) {
    case FINGERPRINT_OK:
      Serial.println("Image taken");
      break;
    case FINGERPRINT_NOFINGER:
      Serial.println(".");
      break;
    case FINGERPRINT_PACKETRECIEVEERR:
      Serial.println("Communication error");
      break;
    case FINGERPRINT_IMAGEFAIL:
      Serial.println("Imaging error");
      break;
    default:
      Serial.println("Unknown error");
      break;
    }
  }

  // OK success!

  p = finger.image2Tz(1);
  switch (p) {
    case FINGERPRINT_OK:
      Serial.println("Image converted");
      break;
    case FINGERPRINT_IMAGEMESS:
      Serial.println("Image too messy");
      return p;
    case FINGERPRINT_PACKETRECIEVEERR:
      Serial.println("Communication error");
      return p;
    case FINGERPRINT_FEATUREFAIL:
      Serial.println("Could not find fingerprint features");
      return p;
    case FINGERPRINT_INVALIDIMAGE:
      Serial.println("Could not find fingerprint features");
      return p;
    default:
      Serial.println("Unknown error");
      return p;
  }

  Serial.println("Remove finger");
  delay(2000);
  p = 0;
  while (p != FINGERPRINT_NOFINGER) {
    p = finger.getImage();
  }
  Serial.print("ID ");
Serial.println(id);
  p = -1;
  Serial.println("Place same finger again");
  while (p != FINGERPRINT_OK) {
    p = finger.getImage();
    switch (p) {
    case FINGERPRINT_OK:
      Serial.println("Image taken");
      break;
    case FINGERPRINT_NOFINGER:
      Serial.print(".");
      break;
    case FINGERPRINT_PACKETRECIEVEERR:
      Serial.println("Communication error");
      break;
    case FINGERPRINT_IMAGEFAIL:
      Serial.println("Imaging error");
      break;
    default:
      Serial.println("Unknown error");
      break;
    }
  }

  // OK success!

  p = finger.image2Tz(2);
  switch (p) {
    case FINGERPRINT_OK:
      Serial.println("Image converted");
      break;
    case FINGERPRINT_IMAGEMESS:
      Serial.println("Image too messy");
      return p;
    case FINGERPRINT_PACKETRECIEVEERR:
      Serial.println("Communication error");
      return p;
    case FINGERPRINT_FEATUREFAIL:
      Serial.println("Could not find fingerprint features");
      return p;
    case FINGERPRINT_INVALIDIMAGE:
      Serial.println("Could not find fingerprint features");
      return p;
    default:
      Serial.println("Unknown error");
      return p;
  }

  // OK converted!
  Serial.print("Creating model for #");
Serial.println(id);

  p = finger.createModel();
  if (p == FINGERPRINT_OK) {
    Serial.println("Prints matched!");
  } else if (p == FINGERPRINT_PACKETRECIEVEERR) {
    Serial.println("Communication error");
    return p;
  } else if (p == FINGERPRINT_ENROLLMISMATCH) {
    Serial.println("Fingerprints did not match");
    return p;
  } else {
    Serial.println("Unknown error");
    return p;
  }

  Serial.print("ID ");
Serial.println(id);
  p = finger.storeModel(id);
  if (p == FINGERPRINT_OK) {
    Serial.println("Stored!");
  } else if (p == FINGERPRINT_PACKETRECIEVEERR) {
    Serial.println("Communication error");
    return p;
  } else if (p == FINGERPRINT_BADLOCATION) {
    Serial.println("Could not store in that location");
    return p;
  } else if (p == FINGERPRINT_FLASHERR) {
    Serial.println("Error writing to flash");
    return p;
  } else {
    Serial.println("Unknown error");
    return p;
  }

  return true;
}
As the upload completes, open the serial monitor to see the output of the program, and set the baud rate to 9600.
Now, set the ID for the fingerprint.
Place your finger on the sensor.
The first process is complete. The sensor has stored your fingerprint data in the in-built memory. Now we need to write the verification code.
Fingerprint Verify Code:-
To write the fingerprint code follow the same steps as mentioned above and select the ‘fingerprint’ example from the lists of examples in the Adafruit Fingerprint Sensor Library.
Upload the code to the Arduino board.
#include <Adafruit_Fingerprint.h>


#if (defined(__AVR__) || defined(ESP8266)) && !defined(__AVR_ATmega2560__)
// For UNO and others without hardware serial, we must use software serial...
// pin #2 is IN from sensor (GREEN wire)
// pin #3 is OUT from arduino  (WHITE wire)
// Set up the serial port to use softwareserial..
SoftwareSerial mySerial(2, 3);

#else
// On Leonardo/M0/etc, others with hardware serial, use hardware serial!
// #0 is green wire, #1 is white
#define mySerial Serial1

#endif


Adafruit_Fingerprint finger = Adafruit_Fingerprint(&mySerial);

void setup()
{
  Serial.begin(9600);
  while (!Serial);  // For Yun/Leo/Micro/Zero/...
  delay(100);
  Serial.println("\n\nAdafruit finger detect test");

  // set the data rate for the sensor serial port
  finger.begin(57600);
  delay(5);
  if (finger.verifyPassword()) {
    Serial.println("Found fingerprint sensor!");
  } else {
    Serial.println("Did not find fingerprint sensor :(");
    while (1) { delay(1); }
  }

  Serial.println(F("Reading sensor parameters"));
  finger.getParameters();
  Serial.print(F("Status: 0x"));
Serial.println(finger.status_reg, HEX);
  Serial.print(F("Sys ID: 0x"));
Serial.println(finger.system_id, HEX);
  Serial.print(F("Capacity: "));
Serial.println(finger.capacity);
  Serial.print(F("Security level: "));
Serial.println(finger.security_level);
  Serial.print(F("Device address: "));
Serial.println(finger.device_addr, HEX);
  Serial.print(F("Packet len: "));
Serial.println(finger.packet_len);
  Serial.print(F("Baud rate: "));
Serial.println(finger.baud_rate);

  finger.getTemplateCount();

  if (finger.templateCount == 0) {
    Serial.print("Sensor doesn't contain any fingerprint data. Please run the 'enroll' example.");
  }
  else {
    Serial.println("Waiting for valid finger...");
      Serial.print("Sensor contains ");
Serial.print(finger.templateCount);
Serial.println(" templates");
  }
}

void loop()                     // run over and over again
{
  getFingerprintID();
  delay(50);            //don't need to run this at full speed.
}

uint8_t getFingerprintID() {
  uint8_t p = finger.getImage();
  switch (p) {
    case FINGERPRINT_OK:
      Serial.println("Image taken");
      break;
    case FINGERPRINT_NOFINGER:
      Serial.println("No finger detected");
      return p;
    case FINGERPRINT_PACKETRECIEVEERR:
      Serial.println("Communication error");
      return p;
    case FINGERPRINT_IMAGEFAIL:
      Serial.println("Imaging error");
      return p;
    default:
      Serial.println("Unknown error");
      return p;
  }

  // OK success!

  p = finger.image2Tz();
  switch (p) {
    case FINGERPRINT_OK:
      Serial.println("Image converted");
      break;
    case FINGERPRINT_IMAGEMESS:
      Serial.println("Image too messy");
      return p;
    case FINGERPRINT_PACKETRECIEVEERR:
      Serial.println("Communication error");
      return p;
    case FINGERPRINT_FEATUREFAIL:
      Serial.println("Could not find fingerprint features");
      return p;
    case FINGERPRINT_INVALIDIMAGE:
      Serial.println("Could not find fingerprint features");
      return p;
    default:
      Serial.println("Unknown error");
      return p;
  }

  // OK converted!
  p = finger.fingerSearch();
  if (p == FINGERPRINT_OK) {
    Serial.println("Found a print match!");
  } else if (p == FINGERPRINT_PACKETRECIEVEERR) {
    Serial.println("Communication error");
    return p;
  } else if (p == FINGERPRINT_NOTFOUND) {
    Serial.println("Did not find a match");
    return p;
  } else {
    Serial.println("Unknown error");
    return p;
  }

  // found a match!
  Serial.print("Found ID #");
Serial.print(finger.fingerID);
  Serial.print(" with confidence of ");
Serial.println(finger.confidence);

  return finger.fingerID;
}

// returns -1 if failed, otherwise returns ID #
int getFingerprintIDez() {
  uint8_t p = finger.getImage();
  if (p != FINGERPRINT_OK)  return -1;

  p = finger.image2Tz();
  if (p != FINGERPRINT_OK)  return -1;

  p = finger.fingerFastSearch();
  if (p != FINGERPRINT_OK)  return -1;

  // found a match!
  Serial.print("Found ID #");
Serial.print(finger.fingerID);
  Serial.print(" with confidence of ");
Serial.println(finger.confidence);
  return finger.fingerID;
}
The code has been uploaded. Now, you can place your finger on the R307 fingerprint sensor to check whether the code is working or not. Try this with different fingers or people.
If you need to know more about the R307 fingerprint sensor you can download the datasheet below
R307 Fingerprint Sensor Datasheet
We have made a project with this sensor the link is given below
Home security door lock system with R307 Fingerprint Sensor with Arduino
FAQ (Frequently Asked Questions
Q.1) My R307 Fingerprint Sensor With Arduino code isn’t working?
Ans. May be you have forgotten to add the Adafruit library #include <Adafruit_Fingerprint.h>
Q.2) How to download the Adafruit fingerprint library?
Ans. click on sketch > include library > Manage Libraries > type “Adafruit_Fingerprint.h> in search box and download. And make sure to add this library in starting of your code.
Q.3) Why the output isn’t showing in the Serial monitor?
Ans. Check in the void setup that you have added the Serial.begin(9600) and also check that you have selected the baud rate to 9600 in the serial monitor.


