
Hello folks, welcome back to the Techatronic. In this new article, we are going to make a very useful project which is known as the medicine reminder project. This project can help people who are taking medicine. This is basically a box with some drawers. there are 3 drawers which can open and close.
Nowadays many people have medicine that is prescribed for taking time and it is very important. so, we have made this awesome medicine reminder project with the help of Arduino. We have to set the medicine reminder once then it will automatically remind the medicine by opening and closing the drawer of medicine also a buzzer is there.
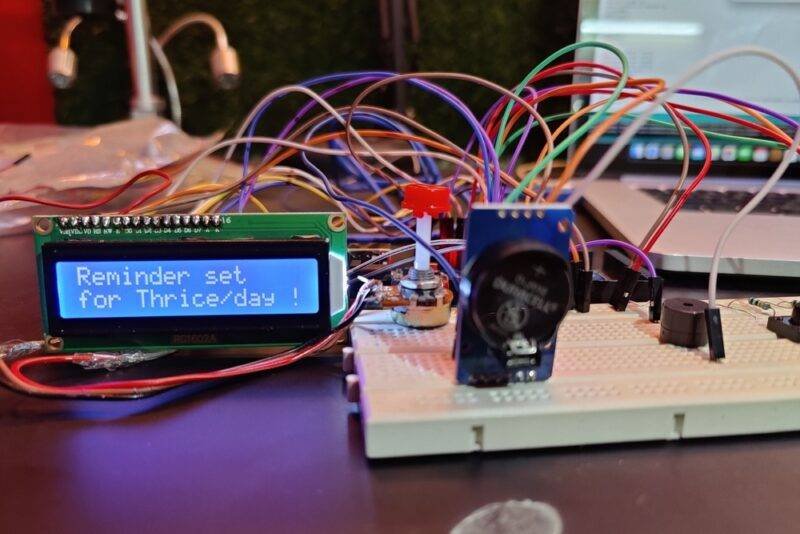
Table of Contents
Introduction
The medicine reminder project is very important for a patient who is having regular and timely prescribe medicine. Our Automatic medicine reminder using Arduino project is similar to the alarm system. which also shows you the medicine name. many times we forgot to take the medicine which is not good for some of the diseases so, this kind of project can help a lot in that case. Medicine reminder has an LCD that shows you the name of the medicine to be taken at which time and also.
Whenever you will start the system it will ask you to set the reminder for medicine. we have made it there 3 times for medicine. once a day, twice a day, and thrice a day. you can add more from the code section. When you will start the system it will ask you to set the time for all three reminders. there are four buttons that will be used to set the time. once you set the time the clock will be started and every second it is comparing the time with the data logged by the user.
So, we are going to give all the steps to make this project you need to follow all the steps to make this medicine reminder project. and we would like to refer to some articles before making this project to understand the basic of Arduino and how to connect RTC with Arduino.
Construction
In the construction phase, we must know the flow of the project. first, we will make a list of the required components
Material Required for Medicine Reminder
- Arduino Mega-BUY LINK
It is a microcontroller development board. which are used here as the brain of the controller of this project. if you want to know what is Arduino you can see the article on our website
- RTC3231 Module-BUY LINK
RTC3231 is a real-time clock system designed by a chip name rtc3231 it is having a coin battery that continuously powers the module due to this continuous power it remembers the time once you set the time.
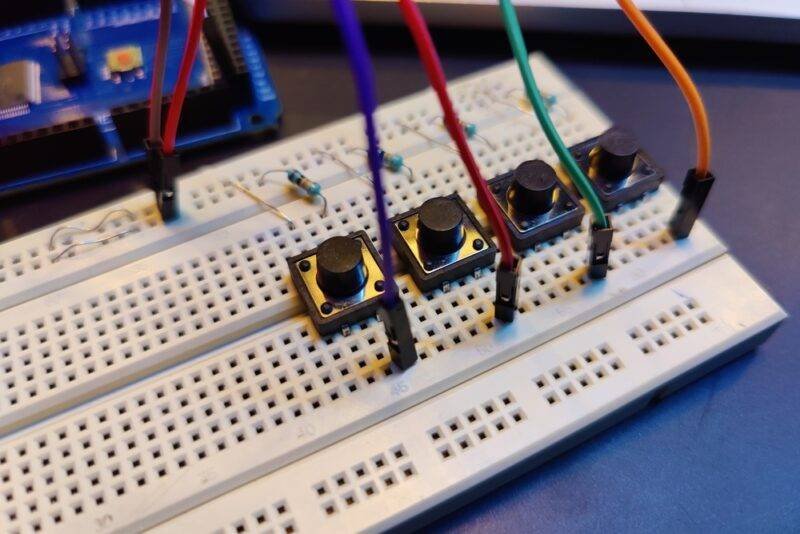
- 4- push button-BUY LINK
Push buttons are one of the most usable switches which break and connect the circuit by pushing them
- jumper wires-BUY LINK
they use to make the connection over the breadboard
- buzzer-BUY LINK
It makes noise whenever we power it. basically, it converts electrical energy into sound energy.
- 16×2 LCD display-BUY LINK
16×2 displays are common uses in the project there are 16 columns and 2 rows that’s why it is known as 16×2 LCD.
- Breadboard-BUY LINK
if you want to learn
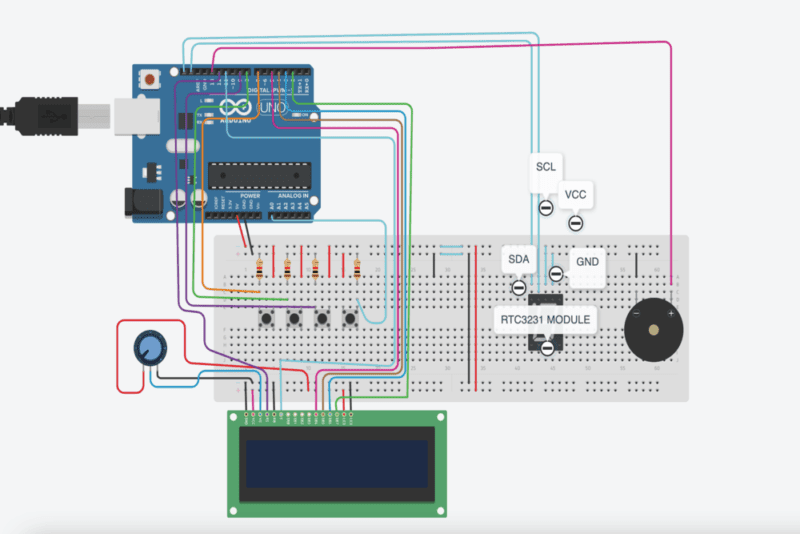
Circuit Diagram for Medicine Alarm:-
Code For medicine reminder project
//Medicine Reminder using Arduino Uno

// Reminds to take medicine at 8am, 2pm, 8pm

/*  The circuit:

   LCD RS pin to digital pin 12

   LCD Enable pin to digital pin 11

   LCD D4 pin to digital pin 5

   LCD D5 pin to digital pin 4

   LCD D6 pin to digital pin 3

   LCD D7 pin to digital pin 2

   LCD R/W pin to ground

   LCD VSS pin to ground

   LCD VCC pin to 5V

   10K resistor:

   ends to +5V and ground

   wiper to LCD VO pin (pin 3)*/


#include <LiquidCrystal.h>

#include <Wire.h>

#include <RTClib.h>

#include <EEPROM.h>


int pushVal = 0;

int val;

int val2;

int addr = 0;


RTC_DS3231 rtc;


const int rs = 12, en = 11, d4 = 5, d5 = 4, d6 = 3, d7 = 2;                 // lcd pins

LiquidCrystal lcd(rs, en, d4, d5, d6, d7);


#define getWellsoon 0

#define HELP_SCREEN 1

#define TIME_SCREEN 2


//bool pushPressed;                               //flag to keep track of push button state

int pushpressed = 0;

const int ledPin =  13;                       // buzzer and led pin

int ledState = LOW;

int Signal = 0;


int buzz = 13;

int push1state, push2state, push3state, stopinState = 0;     //

int push1Flag, push2Flag, Push3Flag = false;              // push button flags

int push1pin = 9;

int push2pin = 8;

int push3pin = 7;

int stopPin = A0;

int screens = 0;              // screen to show

int maxScreen = 2;            // screen count

bool isScreenChanged = true;


long previousMillis = 0;

long interval = 500;                   // buzzing interval

unsigned long currentMillis;


long previousMillisLCD = 0;    // for LCD screen update

long intervalLCD = 2000;          // Screen cycling interval

unsigned long currentMillisLCD;


//   Set Reminder Change Time

int buzz8amHH = 8;          //    HH - hours         ##Set these for reminder time in 24hr Format

int buzz8amMM = 00;          //    MM - Minute

int buzz8amSS = 00;          //    SS - Seconds


int buzz2pmHH = 14;          //    HH - hours

int buzz2pmMM = 00;          //    MM - Minute

int buzz2pmSS = 00;          //    SS - Seconds


int buzz8pmHH = 20;          //    HH - hours

int buzz8pmMM = 00;          //    MM - Minute

int buzz8pmSS = 00;          //    SS - Seconds


int nowHr, nowMin, nowSec;                     // to show current mm,hh,ss


// All messeges

void gwsMessege(){               // print get well soon messege

    lcd.clear();

    lcd.setCursor(0, 0);

    lcd.print("Stay Healthy :)");     // Give some cheers

    lcd.setCursor(0, 1);

    lcd.print("Get Well Soon :)");    // wish

}


void helpScreen() {              // function to display 1st screen in LCD

    lcd.clear();

    lcd.setCursor(0, 0);

    lcd.print("Press Buttons");

    lcd.setCursor(0, 1);

    lcd.print("for Reminder...!");


 }


void timeScreen() {              // function to display Date and time in LCD screen

  DateTime now = rtc.now();             // take rtc time and print in display

    lcd.clear();

    lcd.setCursor(0, 0);

    lcd.print("Time:");

    lcd.setCursor(6, 0);

    lcd.print(nowHr = now.hour(), DEC);

    lcd.print(":");

    lcd.print(nowMin = now.minute(), DEC);

    lcd.print(":");

    lcd.print(nowSec = now.second(), DEC);

    lcd.setCursor(0, 1);

    lcd.print("Date: ");

    lcd.print(now.day(), DEC);

    lcd.print("/");

    lcd.print(now.month(), DEC);

    lcd.print("/");

    lcd.print(now.year(), DEC);

}


void setup() {


  Serial.begin(9600);                      // start serial debugging

  if (! rtc.begin()) {                      // check if rtc is connected

    Serial.println("Couldn't find RTC");

    while (1);

  }

  if (rtc.lostPower()) {

    Serial.println("RTC lost power, lets set the time!");

  }


//    rtc.adjust(DateTime(F(__DATE__), F(__TIME__)));            // uncomment this to set the current time and then comment in next upload when u set the time

  rtc.adjust(DateTime(2019, 1, 10, 7, 59, 30));                // manual time set


  lcd.begin(16, 2);

  lcd.clear();

  lcd.setCursor(0, 0);

  lcd.print("Welcome To");                                      // print a messege at startup

  lcd.setCursor(0, 1);

  lcd.print("Circuit Digest");

  delay(1000);

  pinMode(push1pin, INPUT_PULLUP);                                    // define push button pins type

  pinMode(push2pin, INPUT_PULLUP);

  pinMode(push3pin, INPUT_PULLUP);

  pinMode(stopPin, INPUT_PULLUP);

  pinMode(ledPin, OUTPUT);

  delay(200);

  Serial.println(EEPROM.read(addr));

  val2 = EEPROM.read(addr);                         // read previosuly saved value of push button to start from where it was left previously

  switch (val2) {

    case 1:

      Serial.println("Set for 1/day");

      push1state = 1;

      push2state = 0;

      push3state = 0;

      pushVal = 1;

      break;

    case 2:

      Serial.println("Set for 2/day");

      push1state = 0;

      push2state = 1;

      push3state = 0;

      pushVal = 2;


      break;

    case 3:

      Serial.println("Set for 3/day");

      push1state = 0;

      push2state = 0;

      push3state = 1;

      pushVal = 3;


      break;

  }


}


void loop() {

  push1();                                             //call to set once/day

  push2();                                             //call to set twice/day

  push3();                                             //call to set thrice/day

    if (pushVal == 1) {                                // if push button 1 pressed then remind at 8am

    at8am();                                           //function to start uzzing at 8am

  }

  else if (pushVal == 2) {                             // if push button 2 pressed then remind at 8am and 8pm

    at8am();

    at8pm();                                           //function to start uzzing at 8mm

  }

  else if (pushVal == 3) {                             // if push button 3 pressed then remind at 8am and 8pm

    at8am();

    at2pm();                                            //function to start uzzing at 8mm

    at8pm();

  }


  currentMillisLCD = millis();                         // start millis for LCD screen switching at defined interval of time

  push1state = digitalRead(push1pin);                  // start reading all push button pins

  push2state = digitalRead(push2pin);

  push3state = digitalRead(push3pin);

  stopinState = digitalRead(stopPin);


  stopPins();                                            // call to stop buzzing

  changeScreen();                                        // screen cycle function


}


// push buttons

void push1() {                   // function to set reminder once/day

  if (push1state == 1) {

    push1state = 0;

    push2state = 0;

    push3state = 0;

//    pushPressed = true;

    EEPROM.write(addr, 1);

    Serial.print("Push1 Written : "); Serial.println(EEPROM.read(addr));  // for debugging

    pushVal = 1;                                             //save the state of push button-1

    lcd.clear();

    lcd.setCursor(0, 0);

    lcd.print("Reminder set ");

    lcd.setCursor(0, 1);

    lcd.print("for Once/day !");

    delay(1200);

    lcd.clear();

  }

}


void push2() {                      //function to set reminder twice/day

  if (push2state == 1) {

    push2state = 0;

    push1state = 0;

    push3state = 0;

//    pushPressed = true;

    EEPROM.write(addr, 2);

    Serial.print("Push2 Written : "); Serial.println(EEPROM.read(addr));

    pushVal = 2;

    lcd.clear();

    lcd.setCursor(0, 0);

    lcd.print("Reminder set ");

    lcd.setCursor(0, 1);

    lcd.print("for Twice/day !");

    delay(1200);

    lcd.clear();

  }

}


void push3() {                    //function to set reminder thrice/day

  if (push3state == 1) {

    push3state = 0;

    push1state = 0;

    push2state = 0;

//    pushPressed = true;

    EEPROM.write(addr, 3);

    Serial.print("Push3 Written : "); Serial.println(EEPROM.read(addr));

    pushVal = 3;

    lcd.clear();

    lcd.setCursor(0, 0);

    lcd.print("Reminder set ");

    lcd.setCursor(0, 1);

    lcd.print("for Thrice/day !");

    delay(1200);

    lcd.clear();

  }

}


void stopPins() {                   //function to stop buzzing when user pushes stop push button

  if (stopinState == 1) {

//    stopinState = 0;

//    pushPressed = true;

    pushpressed = 1;

    lcd.clear();

    lcd.setCursor(0, 0);

    lcd.print("Take Medicine  ");

    lcd.setCursor(0, 1);

    lcd.print("with Warm Water");

    delay(1200);

    lcd.clear();

  }

}


void startBuzz() {                    // function to start buzzing when time reaches to defined interval


//  if (pushPressed == false) {

 if (pushpressed == 0) {

    Serial.println("pushpressed is false in blink");

    unsigned long currentMillis = millis();

    if (currentMillis - previousMillis >= interval) {

      previousMillis = currentMillis;         // save the last time you blinked the LED

      Serial.println("Start Buzzing");

      if (ledState == LOW) {                  // if the LED is off turn it on and vice-versa:

        ledState = HIGH;

      }  else {

        ledState = LOW;

      }

      digitalWrite(ledPin, ledState);

    }

  }

  else if (pushpressed == 1) {

    Serial.println("pushpressed is true");

    ledState = LOW;

    digitalWrite(ledPin, ledState);

  }

}


void at8am() {                      // function to start buzzing at 8am

  DateTime now = rtc.now();

  if (int(now.hour()) >= buzz8amHH) {

    if (int(now.minute()) >= buzz8amMM) {

      if (int(now.second()) > buzz8amSS) {

        /////////////////////////////////////////////////////


        startBuzz();

        /////////////////////////////////////////////////////

      }

    }

  }

}


void at2pm() {                          // function to start buzzing at 2pm

  DateTime now = rtc.now();

  if (int(now.hour()) >= buzz2pmHH) {

    if (int(now.minute()) >= buzz2pmMM) {

      if (int(now.second()) > buzz2pmSS) {


        ///////////////////////////////////////////////////

        startBuzz();

        //////////////////////////////////////////////////

      }

    }

  }

}


void at8pm() {                           // function to start buzzing at 8pm

  DateTime now = rtc.now();

  if (int(now.hour()) >= buzz8pmHH) {

    if (int(now.minute()) >= buzz8pmMM) {

      if (int(now.second()) > buzz8pmSS) {


        /////////////////////////////////////////////////////

        startBuzz();

        /////////////////////////////////////////////////////

      }

    }

  }

}


//Screen Cycling

void changeScreen() {                 //function for Screen Cycling

  // Start switching screen every defined intervalLCD

  if (currentMillisLCD - previousMillisLCD > intervalLCD)             // save the last time you changed the display

  {

    previousMillisLCD = currentMillisLCD;

    screens++;

    if (screens > maxScreen) {

      screens = 0;  // all screens over -> start from 1st

    }

    isScreenChanged = true;

  }


  // Start displaying current screen

  if (isScreenChanged)   // only update the screen if the screen is changed.

  {

    isScreenChanged = false; // reset for next iteration

    switch (screens)

    {

      case getWellsoon:

        gwsMessege();                // get well soon message

        break;

      case HELP_SCREEN:

        helpScreen();               // instruction screen

        break;

      case TIME_SCREEN:

        timeScreen();                  // to print date and time

        break;

      default:

        //NOT SET.

        break;

    }

  }

}
The code is given above. only you have to upload the code into the Arduino with the help of Arduino IDE software.
Working of Medicine Reminder
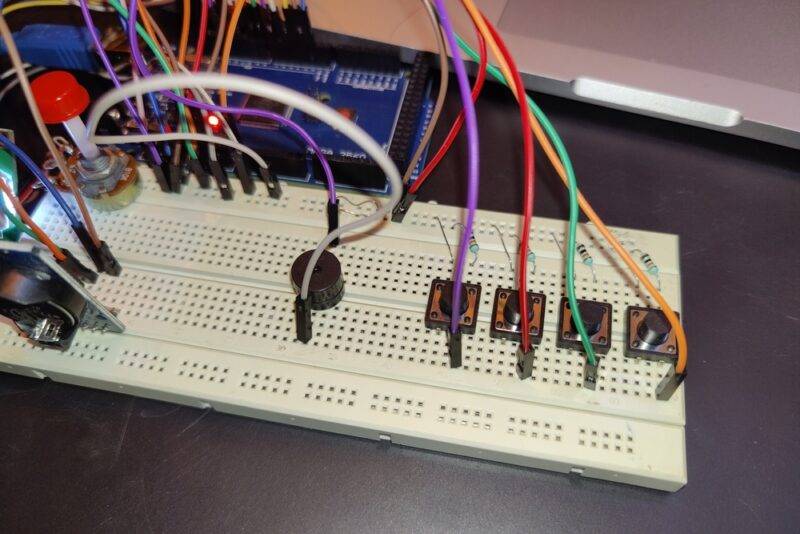
There are 4 push buttons in the Medicine reminder Arduino project one is for + in time like in hours and minutes. the second button will shift the cursor to the next option. if you are adding in an hour then after pressing the second button the cursor will shift to the next digit which is the minute. now the 3rd button will save the changes and start the reminder. Now, when we start the system the Display of the project will prompt and ask for “Set reminder “. there are four buttons when you press the first button it will start the time setting. now when it will reach the user-defined time the buzzer will start for 30 seconds.