
Table of Contents
Introduction of Arduino Clock Project
Hey geeks, welcome back to Techatronic. We are sure that you all have seen analog clocks near you all which tells us time but from these clocks, a machine cant read the time.
For reading the time a machine required a clock that generates output data in machine language. In this article, we are going to discuss the working of a DS1307 RTC module with Arduino.
Basically, Arduino is a microcontroller development board that operates using ATmega328p ic. You can check more similar projects on Arduino and also check out our E-book on Arduino at once
which contains 10+ projects with well-label diagrams. We have also made a Digital clock with an LCD display and a Digital clock with a 4-digits display previously,
you can check both of them if you want. Complete the connections first and then upload the given code.

How DS1307 RTC Module Works? / Working
- We are using a DS1307 RTC module in which RTC stands for Real-Time Clock.
- The images of the RTC module we are using are also provided below.
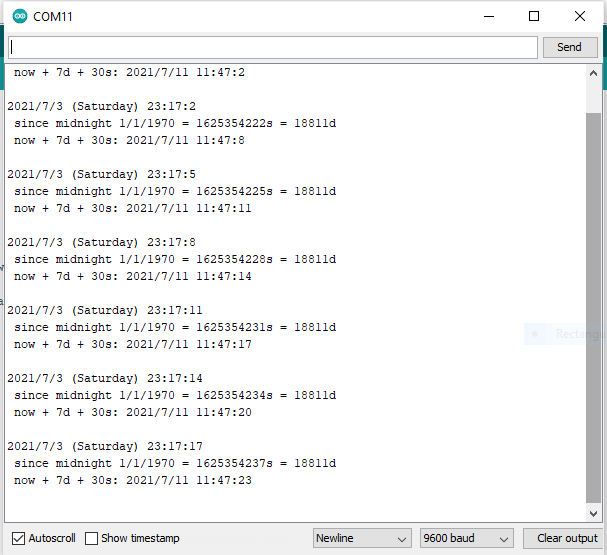
- You can open the serial monitor from the top right-hand side on your Arduino IDE application as shown below.
- We are using four of its pins, two for power(GND and VCC) and two for data(SDA and SCL).
- The RTC module is used for remembering the date and the time.

in this Arduino clock project,
- It comes with an inbuilt battery which helps it to keep working in the absence of external power.
- The inbuilt battery has a very long life span.
- We are displaying the day, date, and time on the Serial monitor which automatically keeps updating after a regular interval of time.
- You can make various projects from it which deal with data-logging, time stamping, clock-building, real-world time.
Simulation


Components Required for Arduino Clock project

| Arduino UNO | BUY LINK |
| USB cable for uploading the code | BUY LINK |
| DS1307 RTC module | BUY LINK |
| Breadboard | BUY LINK |
| Jumper wires | BUY LINK |
Circuit Diagram for the Project

Connection Table
| Arduino UNO | DS1307 RTC Module |
| ( +5V ) | VCC |
| GND | GND |
| A4 Pin ( SDA ) | SDA Pin |
| A5 Pin ( SCL ) | SCL Pin |
- You have to make the connections according to the circuit diagram given above.
- You can power the Arduino by using a USB cable or battery.
- Use the breadboard for making connections.
- Connect the 5-volts pin of the Arduino to the VCC of the DS1307 RTC module.
- Attach the GND pin of the Arduino with the GND pin of the RTC module.
- Join the analog-4 pin of the Arduino with the SDA pin of the RTC module.
- Connect the analog-5 pin of the Arduino to the SCL pin of the RTC module as shown in the diagram.
Code for the Project
NOTE: Please upload the code which is given below to the Arduino. Before uploading you have to install <RTClib.h> and <Wire.h> libraries first. Check here how to install zip libraries to the Arduino IDE.
 // TECHATRONIC.COM
  // RTC LIBRARY LINK
  // https://github.com/adafruit/RTClib
 #include <Wire.h>
 #include "RTClib.h"
 RTC_DS1307 rtc;
 char daysOfTheWeek[7][12] = {"Sunday", "Monday", "Tuesday", "Wednesday", "Thursday", "Friday", "Saturday"};
 void setup () {
  while (!Serial); // for Leonardo/Micro/Zero
  Serial.begin(9600);
  if (! rtc.begin()) {
   Serial.println("Couldn't find RTC");
   while (1);
  }
  if (! rtc.isrunning()) {
   Serial.println("RTC is NOT running!");
   // following line sets the RTC to the date & time this sketch was compiled
   // rtc.adjust(DateTime(F(__DATE__), F(__TIME__)));
   // This line sets the RTC with an explicit date & time, for example to set
   // January 21, 2014 at 3am you would call:
    //rtc.adjust(DateTime(2019, 3, 3, 20, 0, 0));
  }
   //rtc.adjust(DateTime(2019, 3, 3, 20, 0, 0));
   rtc.adjust(DateTime(F(__DATE__), F(__TIME__)));
 }
 void loop () {
   DateTime now = rtc.now();
   Serial.print(now.year(), DEC);
   Serial.print('/');
   Serial.print(now.month(), DEC);
   Serial.print('/');
   Serial.print(now.day(), DEC);
   Serial.print(" (");
   Serial.print(daysOfTheWeek[now.dayOfTheWeek()]);
   Serial.print(") ");
   Serial.print(now.hour(), DEC);
   Serial.print(':');
   Serial.print(now.minute(), DEC);
   Serial.print(':');
   Serial.print(now.second(), DEC);
   Serial.println();
   Serial.print(" since midnight 1/1/1970 = ");
   Serial.print(now.unixtime());
   Serial.print("s = ");
   Serial.print(now.unixtime() / 86400L);
   Serial.println("d");
   // calculate a date which is 7 days and 30 seconds into the future
   DateTime future (now + TimeSpan(7,12,30,6));
   Serial.print(" now + 7d + 30s: ");
   Serial.print(future.year(), DEC);
   Serial.print('/');
   Serial.print(future.month(), DEC);
   Serial.print('/');
   Serial.print(future.day(), DEC);
   Serial.print(' ');
   Serial.print(future.hour(), DEC);
   Serial.print(':');
   Serial.print(future.minute(), DEC);
   Serial.print(':');
   Serial.print(future.second(), DEC);
   Serial.println();
   Serial.println();
   delay(3000);
 }
The Final Project of Clock Looks Like This

We hope that you learn the interfacing of a DS1307 RTC module with Arduino and please try to make the project on your own.
If you are facing any errors during making this please inform us in the comments section below. Also, check more tutorials on Arduino and Raspberry Pi written by us.
HAPPY LEARNING!