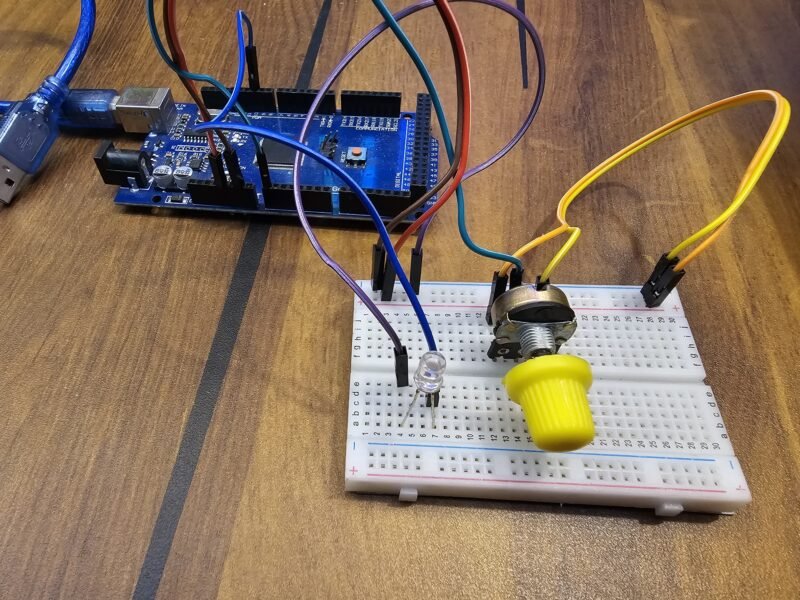
Hello everyone, welcome back to Techatronic. Today we are going to learn how to do LED fading using Arduino Mega. So, You may thinking where we can use this in our day to day life. If you are studying on your study table and the brightness of the lamp is too high, you can use this to dim the light according to your desired preference.
This can help you to prevent eye straining. You can also use potentiometer to control the speed of your table fan and you can also use it in your audio projects to increase or decrease the volume and you can make much more with it.

Table of Contents
Introduction
In this project we are going to fade a LED using potentiometer with the help of Arduino Mega. With this project you are going to learn the basic of electronics too and how to integrate the circuit with the Arduino Mega. Arduino Mega uses ATmega2560 and it has 54 digital input/output pins including 15 PWM pins and 16 analog INPUT pins and it has 16 MHz crystal oscillator which makes it a powerful machine.
Components Required
- Arduino Mega
- Jumper wires
- LED
- Potentiometer
- Breadboard
Arduino Mega
You may familiar with Arduino Uno and Arduino Nano but this time we are using Arduino Mega. Arduino Mega uses ATmega2560 microcontroller and it is known for so many input/output pins, it has 54 digital input/output pins and for our suitability.
it has 15 PWM and 16 analog INPUT pins and it uses 16 MHz crystal oscillator which makes it a beast in Arduino microcontroller family. We use it in heavy and big projects due to its high processing and computing power related to other Arduino microcontroller boards.
Potentiometer
You may heard of potentiometer before and now in this project you are going to use it with us. So, the question is, what is potentiometer? and the simplest explanation is, it is a variable resistor. Yeah, that’s it. Where does it used?
It is used in my places like in radios, microwaves, washing machines, etc. It provides resistance in the circuit which helps to alternate the flow of electrons and the change of flow electrons means the change in current and voltage.
Potentiometer has three pinouts:-
- Pin 1 : This is in fixed position. This connects to the negative/positive of the device.
- Pin 2: This pin is flexible that means it can move to certain degrees. This pin moves to give variable voltage.
- Pin 3: This is in fixed position. This connects to the negative/positive of the device.
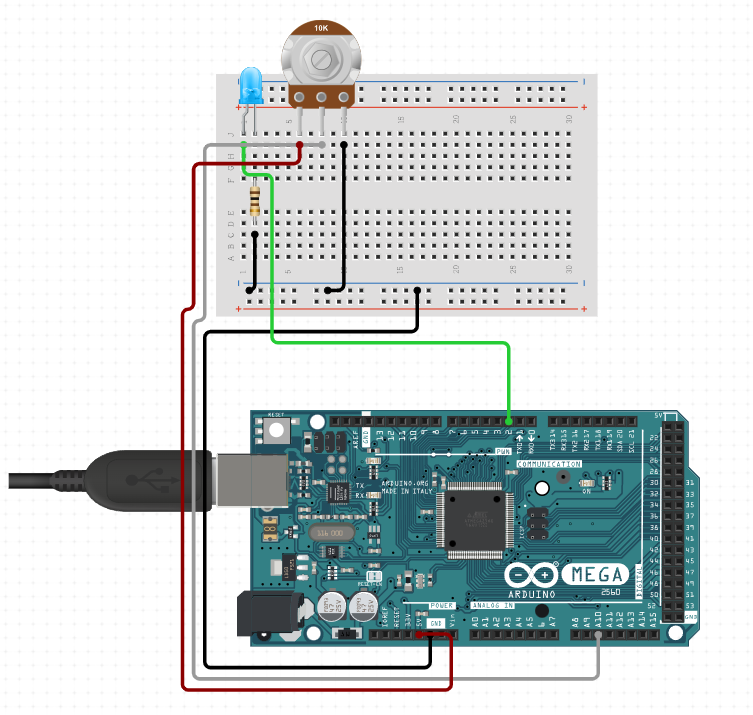
Circuit Diagram of LED fading using Arduino Mega

| Arduino Mega | LED | POTENTIOMETER |
| 5V | — | Left Pin (T1) |
| GND | -V | Right Pin (T3) |
| A10 | — | Middle Pin (T2) |
| 2 | +V | — |
Circuit Connections for LED fading using Arduino Mega
Now, Connect the negative pin of the LED and T3 of the potentiometer to the GND pin of Arduino Mega. Connect the positive pin of the LED to the pin 2 and T1 of the potentiometer to the 5V of Arduino Mega. And now, finally connect the T2 of the potentiometer to the Analog pin A10 of Arduino.
Code
const int led = 2;
const int pot = A10;

void setup(){
  pinMode(led, OUTPUT);
  pinMode(pot, INPUT);
  Serial.begin(9600);
}

void loop(){
  int data = analogRead(pot);
  int z = map(data, 0, 1023, 0, 255);
  Serial.println(z);
    analogWrite(led, z);
    delay(10);
}
Code Explanation
So for LED fading using Arduino Mega, you have completed the circuit and wrote the code in your Arduino IDE as mentioned above but now you may be wondering how the heck this code work. Give me a couple of minutes to explain you the code which we just wrote above.
const int led = 2;
const int pot = A10;
We have connected the led and potentiometer to the pins of 2 and A10 of Arduino Mega.
void setup(){
  pinMode(led, OUTPUT);
  pinMode(pot, INPUT);
  Serial.begin(9600);
}
In the void setup we are telling the Arduino Mega the input/output behavior of each variable(led, pot) like, led is working as an OUTPUT and potentiometer(pot) is working as an INPUT. Serial.begin(9600) is used for serial communication between your computer and Arduino Mega. Because of this we can see the input/output data on serial monitor
  int data = analogRead(pot);
  int range = map(data, 0, 1023, 0, 255);
  Serial.println(range);
    analogWrite(led, range);
analogRead is a function which helps to read the data from the particular sensor, in this case it is potentiometer(pot) and the incoming data is being stored in our data variable which we have created.
The values of potentiometer varies from 0 to 1023 and to fade the led we need values between 0 to 255. We need to convert potentiometer values in range of 0 to 255 and to do so we need a map function which we have just used. Now, with the help of map function we have converted the potentiometer values in our desired range that is 0 to 255 and stored these values in a variable called range.
Serial.println function just shows the data on serial monitor.
analogWrite function is used to glow the led on behalf of the values which we got via potentiometer which we have stored in our range variable.
If you have found any problem on how to upload the code to Arduino board use this link for instructions.
FAQ (Frequently Asked Questions)
Q.1) What should be the value of my Potentiometer?
Ans. You can have it from 1k to 10k ohm.
Q.2) Why my LED is not glowing?
Ans. In this project we are using PWM(Pulse Width Modulation) concept to glow our LED, you need to make sure that your LED is connected to any PWM pin from 2 to 13. We have used pin 2. Connect your positive leg of your LED to PWM pin 2 of Arduino Mega.
Q.3) My LED fading using Arduino Mega circuit is not working despite making the same circuit on my breadboard, why?
- Check your LED. It could be fused.
- Check you wiring. May be any of your jumper wire faulty.
- Is your potentiometer fixed properly.
- check the pin connections.
