

Hello techies, Welcome back to Techatronic. Home automation using IoT with the Blynk app is one of the easiest and popular projects in the IoT department. IoT is the branch of science in which we deal related to the internet things.
Table of Contents
Introduction
IoT stands for the internet of things. And we are using the internet here to control things which is the definition of the Io.
IoT means controlling things like home appliances over the internet. We have uploaded many more IoT projects here from these the smart parking using IoT is the best one. you should check this project too.
In this project, we will show you how to control home appliances with the mobile app over the internet. In Bluetooth control home automation, we also use a mobile phone but there are some limitations. and the biggest limitation is the range.
but, there is no limitation of the range you can control the appliances from anywhere. only you need internet for both devices. for your mobile phone and your device which is esp8266.
A preview image of Home automation using iot

Home Automation using IoT?
Blynk app is a server-based app which always connected to the server and controls the NodeMCU from that server. so here you don’t need to make any other application.
only you need some device and follow our instructions. we are sharing all the information to make this awesome project. if you wanna buy this project from us you can also Buy this project. with the given link.
the application is already available on the play store. So, now you can control your home by an app. we can say you can make your home smart. like a smartwatch, smartphone, and smart dustbin. this is a smart era and everything needs to be smart.
so, this season make your own IoT smart home. If you buy any IoT controller from the market it will be costly but if you wanna make your own at-home automation system app control.


Home automation Working
- Here we are having an app named Blynk app.
- which we need to download from the play store.
- And then we need to create some buttons as per requirement.
- we will make the connection as given below and then upload the code into the ESP8266.
- and then when we pressed the button in our IoT home automation project on the mobile screen then the app will send the data to the server and according to the code,
- the server controls the device according to the input. this is how the whole system works?

Components Required
| NodeMCU (esp8266) | BUY LINK |
| 4 Channel relay | BUY LINK |
| Breadboard | BUY LINK |
| jumper wires | BUY LINK |
| Connecting cable | BUY LINK |
| AC fan | BUY LINK |
| AC bulb | BUY LINK |
| Bulb holder | BUY LINK |
| Wire | BUY LINK |
| AC Supply | BUY LINK |
| Nodemcu power supply | BUY LINK |
you can buy all components together-BUY LINK

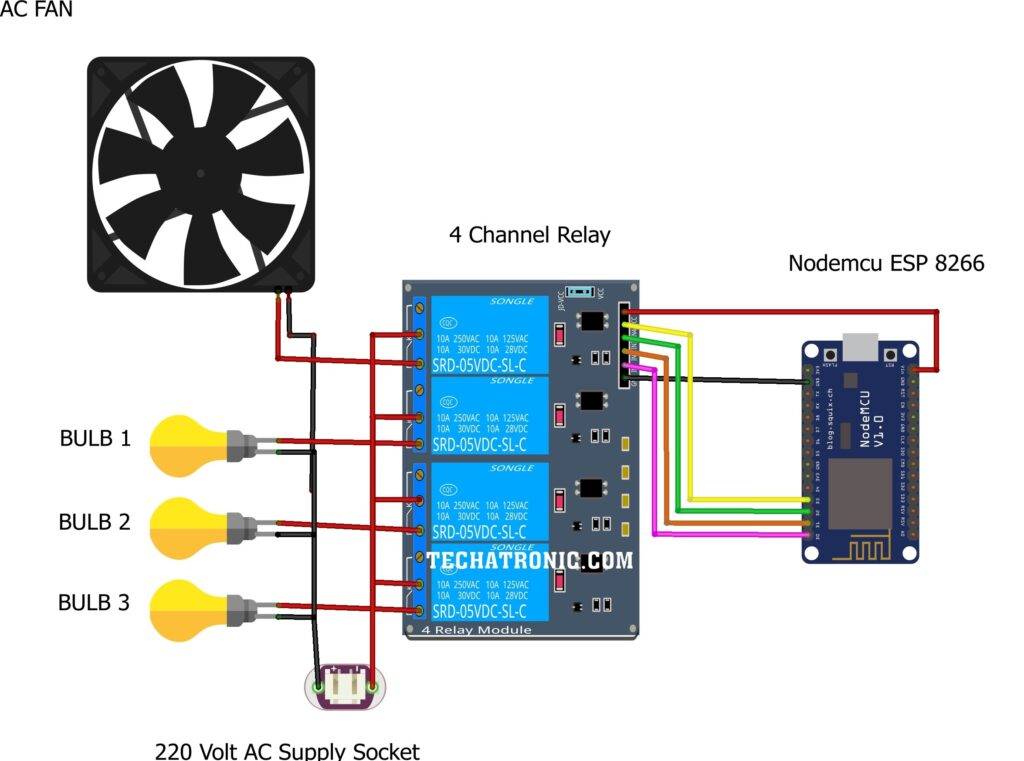
Home Automation using IoT Circuit Diagram
Here as you can see in the image the esp8266 is connected to the Directly relay and from these relay, we are triggering the output devices like bulb and fan. still, if you have any difficulties you can ask us in the comment section.
Connection Table
| Nodemcu esp 8266 | 4 Channel relay module, 5Volt | ||||
| D0 Pin | IN 1 | ||||
| D1 Pin | IN 2 | ||||
| D2 Pin | IN 3 | ||||
| D3 Pin | IN 4 | ||||
| Vin, VV (+ 5V ) | VCC | ||||
| G ( Ground ) | GND | ||||
| Bulb 1 | Bulb 2 | Bulb 3 | AC Fan | 4 Channel Relay | 220 V AC Supply |
| Normally open | |||||
| Common | Phase | ||||
| Terminal 1 | Terminal 1 | Terminal 1 | Terminal 1 | Normally closed | |
| Terminal 2 | Terminal 2 | Terminal 2 | Terminal 2 | Neutral |
Home Automation using IoT Code
  //TECHATRONIC.COM
  // BLYNK LIBRARY
  // https://github.com/blynkkk/blynk-library
  // ESP8266 LIBRARY
  // https://github.com/ekstrand/ESP8266wifi
  //#define BLYNK_PRINT Serial
#define BLYNK_PRINT Serial
#include <ESP8266WiFi.h>
#include <BlynkSimpleEsp8266.h>

// You should get Auth Token in the Blynk App.
// Go to the Project Settings (nut icon).
char auth[] = "R9t8qgxWqzTaeRTaeQbRVLjc42PE4bqm";

// Your WiFi credentials.
// Set password to "" for open networks.
char ssid[] = "dektop";  // Enter Wifi Name
char pass[] = "asdlouy"; // Enter Password

void setup()
{
  // Debug console
  Serial.begin(9600);
  Blynk.begin(auth, ssid, pass);

}

void loop()
{
  Blynk.run();
}
Here you need to change the name and password as your wifi.
Step to make the Button using the Blynk app.
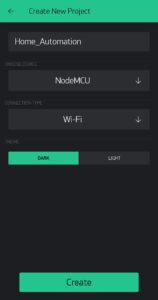
Step 1
Login & Setup In blynk app
Download the app from the play store

Step 2
Login
into the app

Step 3
Click on the
add new project

Step4
Select NodeMCU here
Step 5
Token will be sent to your email id. copy that token from there and insert it into the code.
Add token

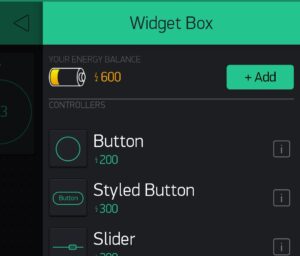
Step 6
Make button by clicking plus sign from upper right corner add button
Create button
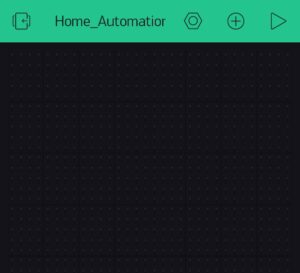
Step 6
Open the button setting and set the trigger of a button from 0 to 1


Step 7
Make 4 buttons for 4 appliances and rename these with your ones


I hope you will learn a lot from this article. if you want to make nodemcu setup in Arduino ide. it is available you can setup your software.
Video Sample
https://www.youtube.com/watch?v=pv4ZhHEeo0o&t=6s
Buy project
