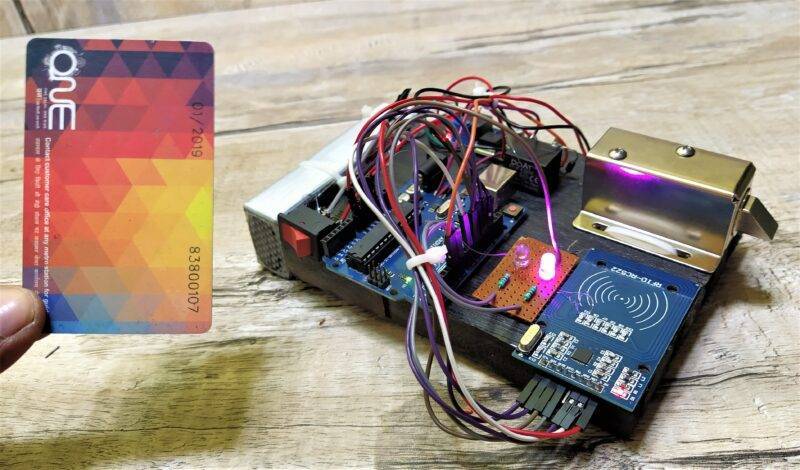
RFID is known as Radio Frequency Identification. and we are using this technology in this project to make a door security system. and we will make it with the Arduino. So who are searching for an Arduino RFID project we would like to show you this project. This is simple and attractive. you can also make this project for your home or office. there is also the solenoid lock so you can attach this with your door also. Rfid security lock works like the metro entry gate. you need to put your RFID card to that surface and then the lock will open. Rfid makes many other entry security locks like the RFID parking gate system.
Hey Guys, welcome to Techatronic. in this project, we are going to make an RFID RC522 ARDUINO lock security system. Basically, this project is for door and lock purposes. you don’t have to buy the token now. you can open the gate simply by tap the RFID card on the surface of the card reader. nowadays the same technology used in the Metro gate and the parking gate. when you tap the Tag or card at the reader. tag is in the shape of a keyring so you can attach this to your car or bike key. then the gate will be open for some time. the opening time you can manage or change by the coding.
So, using the same method we are making this project as you can see in the given image. you can use this lock at your home also. put that project on the door and use a solenoid lock there then. whenever you will tap the tag on the reader the lock will be open. we also made a video on this project. so, if you want to make this RFID-based project or you want to learn about this project we would like to refer you to the youtube video page which is given at the last of this post. Same as this project we have made a Fingerprint door security lock with the Arduino.
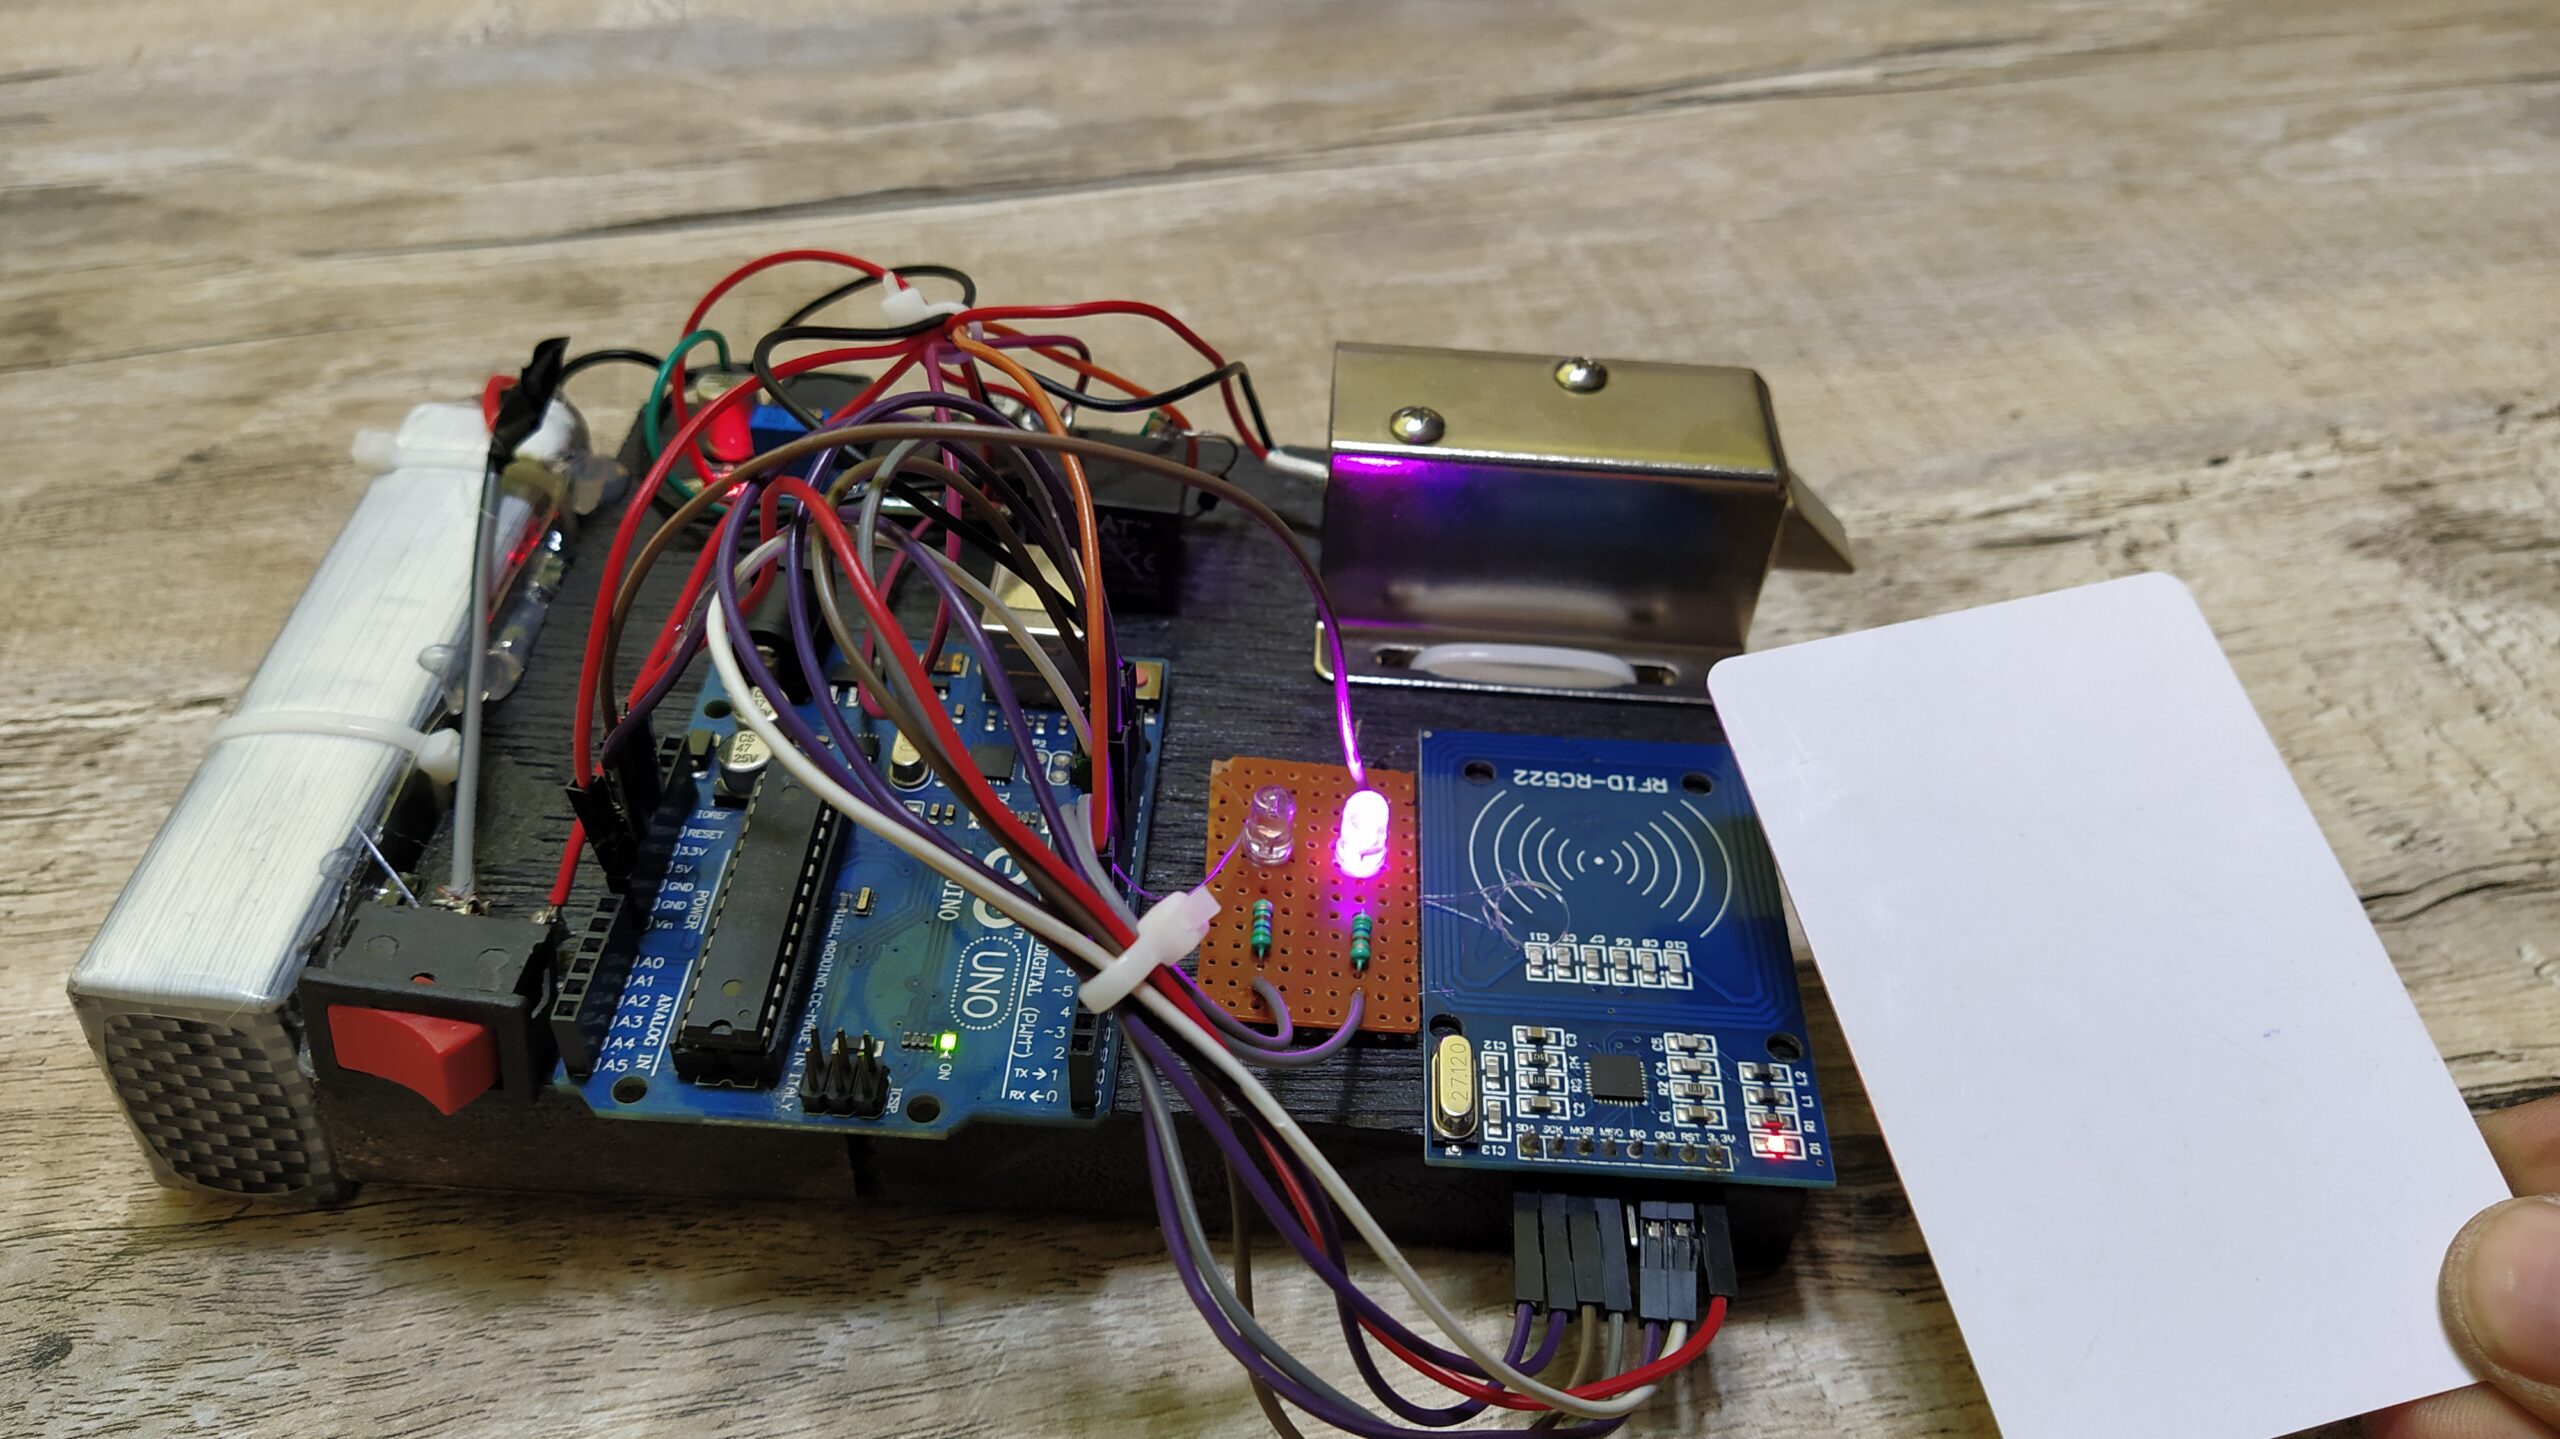
RFID reader having two parts One is a reader and another is Tag. when the tag comes closer to the reader then it will send some data to the reader and. and the reader sends this data to the Arduino and Arduino will take action according to the coding. The tag has a coil which activated when it gets close to the reader. there is one coil on the reader also. which activated the tag coil by the induction. and during this process reader read the information having the tag. Arduino RFID project Having the three devices input, processing, and output.
Rfid rc522 module we are using here which is works here the input device which gets the input from the tag and reader and then sends this information to the Processing device which is Arduino here. when the Arduino receives the data it will start comparing the information with the database which we have included during programming. first, we need to enter the tag information or tag Id into the Arduino programming.
first, you need to upload the program in Arduino and open the serial monitor now when you tap the RFID tag over the reader then there are some value shows in the serial monitor. now you have to write the same value into the Arduino code as we have mentioned in the given code. As the given process you can enter multiple tag ID. Now, we will make a list of components.
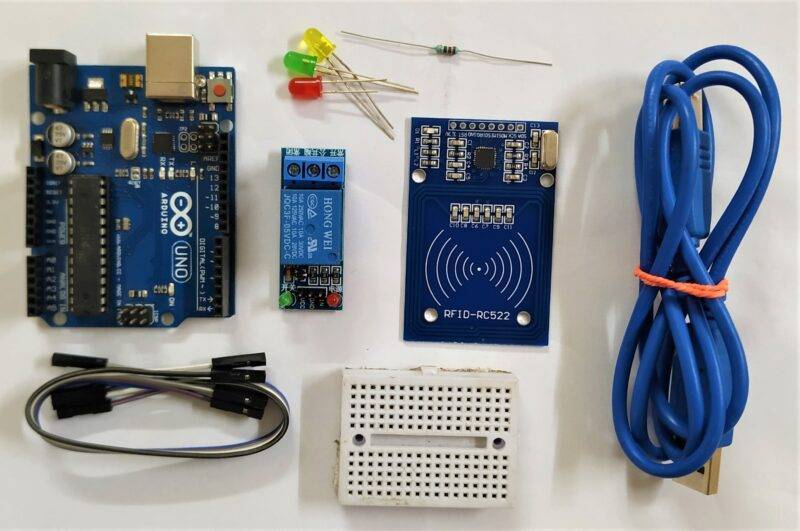
Components required for Door security System Arduino RFID project:-
- Arduino Uno
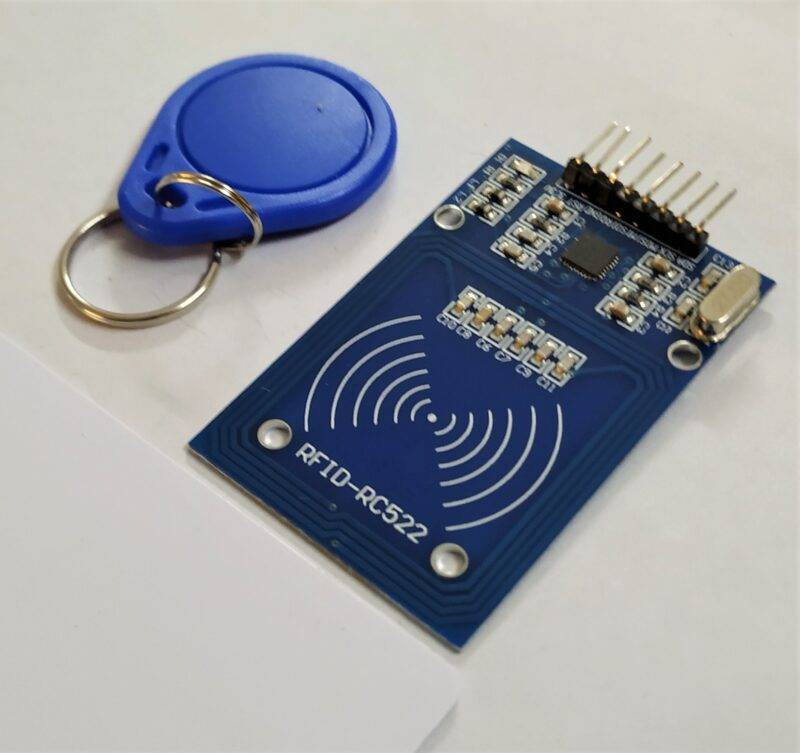
- RFID RC522
- Solenoid Lock
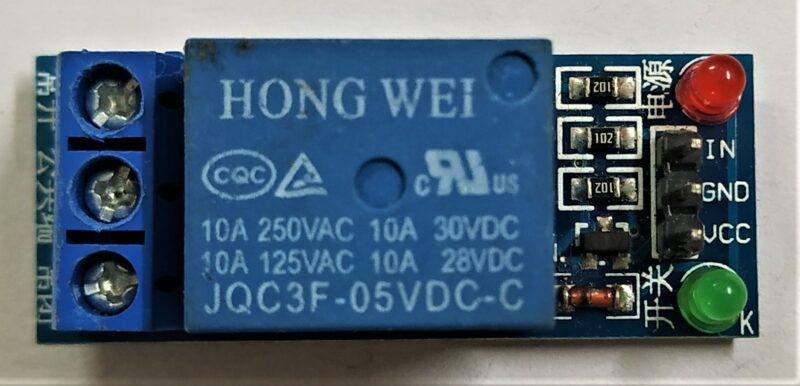
- 5v relay module single channel
- 2 LED
- Jumper wire
- Hook up wire.
- Buck converter
- Arduino Uno
- RFID RC522
- Solenoid Lock
- 5v relay module single channel
- 2 LED
- Jumper wire
- Hook up wire.
- Buck converter
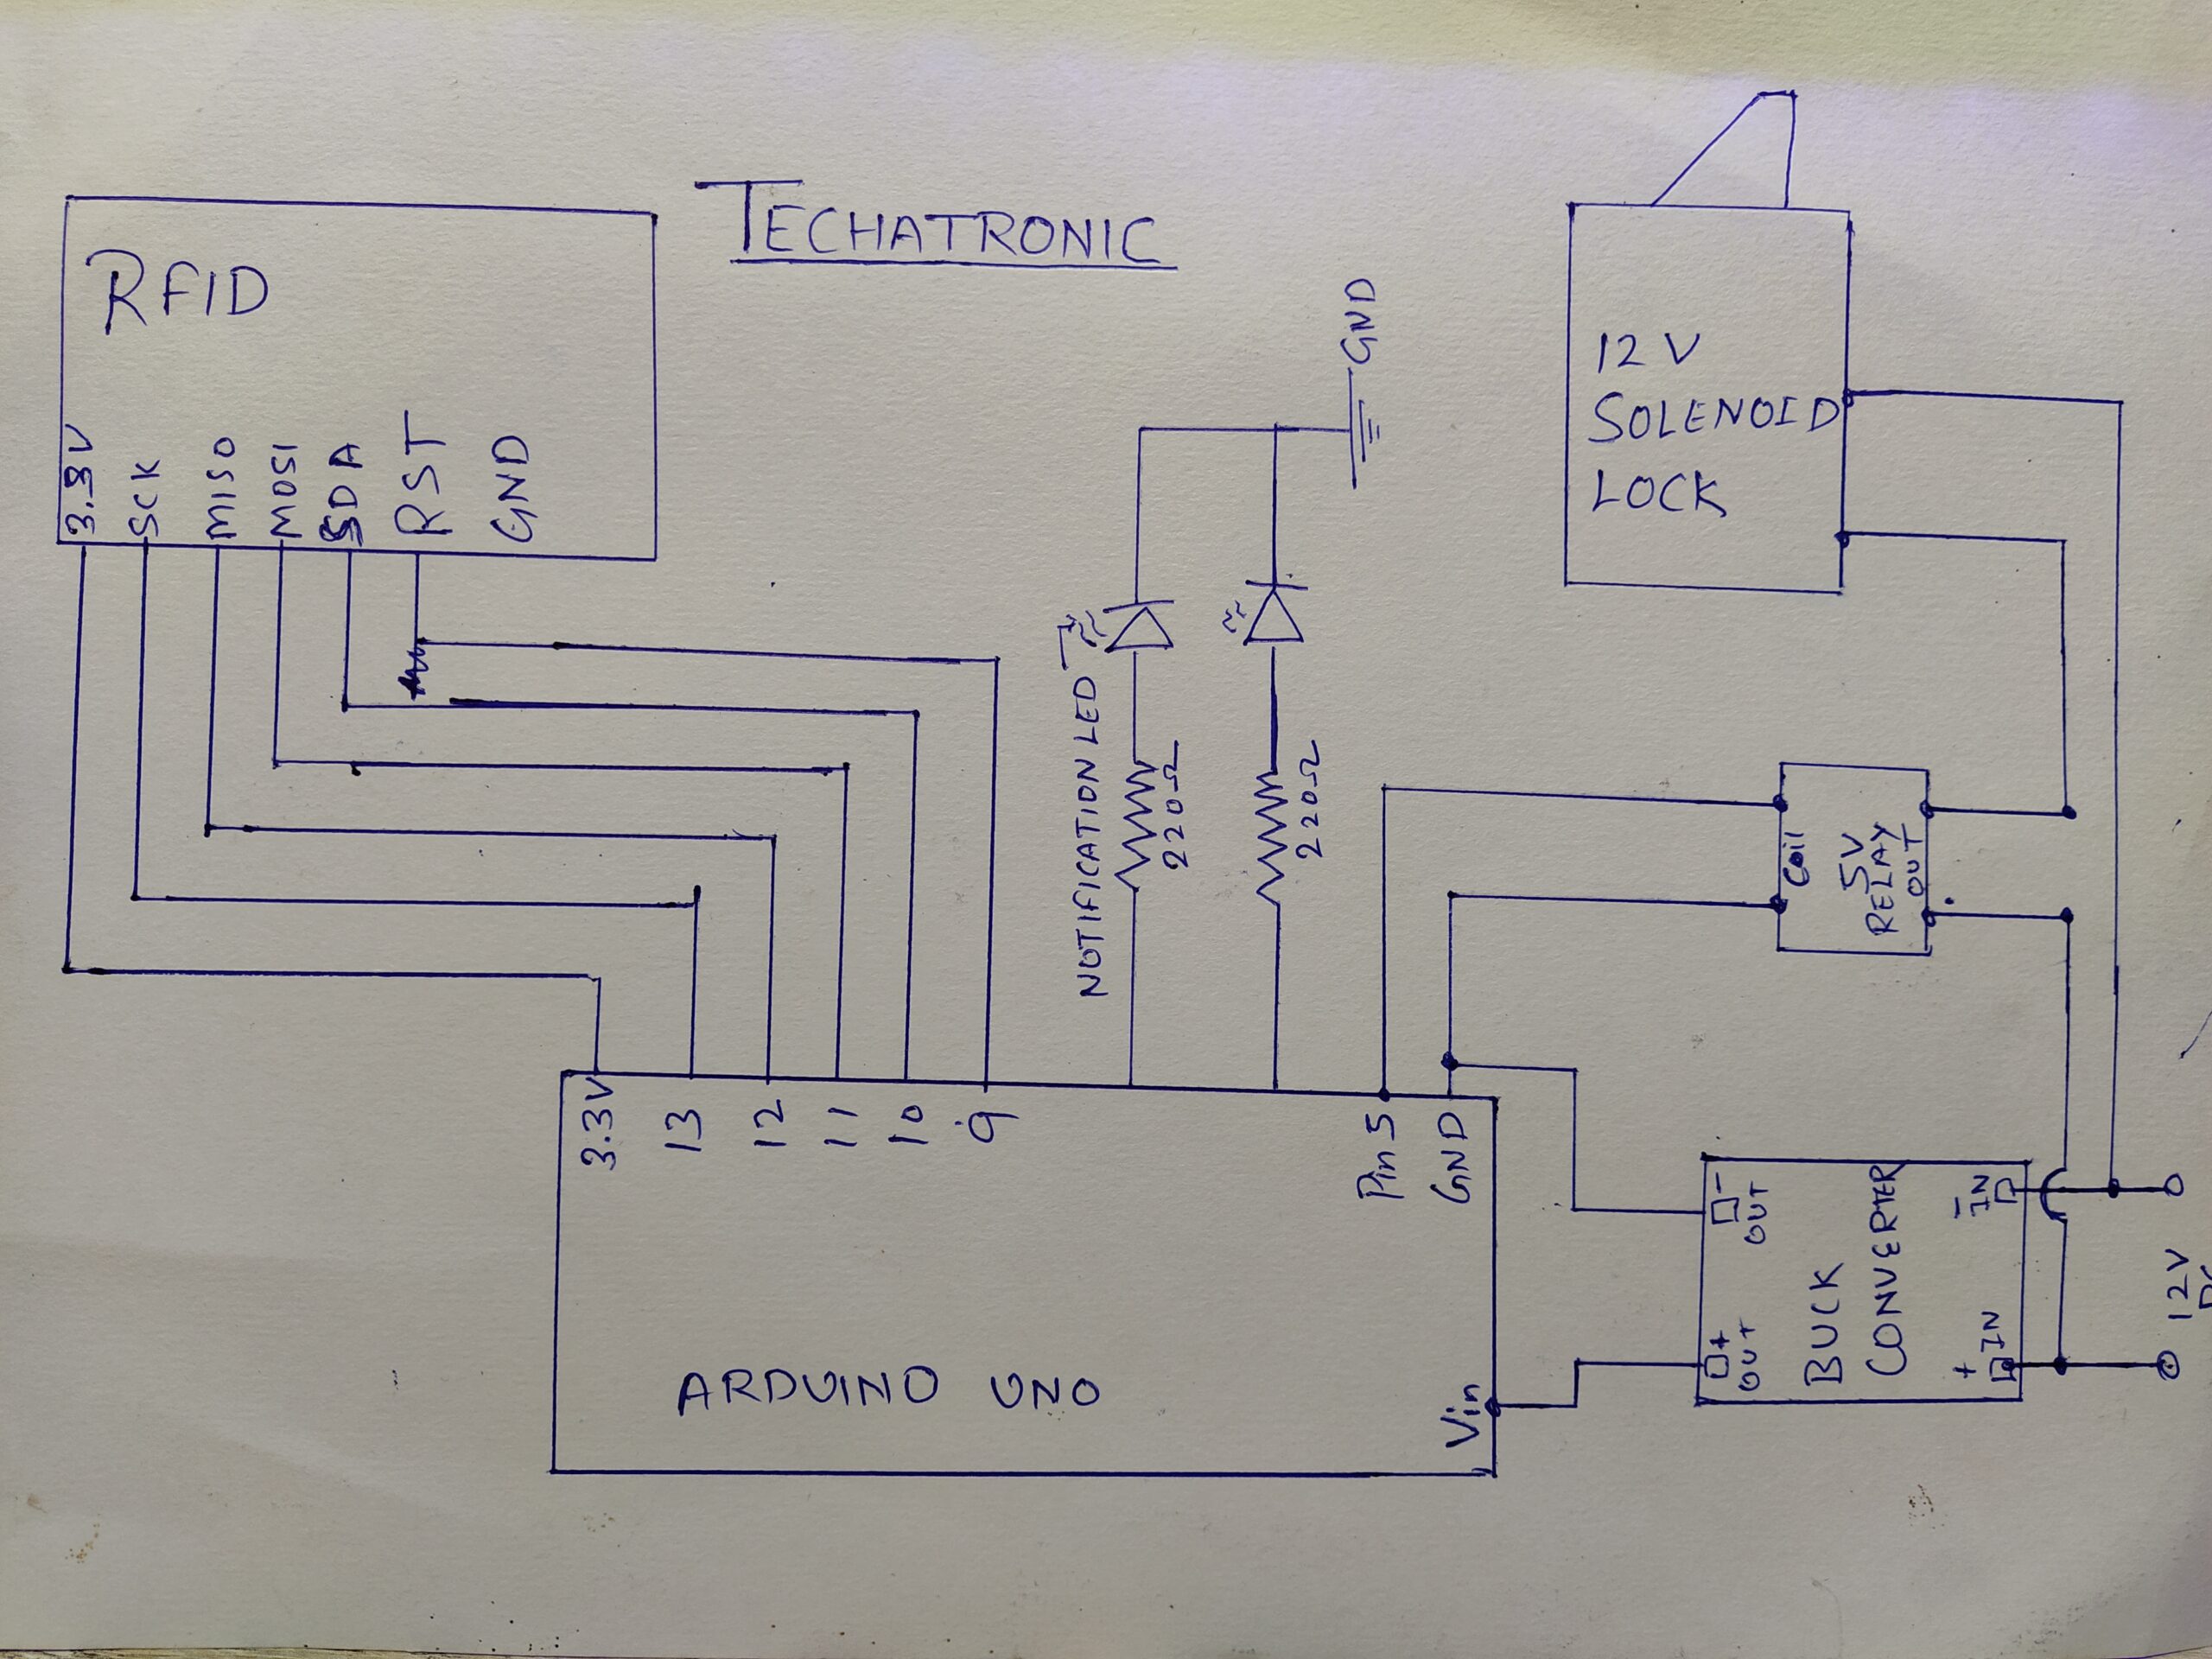
Arduino RFID circuit diagram(with solenoid lock):-
first, we are sharing the handmade circuit diagram.
Also, we are sharing a fritzing diagram that can help to understand better.
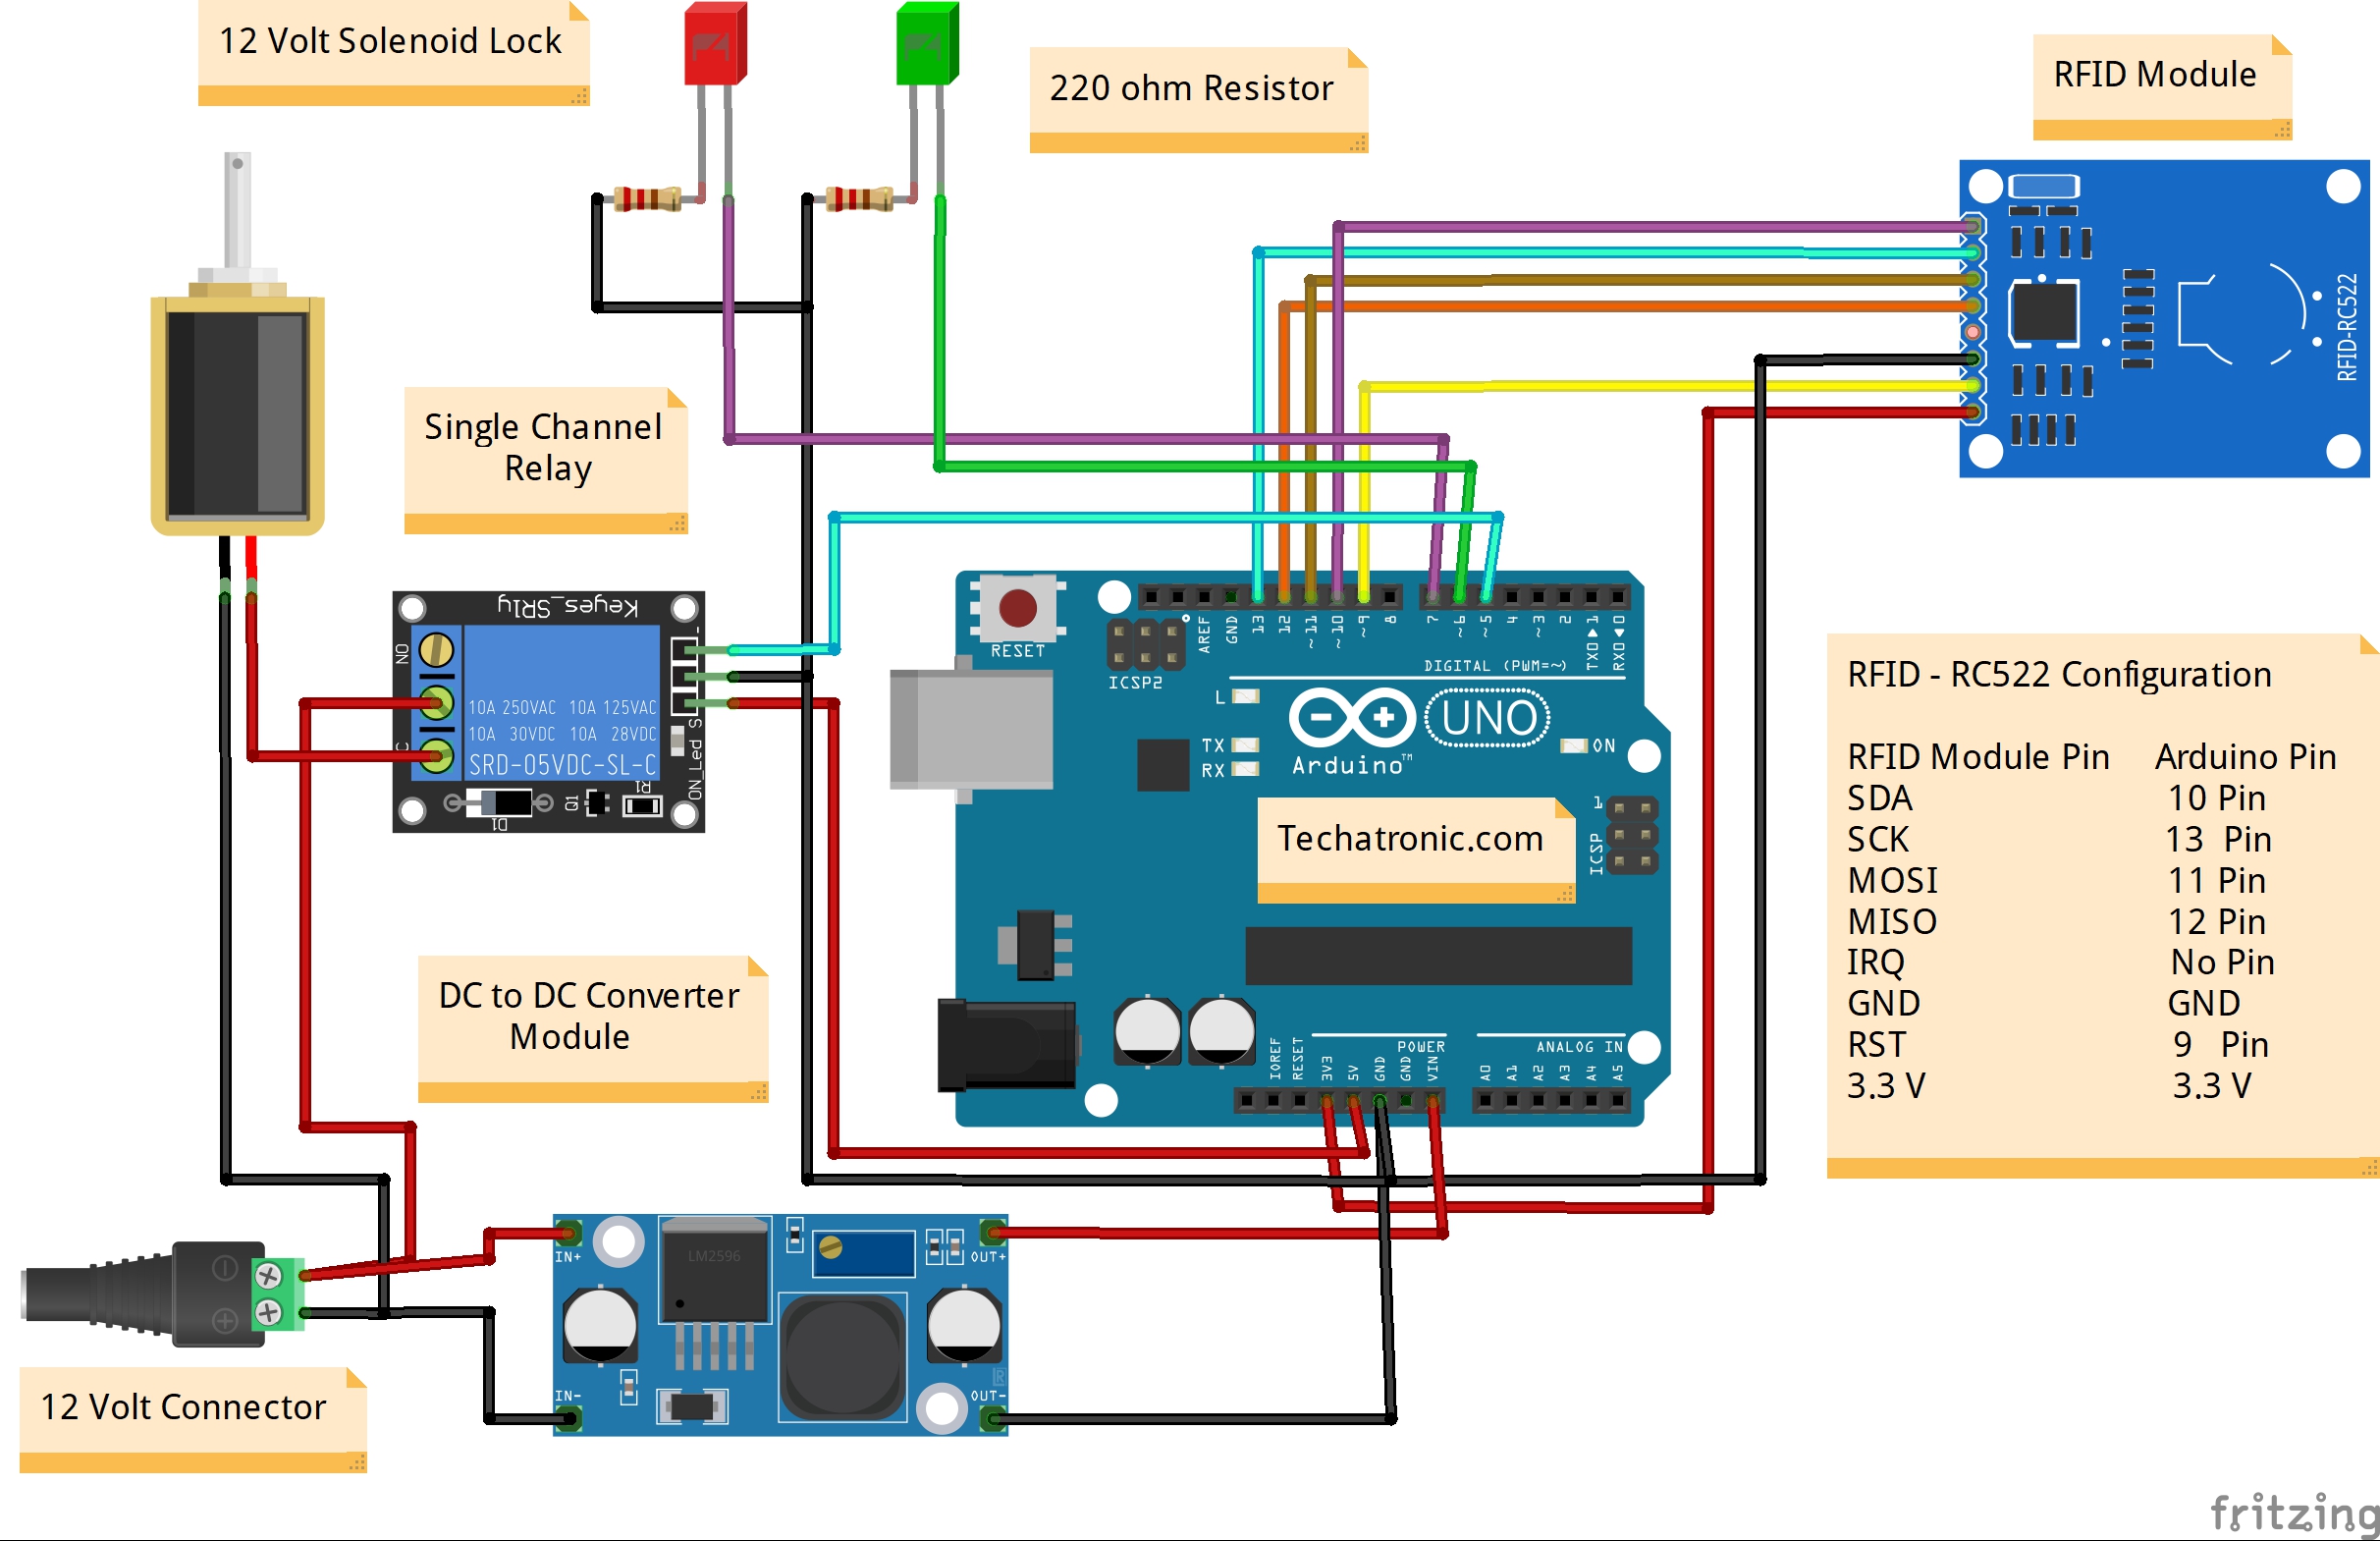
note:- you need a multimeter to calibrate the buck converter output voltage to 5v.
Arduino RFID code(with solenoid lock):-
 #include "SPI.h"
 #include "MFRC522.h"
 #define SS_PIN 10
 #define RST_PIN 9
 int m=0,n=0;
 MFRC522 rfid(SS_PIN, RST_PIN);
 MFRC522::MIFARE_Key key;
 void setup() {
  Serial.begin(9600);
  SPI.begin();
  rfid.PCD_Init();
  pinMode(5, OUTPUT);
   pinMode(6, OUTPUT);
   pinMode(7, OUTPUT);
 }
 void loop() {
  if (!rfid.PICC_IsNewCardPresent() || !rfid.PICC_ReadCardSerial())
   return;
  // Serial.print(F("PICC type: "));
  MFRC522::PICC_Type piccType = rfid.PICC_GetType(rfid.uid.sak);
  // Serial.println(rfid.PICC_GetTypeName(piccType));
  // Check is the PICC of Classic MIFARE type
  if (piccType != MFRC522::PICC_TYPE_MIFARE_MINI &&
   piccType != MFRC522::PICC_TYPE_MIFARE_1K &&
   piccType != MFRC522::PICC_TYPE_MIFARE_4K) {
   Serial.println(F("Your tag is not of type MIFARE Classic."));
   return;
  }
  String strID = "";
  for (byte i = 0; i < 4; i++) {
   strID +=
   (rfid.uid.uidByte[i] < 0x10 ? "0" : "") +
   String(rfid.uid.uidByte[i], HEX) +
   (i!=3 ? ":" : "");
  }
  strID.toUpperCase();
  Serial.print("Tap card key: ");
  Serial.println(strID);
 if(strID.indexOf("E0:68:F7:29")>=0)  // here you can replace your tag id
 {
  Serial.println("card accepted");
  digitalWrite(5, HIGH);
  digitalWrite(6, HIGH);
  digitalWrite(7, LOW);
  delay(3000);
  digitalWrite(5, LOW);
  digitalWrite(6,LOW);
  digitalWrite(7, HIGH);
  }
 else
 {
  digitalWrite(5, LOW);
  digitalWrite(6,LOW);
  digitalWrite(7, HIGH);
  }
 if(strID.indexOf("D5:4A:B0:65")>=0)  // here you can replace your tag id
 {
  Serial.println("Token Accepted");
  digitalWrite(A1, HIGH);
  digitalWrite(A1, LOW);
  }
 else
 {
  digitalWrite(A1, LOW);
  }
  rfid.PICC_HaltA();
  rfid.PCD_StopCrypto1();
 }
note:- the above-given code you need to upload in the Arduino and then you need to open the serial monitor. when you tap your tag to the reader then it will show your tag id and copy that code and paste in the above code. and again you need to upload the code. all the best.
you must install the Arduino MFRC Library to the Arduino IDE.
Click here to download the library.