
Introduction
Measurement of Distance is one of the tricky task now a days. there are many methode to measure the distance like scale, feeta and etc but measure the distance using the Electronic is fun. So today wee have made this project , Distance Measurement with Arduino. which can help to make the distance measurement device using Arduino , ultrasonic , and many other components. we have made this and tested, now we will share al the detail which we got to make this project. we have also made a video and uploaded on my youtube channel. for youtube video i have shared the link.
Distance measurement is one of the most popular and practical applications of Arduino in real‑world electronics projects. From obstacle‑avoiding robots and smart parking systems to security alarms and automation, the ability to detect how far an object is plays a vital role. In this article, we will build a complete Arduino‑based distance monitoring system using an ultrasonic sensor, an OLED display, three LEDs, and a buzzer for audible alerts.
This project measures distance using an ultrasonic sensor, displays the measured value clearly on an OLED screen using a large, easy‑to‑read font, and provides visual and sound alerts based on how close an object is. When the distance becomes too small, the buzzer produces a continuous beep, making the system suitable for safety‑critical applications.
we have made a of project in which the same concepts are used, obstacle avoiding robot, Smart Dustbin, human following robot. all these project uses the same concepts. ultrasonic sensor distance measurement.
The project is beginner‑friendly, highly practical, and can be easily customized for different distance ranges and alert behaviors.
Why Use an Ultrasonic Sensor for Distance Measurement?
Ultrasonic sensors are widely used because they are:
- Low cost
- Easy to interface with Arduino
- Accurate for short‑range distance measurement
- Independent of lighting conditions
The ultrasonic sensor works by sending high‑frequency sound waves and measuring the time taken for the echo to return. This time is converted into distance using a simple formula.ultrasonic sensor have good accuracy than other sensors like IR sensor. so, we choose this sensor. also, you can buy the ultrasonic sensor. the availableity is very good. Distance Measurement with Arduino is very simple with this sensor.
Project Overview
In this project, the Arduino continuously measures distance using an ultrasonic sensor. The measured distance is then:
- Displayed on an OLED screen in large font
- Indicated using LEDs (Green, Yellow, Red)
- Accompanied by a continuous buzzer alert when the object is too close
Distance Indication Logic
- Distance greater than 30 cm → Green LED ON (Safe zone)
- Distance between 15 cm and 30 cm → Yellow LED ON (Warning zone)
- Distance less than 15 cm → Red LED ON + Continuous Buzzer (Danger zone)
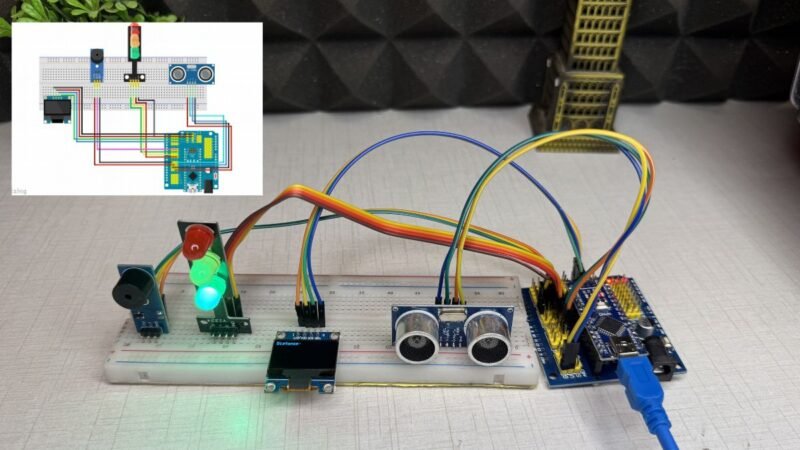
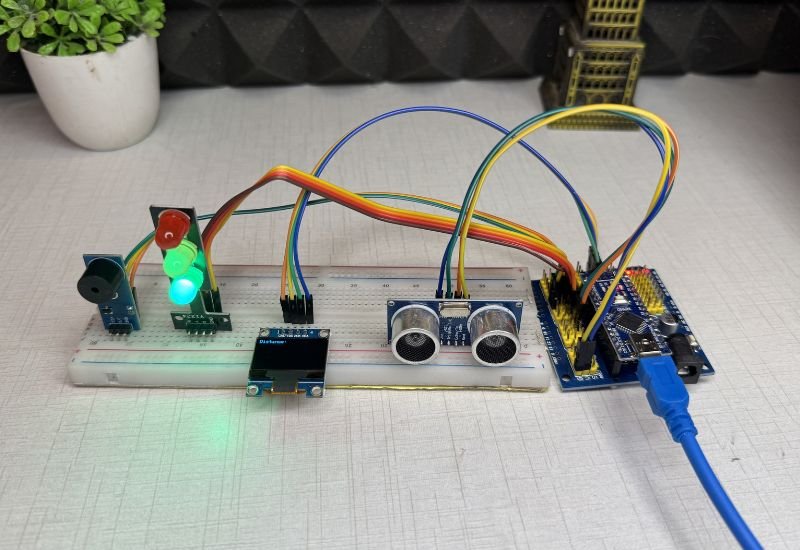
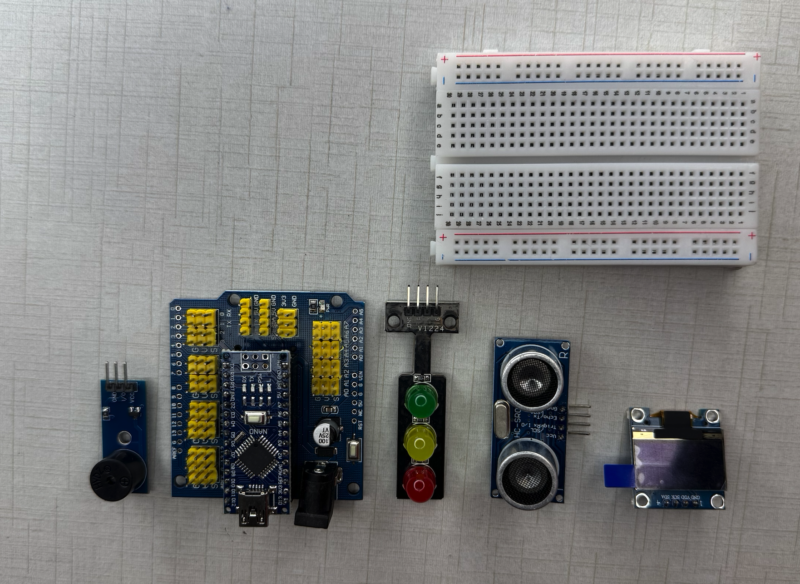
Components Required
To build this project, you will need the following components:
- Arduino Uno (or compatible board)
- Ultrasonic Sensor (HC‑SR04)
- 0.96‑inch OLED Display (128×64, I2C)
- Green, Yellow, Red LED Module
- Buzzer (Active or Passive)
- 220Ω resistors for LEDs
- Breadboard
- Jumper wires
- USB cable for Arduino
Now we need the right circuit diagram.
Distance Measurement with Arduino Circuit Diagram
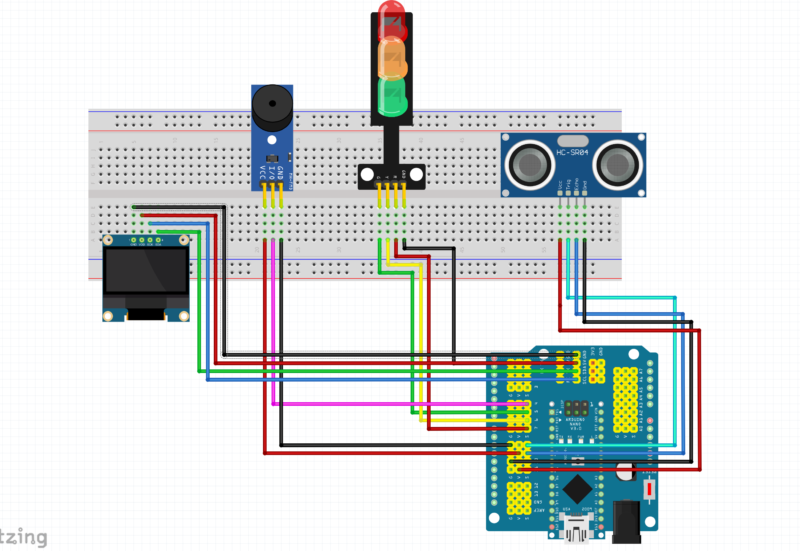
Pin Configuration
Ultrasonic Sensor
- Trig Pin → Arduino Pin 8
- Echo Pin → Arduino Pin 9
- VCC → 5V
- GND → GND
LEDs
- Green LED → Arduino Pin 5
- Yellow LED → Arduino Pin 6
- Red LED → Arduino Pin 7
Buzzer
- Buzzer Positive → Arduino Pin 4
- Buzzer Negative → GND
OLED Display (I2C)
- SDA → Arduino A4
- SCL → Arduino A5
- VCC → 5V
- GND → GND
Working Principle
Ultrasonic Distance Calculation
Ultrasonic sensor continoulsy sending the ultrasonic wave from the transmitter and return back to the ultrasonis sensor. there is an echo on the ultrsonic sensor which can detect the ultrasonic wave. so, we can calculate the distnace by usin the time , speed formula. calculation will be must in our project Distance Measurement with Arduino.
The distance is calculated using the formula:
Distance (cm) = (Time × Speed of Sound) ÷ 2
Where the speed of sound in air is approximately 0.034 cm/µs.
OLED Display for Distance Visualization
An OLED display is used instead of an LCD because it offers:
- Better contrast
- Lower power consumption
- No backlight required
- Compact size
In this project, the OLED displays the distance value using a large font size, making it easily readable even from a distance. The title is displayed in a smaller font, while the distance value is emphasized.
LED and Buzzer Alert System
The LED and buzzer system provides instant feedback about object proximity:
- Green LED indicates a safe distance
- Yellow LED acts as a warning indicator
- Red LED signals danger
- Buzzer produces a continuous beep in danger condition
The buzzer uses the tone() function, which generates a continuous sound until noTone() is called. This ensures a clear and uninterrupted alert when the object is too close.
Distance Measurement with Arduino Code
#include <Wire.h>
#include <Adafruit_GFX.h>
#include <Adafruit_SSD1306.h>

#define SCREEN_WIDTH 128
#define SCREEN_HEIGHT 64

Adafruit_SSD1306 display(SCREEN_WIDTH, SCREEN_HEIGHT, &Wire, -1);

// Pins
#define trigPin 8
#define echoPin 9

#define greenLED 5
#define yellowLED 6
#define redLED 7
#define buzzer 4

long duration;
int distance;

void setup() {
  pinMode(trigPin, OUTPUT);
  pinMode(echoPin, INPUT);

  pinMode(greenLED, OUTPUT);
  pinMode(yellowLED, OUTPUT);
  pinMode(redLED, OUTPUT);
  pinMode(buzzer, OUTPUT);

  display.begin(SSD1306_SWITCHCAPVCC, 0x3C);
  display.clearDisplay();
}

void loop() {
  // Ultrasonic trigger
  digitalWrite(trigPin, LOW);
  delayMicroseconds(2);
  digitalWrite(trigPin, HIGH);
  delayMicroseconds(10);
  digitalWrite(trigPin, LOW);

  duration = pulseIn(echoPin, HIGH);
  distance = duration * 0.034 / 2;

  // OLED Display
  display.clearDisplay();

  display.setTextSize(1);   // Small title
  display.setTextColor(WHITE);
  display.setCursor(0, 0);
  display.println("Distance:");

  display.setTextSize(3);   // BIG font for value
  display.setCursor(0, 20);
  display.print(distance);
  display.println(" cm");

  display.display();

  // LED & Buzzer Logic
  if (distance > 16) {
    digitalWrite(greenLED, HIGH);
    digitalWrite(yellowLED, LOW);
    digitalWrite(redLED, LOW);
    noTone(buzzer);   // buzzer OFF
  }
  else if (distance <= 16 && distance > 8) {
    digitalWrite(greenLED, LOW);
    digitalWrite(yellowLED, HIGH);
    digitalWrite(redLED, LOW);
    noTone(buzzer);   // buzzer OFF
  }
  else { // distance <= 15
    digitalWrite(greenLED, LOW);
    digitalWrite(yellowLED, LOW);
    digitalWrite(redLED, HIGH);
    tone(buzzer, 1000); // Continuous beep at 1kHz //Distance Measurement with Arduino
    delay(50);
    noTone(buzzer);
     delay(50);

  }

  delay(200);
}
Now we all need to know how to upload the code into Arduino, which software and whats the method to upload. so, there is a guide to upload the Arduino code.
Arduino Code Explanation
The Arduino code performs the following tasks:
- Initializes the OLED display
- Sends trigger pulses to the ultrasonic sensor
- Reads the echo time and calculates distance
- Displays the distance on the OLED screen
- Controls LEDs based on distance range
- Activates continuous buzzer alert when distance is below threshold
The logic is written in a clean and modular way so that beginners can easily understand and modify it.
Advantages of This Project
- Simple and reliable distance measurement
- Clear visual output using OLED display
- Loud and effective alert system
- Low power consumption
- Easily expandable
Applications: Distance Measurement with Arduino
This Arduino distance measurement system can be used in many real‑world applications, including:
- Obstacle detection systems
- Smart parking assistance
- Industrial safety alarms
- Water level monitoring
- Proximity alert devices
- Robotics and automation projects
- Home security systems
Customization Ideas
You can easily enhance this project by:
- Adding different buzzer patterns for different distances
- Displaying warning messages on OLED
- Using a relay for automatic control
- Logging distance data
- Adding wireless communication (Bluetooth or Wi‑Fi)
Troubleshooting Tips for Distance Measurement with Arduino
- If OLED does not display anything, check the I2C address
- Ensure proper power supply connections
- Use resistors with LEDs to avoid damage
- Adjust distance thresholds according to your needs
- Avoid placing ultrasonic sensor near soft surfaces
Conclusion
This Arduino ultrasonic distance measurement project demonstrates how simple components can be combined to create a powerful and practical system. By integrating an OLED display, LED indicators, and a continuous buzzer alert, the project becomes highly effective for safety and monitoring applications.
The clear visual output and audible warning make this project ideal for beginners, students, and hobbyists looking to learn sensor interfacing and real‑time feedback systems. With minor modifications, this project can be adapted for numerous real‑world scenarios.
Whether you are building this as a learning exercise or integrating it into a larger system, this project provides a strong foundation for future Arduino‑based innovations.
Happy Learning and Happy Building! 🚀