

The force sensor is also known as the Force-sensitive resister Because it changes the value of current passes through the sensor according to the pressure on the sensor. as much as the weight on a sensor the resistance increase accordingly. Weight is directly proportional to the resistance of the sensor in the circuit. in this force sensor Arduino interface tutorial you will learn how to use variable resistance. There is a lot of sensors that work on the same variable resistance like flex sensor which can be used in the sign language glove using Arduino. The sensor is like a potentiometer which varies according to the sensor characteristics. there are two terminals or wires always with this sensor and not include any data wire. So, if you have any doubt of confusion for the connection you can refer to our website we are having almost all the sensor interfacing, code, and circuit. you can find all the content in our website blog section.

So, we use both Vcc and Gnd wire with this sensor and the data we collect from the resistance end which protects the circuit by the short circuit. So we are using Arduino, buzzer and force resistive sensor, and some resister to the interface. there are two types of sensors one is round shape and another is square share. The round shape sensor is small and the square shape sensor is bigger than the round shape sensor.
There are two wires in the sensor one wire is to be connected to the Positive pin of Arduino and the other wire is to be connected to the 10k resistor and this end to be connected to the Arduino A0, analog pin. because it gives a variable value that can be store from 0 to 1024 and the other end of the resistor should be connected to the GND wire of the Arduino so the Arduino can measure the change in resistance through the sensor. when any person impacts force to the sensor the resistance value will changes. force sensor with Arduino can measure the weight also. only you need to calibrate it with the weight.
force sensor with Arduino Circuit diagram
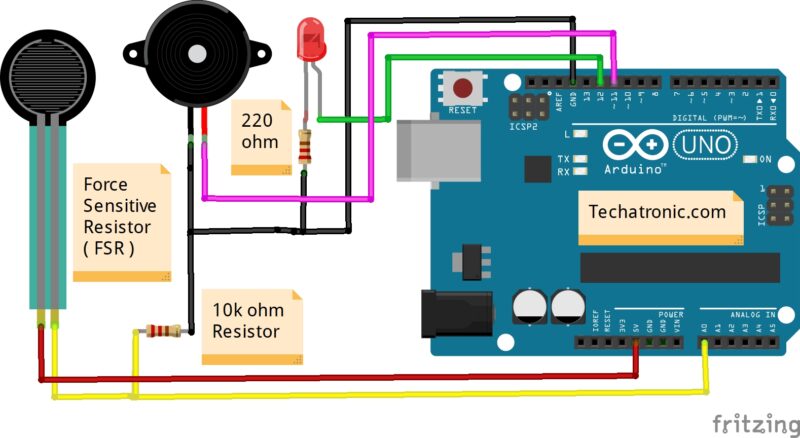
| Arduino UNO | Buzzer | |
| D11 Pin | Positive | |
| GND | Negative | |
| Arduino UNO | Force Sensor | 10k ohm Resistor |
| ( +5V ) | Terminal 1 | |
| A0 Pin | Terminal 2 | Terminal 1 |
| GND | Terminal 2 | |
| Arduino UNO | LED | 220 Ohm Resistor |
| D12 Pin | Anode Pin | |
| GND | Terminal 1 | |
| Cathode Pin | Terminal 2 |
As given in the above diagram we are using the round force sensor but you can also use the Arduino with a square force sensor with the same circuit.
Hey, guys welcome back to Techatronic. We are Shahid and Adnan. Two electronics engineers are providing the best electronic project and tutorial to learn you better. Bookmark our website to learn and make these awesome projects.
Now let’s talk about the
Arduino force sensor Code
 // Techatronic.com
 void setup()
 {
  pinMode(12,OUTPUT); // Led
  pinMode(11,OUTPUT); // Buzzer
  Serial.begin(9600);
 }
 void loop()
 {
  int force=analogRead(A0); // Sensor pin
  Serial.println(force);
  delay(100);
  if(force > 0250)
 {
  digitalWrite(12,HIGH); //Led ON
  digitalWrite(11,HIGH); //Buzzer ON
 }
  else
 {
   digitalWrite(12,LOW); //Led OFF
   digitalWrite(11,LOW);// Buzzer OFF
 }
 }
As you can see the code is very simple and relatable to the Arduino with Potentiometer. we are taking reading from the sensor and there are taking some conditions in the code and compare with the value if the condition got true then the led will on otherwise the led remains the off.
Components Required in force sensor Arduino
- Arduino Uno
- Arduino UNO cable
- Force sensor
- 10K resistor
- LED
- buzzer
- Jumper wire
- breadboard
All the information used in the project has been uploaded above read the full article carefully and follow the steps. and if you are new to Arduino and you don’t know how to operate Arduino and how to upload code in Arduino you can refer to our last blogs. All the best if you have any queries you can ask us in the comment section.