

Table of Contents
Introduction
Hey Hobbyist, Welcome back. I am back with another interesting IoT project. Today we gonna do home automation using Blynk App and NodeMCU. I hope you are familiar with Blynk App if not then see my previous article on it i.e., Pulse oximeter.
So without wasting time let’s head on the Blynk home automation project.
NodeMCU:
If you are unaware of this Board then let me tell you that it is very useful and most common among beginners and various IoT devices.
Today we gonna link this with the internet via Wi-Fi and connect some relay(s) to it. To control our home electrical devices we can either use Blynk App or use the physical button provided. Don’t panic it is not very hard, you only need to concentrate a little on it.
ESP8266 is the module on which is built. It is Wi-Fi inbuilt chip. There are various other models available in the market you may choose anyone. Also, I will make some projects on other models also but for today’s one, I’ll use this version.
Working / blynk home automation working
- Blynk based home automation is the simplest way to make an IoT-based home automation project.
- here you need to configure the application.
- how many buttons do you want in the application? it depends on the appliance you are gonna use with the system.
- the app will be connected to the Blynk server. so when you click on the button on the app it will send the instruction to the server.
- then the server will send a command to the Nodemcu which turns on and off the appliances.
Material required:
- NodeMCU(ESP8266)
- Relay Module(4 in 1)
- LED(s) (for demonstration only)
- A phone with Blynk App installed
- Push Buttons
- Jumper Wires
- Breadboard
- AC fan
blynk home automation Circuit Diagram
In this home automation circuit, you can see the esp8266 is directly connected to the relay module which consists of 4 relays. and 4 appliances connected here. 3 bulbs and a fan. the connections are easy and clear. still, if you have any difficulties you can ask us in the comment section.

Connection Table
| Nodemcu esp 8266 | 4 Channel relay module, 5V | |||
| Vin | VCC | |||
| G | GND | |||
| D1 Pin | IN 1 | |||
| D2 Pin | IN 2 | |||
| D5 Pin | IN 3 | |||
| D6 Pin | IN 4 | |||
| Nodemcu | Push Button 1 | Push Button 2 | Push Button 3 | Push Button 4 |
| RX Pin | Terminal 1 | |||
| D7 Pin | Terminal 1 | |||
| D3 Pin | Terminal 1 | |||
| SD3 Pin | Terminal 1 | |||
| GND | Terminal 2 | Terminal 2 | Terminal 2 | Terminal 2 |
| Bulb 1 | Bulb 2 | Bulb 3 | 4-Relay Module | 220 Volt AC supply |
| Normally open | ||||
| Common | Phase | |||
| Terminal 1 | Terminal 1 | Terminal 1 | Normally closed | |
| Terminal 2 | Terminal 2 | Terminal 2 | Neutral | |
| AC Fan | 4-Relay Module | 220 Volt AC supply | ||
| Normally open | ||||
| Common | Phase | |||
| Terminal 1 | Normally closed | |||
| Terminal 2 | Neutral |
PIN WIRING:
Relay Pin 1 —> D1
Relay Pin 2 —> D2
Relay Pin 3 —> D5
Relay Pin 4 —> D6
Switch pin 1 —> SD3
Switch pin 2 —> D3
Switch pin 3 —> D7
Switch pin 4 —> RX
Rest are VCC and GND connections
NOTE: In pin on the relay module uses 220V/110V AC supply so handle it with care.
Blynk home automation Code:
First, we include some libraries needed for this code to work. Then we define Pins to which push buttons and relay pins are connected.
define pins in Code
 void relayOnOff(int relay){
   switch(relay){
    case 1:
        if(toggleState_1 == 1){
        digitalWrite(RelayPin1, LOW); // turn on relay 1
        toggleState_1 = 0;
        Serial.println("Device1 ON");
        }
        else{
        digitalWrite(RelayPin1, HIGH); // turn off relay 1
        toggleState_1 = 1;
        Serial.println("Device1 OFF");
        }
        delay(100);
    break;
    case 2:
        if(toggleState_2 == 1){
        digitalWrite(RelayPin2, LOW); // turn on relay 2
        toggleState_2 = 0;
        Serial.println("Device2 ON");
        }
        else{
        digitalWrite(RelayPin2, HIGH); // turn off relay 2
        toggleState_2 = 1;
        Serial.println("Device2 OFF");
        }
        delay(100);
    break;
    case 3:
        if(toggleState_3 == 1){
        digitalWrite(RelayPin3, LOW); // turn on relay 3
        toggleState_3 = 0;
        Serial.println("Device3 ON");
        }
        else{
        digitalWrite(RelayPin3, HIGH); // turn off relay 3
        toggleState_3 = 1;
        Serial.println("Device3 OFF");
        }
        delay(100);
    break;
    case 4:
        if(toggleState_4 == 1){
        digitalWrite(RelayPin4, LOW); // turn on relay 4
        toggleState_4 = 0;
        Serial.println("Device4 ON");
        }
        else{
        digitalWrite(RelayPin4, HIGH); // turn off relay 4
        toggleState_4 = 1;
        Serial.println("Device4 OFF");
        }
        delay(100);
    break;
    default : break;
    }
 }
After this, we create a custom function for toggling relay on or off. For this purpose, we use the switch and case statements for simplicity.
Custom function for toggle
 void with_internet(){
   //Manual Switch Control
   if (digitalRead(SwitchPin1) == LOW){
    delay(200);
    relayOnOff(1);
    Blynk.virtualWrite(VPIN_BUTTON_1, toggleState_1);  // Update Button Widget
   }
   else if (digitalRead(SwitchPin2) == LOW){
    delay(200);
    relayOnOff(2);
    Blynk.virtualWrite(VPIN_BUTTON_2, toggleState_2);  // Update Button Widget
   }
   else if (digitalRead(SwitchPin3) == LOW){
    delay(200);
    relayOnOff(3);
    Blynk.virtualWrite(VPIN_BUTTON_3, toggleState_3);  // Update Button Widget
   }
   else if (digitalRead(SwitchPin4) == LOW){
    delay(200);
    relayOnOff(4);
    Blynk.virtualWrite(VPIN_BUTTON_4, toggleState_4);  // Update Button Widget
   }
 }
Then we create another function for switching replays via the internet using Blynk App.
Control relay via Internet
 void without_internet(){
   //Manual Switch Control
   if (digitalRead(SwitchPin1) == LOW){
    delay(200);
    relayOnOff(1);
   }
   else if (digitalRead(SwitchPin2) == LOW){
    delay(200);
    relayOnOff(2);
   }
   else if (digitalRead(SwitchPin3) == LOW){
    delay(200);
    relayOnOff(3);
   }
   else if (digitalRead(SwitchPin4) == LOW){
    delay(200);
    relayOnOff(4);
   }
 }
After this, we create another function for switching relays with push buttons provided.
With the BLYNK_CONNECTED function, we synchronize the status of virtual buttons on the Blynk App.
The whole code is Given below:
Full Code
//TECHATRONIC.COM
// BLYNK LIBRARY
// https://github.com/blynkkk/blynk-library
// ESP8266 LIBRARY
// https://github.com/ekstrand/ESP8266wifi

//#define BLYNK_PRINT Serial
#include <BlynkSimpleEsp8266.h>

// define the GPIO connected with Relays and switches
#define RelayPin1 5  //D1
#define RelayPin2 4  //D2
#define RelayPin3 14 //D5
#define RelayPin4 12 //D6

#define SwitchPin1 10  //SD3
#define SwitchPin2 0   //D3
#define SwitchPin3 13  //D7
#define SwitchPin4 3   //RX

#define wifiLed   16   //D0

#define VPIN_BUTTON_1    V1
#define VPIN_BUTTON_2    V2
#define VPIN_BUTTON_3    V3
#define VPIN_BUTTON_4    V4

int toggleState_1 = 1; //Define integer to remember the toggle state for relay 1
int toggleState_2 = 1; //Define integer to remember the toggle state for relay 2
int toggleState_3 = 1; //Define integer to remember the toggle state for relay 3
int toggleState_4 = 1; //Define integer to remember the toggle state for relay 4

int wifiFlag = 0;

#define AUTH "8VCptGVC--7TKvMbZPikfxbZsMG_K4Qj"  // You should get Auth Token in the Blynk App.
#define WIFI_SSID "DESKTOP"                      //Enter Wifi Name
#define WIFI_PASS "asdfghjkl"                    //Enter wifi Password

BlynkTimer timer;

void relayOnOff(int relay){

    switch(relay){
      case 1:
             if(toggleState_1 == 1){
              digitalWrite(RelayPin1, LOW); // turn on relay 1
              toggleState_1 = 0;
              Serial.println("Device1 ON");
              }
             else{
              digitalWrite(RelayPin1, HIGH); // turn off relay 1
              toggleState_1 = 1;
              Serial.println("Device1 OFF");
              }
             delay(100);
      break;
      case 2:
             if(toggleState_2 == 1){
              digitalWrite(RelayPin2, LOW); // turn on relay 2
              toggleState_2 = 0;
              Serial.println("Device2 ON");
              }
             else{
              digitalWrite(RelayPin2, HIGH); // turn off relay 2
              toggleState_2 = 1;
              Serial.println("Device2 OFF");
              }
             delay(100);
      break;
      case 3:
             if(toggleState_3 == 1){
              digitalWrite(RelayPin3, LOW); // turn on relay 3
              toggleState_3 = 0;
              Serial.println("Device3 ON");
              }
             else{
              digitalWrite(RelayPin3, HIGH); // turn off relay 3
              toggleState_3 = 1;
              Serial.println("Device3 OFF");
              }
             delay(100);
      break;
      case 4:
             if(toggleState_4 == 1){
              digitalWrite(RelayPin4, LOW); // turn on relay 4
              toggleState_4 = 0;
              Serial.println("Device4 ON");
              }
             else{
              digitalWrite(RelayPin4, HIGH); // turn off relay 4
              toggleState_4 = 1;
              Serial.println("Device4 OFF");
              }
             delay(100);
      break;
      default : break;
      }

}

void with_internet(){
    //Manual Switch Control
    if (digitalRead(SwitchPin1) == LOW){
      delay(200);
      relayOnOff(1);
      Blynk.virtualWrite(VPIN_BUTTON_1, toggleState_1);   // Update Button Widget
    }
    else if (digitalRead(SwitchPin2) == LOW){
      delay(200);
      relayOnOff(2);
      Blynk.virtualWrite(VPIN_BUTTON_2, toggleState_2);   // Update Button Widget
    }
    else if (digitalRead(SwitchPin3) == LOW){
      delay(200);
      relayOnOff(3);
      Blynk.virtualWrite(VPIN_BUTTON_3, toggleState_3);   // Update Button Widget
    }
    else if (digitalRead(SwitchPin4) == LOW){
      delay(200);
      relayOnOff(4);
      Blynk.virtualWrite(VPIN_BUTTON_4, toggleState_4);   // Update Button Widget
    }
}
void without_internet(){
    //Manual Switch Control
    if (digitalRead(SwitchPin1) == LOW){
      delay(200);
      relayOnOff(1);
    }
    else if (digitalRead(SwitchPin2) == LOW){
      delay(200);
      relayOnOff(2);
    }
    else if (digitalRead(SwitchPin3) == LOW){
      delay(200);
      relayOnOff(3);
    }
    else if (digitalRead(SwitchPin4) == LOW){
      delay(200);
      relayOnOff(4);
    }
}

BLYNK_CONNECTED() {
  // Request the latest state from the server
  Blynk.syncVirtual(VPIN_BUTTON_1);
  Blynk.syncVirtual(VPIN_BUTTON_2);
  Blynk.syncVirtual(VPIN_BUTTON_3);
  Blynk.syncVirtual(VPIN_BUTTON_4);
}

// When App button is pushed - switch the state

BLYNK_WRITE(VPIN_BUTTON_1) {
  toggleState_1 = param.asInt();
  digitalWrite(RelayPin1, toggleState_1);
}

BLYNK_WRITE(VPIN_BUTTON_2) {
  toggleState_2 = param.asInt();
  digitalWrite(RelayPin2, toggleState_2);
}

BLYNK_WRITE(VPIN_BUTTON_3) {
  toggleState_3 = param.asInt();
  digitalWrite(RelayPin3, toggleState_3);
}

BLYNK_WRITE(VPIN_BUTTON_4) {
  toggleState_4 = param.asInt();
  digitalWrite(RelayPin4, toggleState_4);
}


void checkBlynkStatus() { // called every 3 seconds by SimpleTimer

  bool isconnected = Blynk.connected();
  if (isconnected == false) {
    wifiFlag = 1;
    digitalWrite(wifiLed, HIGH); //Turn off WiFi LED
  }
  if (isconnected == true) {
    wifiFlag = 0;
    digitalWrite(wifiLed, LOW); //Turn on WiFi LED
  }
}
void setup()
{
  Serial.begin(9600);

  pinMode(RelayPin1, OUTPUT);
  pinMode(RelayPin2, OUTPUT);
  pinMode(RelayPin3, OUTPUT);
  pinMode(RelayPin4, OUTPUT);

  pinMode(wifiLed, OUTPUT);

  pinMode(SwitchPin1, INPUT_PULLUP);
  pinMode(SwitchPin2, INPUT_PULLUP);
  pinMode(SwitchPin3, INPUT_PULLUP);
  pinMode(SwitchPin4, INPUT_PULLUP);

  //During Starting all Relays should TURN OFF
  digitalWrite(RelayPin1, toggleState_1);
  digitalWrite(RelayPin2, toggleState_2);
  digitalWrite(RelayPin3, toggleState_3);
  digitalWrite(RelayPin4, toggleState_4);

  WiFi.begin(WIFI_SSID, WIFI_PASS);
  timer.setInterval(3000L, checkBlynkStatus); // check if Blynk server is connected every 3 seconds
  Blynk.config(AUTH);
}

void loop()
{
  if (WiFi.status() != WL_CONNECTED)
  {
    Serial.println("WiFi Not Connected");
  }
  else
  {
    Serial.println("WiFi Connected");
    Blynk.run();
  }

  timer.run(); // Initiates SimpleTimer
  if (wifiFlag == 0)
    with_internet();
  else
    without_internet();
}
Blynk App Installation and Setup

Download Blynk App from any Appstore: Playstore Apple App Store
login in Blynk app

After you open and login in it, you will see this type of main screen interface

Now create a new project with any name (here I have used Iot base Automation)

After this, an authentication token will be sent to your registered email-id copy that auth token and paste it in the code where auth token is required.

You have successfully created the new project. now lets create some virtual buttons to control the relay(s).
create button
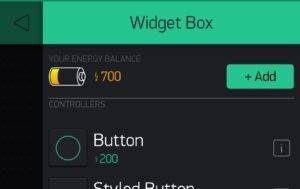
Use the widget menu to import 4 buttons onto the main interface.

Like this, it will look then
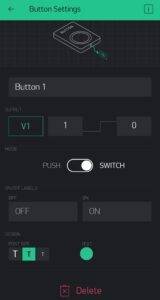


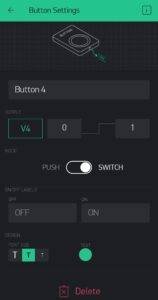
Now edit all 4 button settings for making the connection to ESP8266 as shown in the Above images.

This is how your main interface will look after completing all setup.
completion of setup
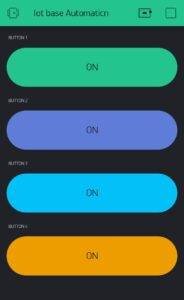
Now you are ready to go to do some home automation in IoT project with just a click of your finger. With this, we have completed our Blynk Home Automation project.
I hope you like this project. If you face any problem in code or setting up let me know. I will solve it for you.