

Welcome back guys, Today I’m here with another new IoT-based project but it is not based on Raspberry Pi. It’s on NodeMCU. Pulse oximeter NodeMCU is a project based on ESP8266MOD. It is a Wi-Fi chip and can be controlled or accessed from anywhere in the world through an Internet connection.
What is NodeMCU?
If you are familiar with Arduino boards then it is similar to it but is a bit more powerful, has more capacity, and also has an in-built Wi-Fi feature for IoT purposes. NodeMCU is built out of ESP8266 based Wi-Fi chip. Like Arduino, it also has many variants like Wi-FI, Wi-Fi + Bluetooth, or only Bluetooth. As for speed and storage, all have different. If you want to read more about it you can look up this site for more information.
Materials required:
- NodeMCU (ESP8266 MOD)
- Nodemcu Cable
- MAX30100 Heart Rate Pulse Oximetry Sensor
- Jumper wire
- Breadboard
- Phone with Blynk App installed and Wi-Fi connection
Circuit Diagram:
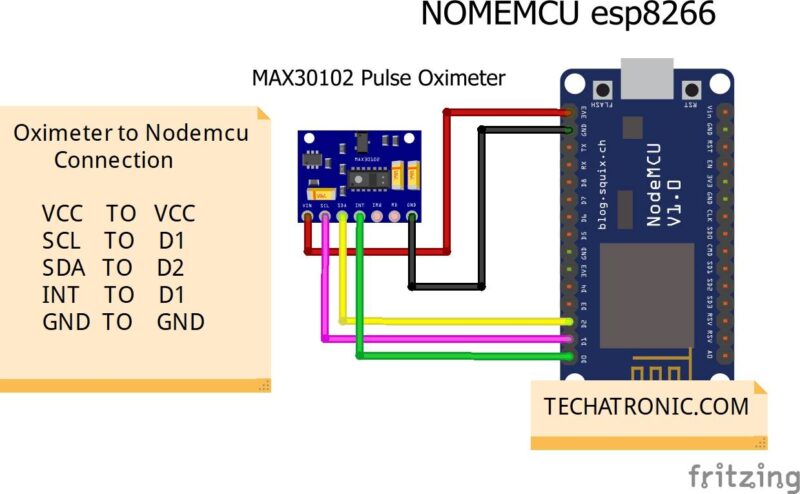
| Nodemcu esp8266 | MAX30100 Heart Rate Pulse Oximetry Sensor |
| D0 Pin | INT Pin |
| D1 Pin | SCL Pin |
| D2 Pin | SDA Pin |
| Vin, VV | VCC |
| GND | GND |
Programming using Arduino IDE:
For programming NodeMCU, we can use Arduino IDE but first, we have to install some more boards. For this in preferences option on IDE add these two links
 https://dl.espressif.com/dl/package_esp32_index.json
 http://arduino.esp8266.com/stable/package_esp8266com_index.json


now install ESP board from Boards Manager.
CODE:
  //TECHATRONIC.COM
 // BLYNK LIBRARY
 // https://github.com/blynkkk/blynk-library
 // ESP8266 LIBRARY
 // https://github.com/ekstrand/ESP8266wifi
 // Arduino-MAX30100 LIBRARY
 // https://github.com/oxullo/Arduino-MAX30100
 // SimpleTimer LIBRARY
 // https://github.com/jfturcot/SimpleTimer
 #include <Wire.h>
 #include <ESP8266WiFi.h>
 #include <BlynkSimpleEsp8266.h>
 #include "MAX30100_PulseOximeter.h"
 #include <SimpleTimer.h>
 #include <ESP8266WiFi.h>
 #include <BlynkSimpleEsp8266.h>
 // BPM GAUGE CONNECT V2
 // SP02 GAUGE CONNECT V3
 char auth[] = "your auth token";  // You should get Auth Token in the Blynk App.
 char ssid[] = "your wifi ssid";              // Your WiFi credentials.
 char pass[] = "your wifi password";             // Your WiFi Password.
 #define REPORTING_PERIOD_MS   3000
 SimpleTimer timer;
 PulseOximeter pox;
 uint32_t tsLastReport = 0;
 void onBeatDetected()
 {
  ;
 }
 void setup()
 {
  Serial.begin(115200);
  Blynk.begin(auth, ssid, pass);
  Serial.print("Initializing pulse oximeter..");
  if (!pox.begin()) {
   Serial.println("FAILED");
   for (;;);
  } else {
   Serial.println("SUCCESS");
   digitalWrite(1, HIGH);
  }
  pox.setIRLedCurrent(MAX30100_LED_CURR_24MA);
  // Register a callback for the beat detection
  pox.setOnBeatDetectedCallback(onBeatDetected);
  timer.setInterval(3000L, getSendData);
 }
 void loop()
 {
  timer.run(); // Initiates SimpleTimer
  Blynk.run();
  // Make sure to call update as fast as possible
  pox.update();
  if (millis() - tsLastReport > REPORTING_PERIOD_MS) {
   // to android cell phone application
   Serial.print("BPM: ");
   Serial.print(pox.getHeartRate());
   //blue.println("\n");
   Serial.print("  SpO2: ");
   Serial.print(pox.getSpO2());
   Serial.print("%");
   Serial.println("\n");
   Blynk.virtualWrite(V2, pox.getHeartRate() );
   Blynk.virtualWrite(V3, pox.getSpO2());
   tsLastReport = millis();
  }
 }
 void getSendData()
 {
 }
Link for libraries are included: Arduino-MAX30100-master, SimpleTimer-master
Replace your auth token received on your email (discussed in the next step) and your Wi-Fi details in code. Upload the code and look at the output at the serial monitor.

What is BLYNK App?

BLYNK app is an open source project development interface for IoT projects. It is very popular and easy to use. you can find it on any app store. For interface and setting it up you refer to these snapshots.


For Google Playstore direct link.
After you open the app you have to log in using one of your social accounts and an authorization token will be sent to that specific email address like in this image.


These are a few pictures of the interface. After you log in click on a new project and create one with any name. Here I have used Pulse Oximeter.
Now create some widgets to get reading by clicking on the widget box on the top right triangle button as shown.


Now follow these images and create a similar final interface like this so as to receive readings.
After all these steps your pulse oximeter NodeMCU project has been completed. Hope you find it interesting and had fun making it. If you face any kind of problem then let me know below. I’ll surely help you out.