
Hey guys, welcome back to the techatronic. In this article we are going to share how to make a pet feeder at home it is a basic electronic project which will build using arduino and IR sensor that is a simple task. This project is only for fun purpose and learning outcomes so there we will share all the things what turning outcomes and what topic will be covered in this project that feeder is a useful device that can allowed to feed at times whenever we are not at home. Using this pet feeder we don’t required a person to feed the pet. So if we put this project in our house our pet can find his food by itself. So if you want to make this project by yourself you should read our full article we will share all the detail here like code circuit and instructions step by step.
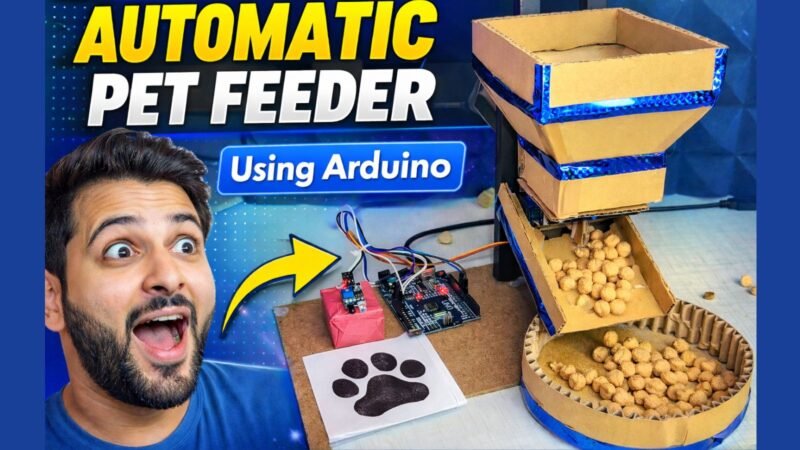
Table of Contents
Introduction to How to Make a Pet Feeder
The pet feeder always start and it continuously watch for the pet Paw. As you can see the image has been district on the project at the particular area in this area when the pet put their paw at that image then the machine is start dispense the food. So if you watch this project working you will love to know how to make a bad feeder at home. It will consist some cardboard, electronics and some tools which can help you to make this project. Basically we can make this project with any of the controller but we choose for this project because to use the use is very simple.
We have made a lot of project recently but there is some special project which can showcase you in your college and school and in any competition so last one we have made Water Level Alarm Project with Arduino and OLED . We have made a lot of projects with sensors actuators modules electronic component if you want to learn Robotics electronics and coding you are at the right page you can learn everything from this single website we have our course is on Arduino robotics.
We have made this project How to make a Pet Feeder but before it we have make an activity in which you learn how to use IR sensor with Arduino. So here we use the same concept where using and IR sensor with the arduino. Like if the sensor detect anything it will send command to the arduino and arduino decide to rotate the Servo Motor here the server motor will rotate 90 degree and we have a test a cardboard on the Servo Motor which can rotate with the Servo Motor so the cardboard is placed beside the container in which we store the food that when the cardboard rotate 90 degree and displays from that place then the food will dispatch.
How to Make a Pet Feeder Using Arduino IR Sensor
The automatic pet feeder project is designed to make feeding your pet easier, smarter, and more convenient. This feeder continuously monitors the designated feeding area and waits for the pet’s paw to be placed in a specific detection zone. As shown in the project image, a marked area is created where the pet needs to put its paw. When the pet touches or places its paw in that area, the system detects it and immediately activates the food dispensing mechanism.
The idea behind this article How to make a Pet Feeder and project is simple but very effective. Instead of feeding pets manually every time, this smart feeder responds automatically to the pet’s action. Once the pet interacts with the sensing area, the machine starts dispensing food. If you watch this project in action, you will definitely be excited to learn how to make this smart pet feeder at home. It is an interesting DIY project that combines creativity, electronics, and basic mechanical design.
Materials Required
This project can be made using simple and affordable materials. You do not need expensive components to build it. The main materials include:
- Cardboard sheets (for body and structure)
- Arduino board (we used Arduino Uno)
- IR sensor module
- Servo motor
- Jumper wires
- Breadboard
- Basic tools (cutter, glue gun, scale, etc.)
The outer structure of the feeder is made using cardboard. Cardboard is lightweight, easy to cut, and perfect for prototyping. It also allows you to design the feeder in different shapes and sizes according to your needs.
Why We Chose Arduino
This project can be built using different microcontrollers. However, we chose Arduino because it is beginner-friendly, easy to program, and widely used in robotics and electronics projects. Arduino provides a simple coding environment and supports a large number of sensors and modules.
For students, hobbyists, and beginners, Arduino is one of the best platforms to start learning embedded systems and robotics. The coding language is simple, and there are many resources available online to help you understand and modify the project.
Working Principle of the Project How to make a Pet Feeder
The working of this automatic pet feeder is based on the IR (Infrared) sensor and servo motor mechanism.
Step 1: Continuous Monitoring
The system always stays active and continuously monitors the designated paw detection area. The IR sensor is placed in such a way that it can detect any object placed near it.
Step 2: Paw Detection
When the pet places its paw in the marked area, the IR sensor detects the obstacle. The IR sensor works by sending infrared light and checking for reflection. When something blocks or reflects the IR beam, the sensor generates a signal.
Step 3: Signal to Arduino
Once the IR sensor detects the paw, it sends a signal to the Arduino board. The Arduino receives this signal and processes it according to the programmed logic.
Step 4: Servo Motor Activation
After receiving the signal, the Arduino commands the servo motor to rotate 90 degrees. A small cardboard flap is attached to the servo motor shaft. This flap is placed beside the food container opening.
When the servo rotates 90 degrees, the cardboard flap moves away from the container opening, allowing food to fall into the feeding tray.
Step 5: Return to Initial Position
After dispensing food, the servo motor rotates back to 0 degrees. This closes the container opening again, preventing extra food from falling. This ensures controlled and measured feeding.
Structure Design
The structure of the feeder consists of three main sections:
- Food Storage Container – This is where the pet food is stored.
- Dispensing Mechanism – Controlled by the servo motor and cardboard flap.
- Detection Area – The area where the pet places its paw to activate the feeder.
The cardboard is cut and assembled to create a stable body. The IR sensor is positioned carefully so it can detect the paw accurately without false triggering.
How to make a Pet Feeder is a trending article now a days
Educational Value of This Project
This project is not just useful for pet owners, but it is also an excellent educational project. It combines multiple important concepts of electronics and robotics:
- Sensor interfacing
- Actuator control
- Microcontroller programming
- Mechanical design
- Automation logic
Students can present this project in school or college exhibitions. It is a creative and practical project that can easily attract attention in competitions.
Recently, we have made many projects that help students understand electronics and robotics in a practical way. One of our popular projects was the Water Level Alarm Project with Arduino and OLED Display. That project demonstrated how sensors can be used to monitor and display real-time data.
Similarly, this pet feeder project demonstrates how sensors and actuators work together to create an automated system.
Now we need a Circuit Diagram
Pet Feeder Circuit Daigram
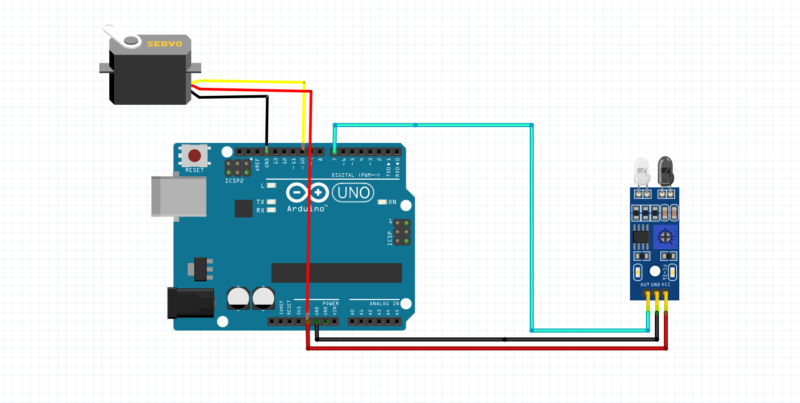
After Circuit making process we need to upload the code into the Arduino.
How to Make a Pet Feeder Code
#include <Servo.h> //How to make a Pet Feeder
Servo myServo;

const int irPin = 7;     // IR sensor connected to pin 2
int irState = 0;

void setup() {
  pinMode(irPin, INPUT);
  myServo.attach(9);     // Servo connected to pin 9
  myServo.write(0);      // Initial position
}

void loop() {How to make a Pet Feeder

  irState = digitalRead(irPin);

  if (irState == LOW) {   // Most IR sensors give LOW when object detected
    myServo.write(90);    // Rotate to 90 degrees
    delay(500);           // Wait for 0.5 second. How to make a Pet Feeder
    myServo.write(0);     // Return to 0 degreeHow to make a Pet Feeder
    delay(500);           // Small delay to prevent continuous triggering. How to make a Pet Feeder
  }
}
To Upload the code into Arduino download the software first. – Download software
Learning Through This Project
Before building this pet feeder, we created a simple activity project to understand how to use an IR sensor with Arduino. That project helped beginners learn how sensor signals are read and processed by the microcontroller.
In this pet feeder, we used the same concept:
- If the IR sensor detects an object → Send signal to Arduino.
- Arduino processes the signal → Rotate servo motor.
- Servo rotates 90 degrees → Dispense food.
- Servo returns to 0 degrees → Stop dispensing.
This step-by-step logic makes the system efficient and reliable.
Why This Project is Special
Among all the projects we have created recently, this automatic pet feeder is one of the most practical and innovative ones. It solves a real-life problem while also teaching important technical concepts.
It is a perfect combination of:
- Creativity
- Automation
- Mechanical design
- Programming
- Electronics
This project can be showcased in:
- School exhibitions
- College technical festivals
- Robotics competitions
- Science fairs
It demonstrates your understanding of automation systems and microcontroller programming.
Learn More With Us
We have created many projects using sensors, actuators, modules, and electronic components. If you are interested in learning robotics, electronics, and coding, you are at the right place.
Our website provides complete tutorials, step-by-step guides, and practical projects to help you master Arduino and robotics. We also offer a dedicated course on Arduino and robotics for beginners and advanced learners.
Whether you are a student, hobbyist, or engineering enthusiast, you can learn everything from basic electronics to advanced automation systems from our platform. This article on How to make a Pet Feeder will also hep you a lot.
Conclusion
The Automatic Pet Feeder using Arduino and IR sensor is a smart, simple, and educational DIY project. It automatically detects the pet’s paw and dispenses food using a servo motor mechanism. The project is affordable, easy to build, and highly innovative.
By using simple materials like cardboard and basic electronic components, we can create a functional automated feeding system at home. This project not only helps pet owners but also teaches valuable lessons in robotics and embedded systems.
If you enjoy building creative and practical projects, this automatic pet feeder is a must-try DIY innovation.
Video Sample