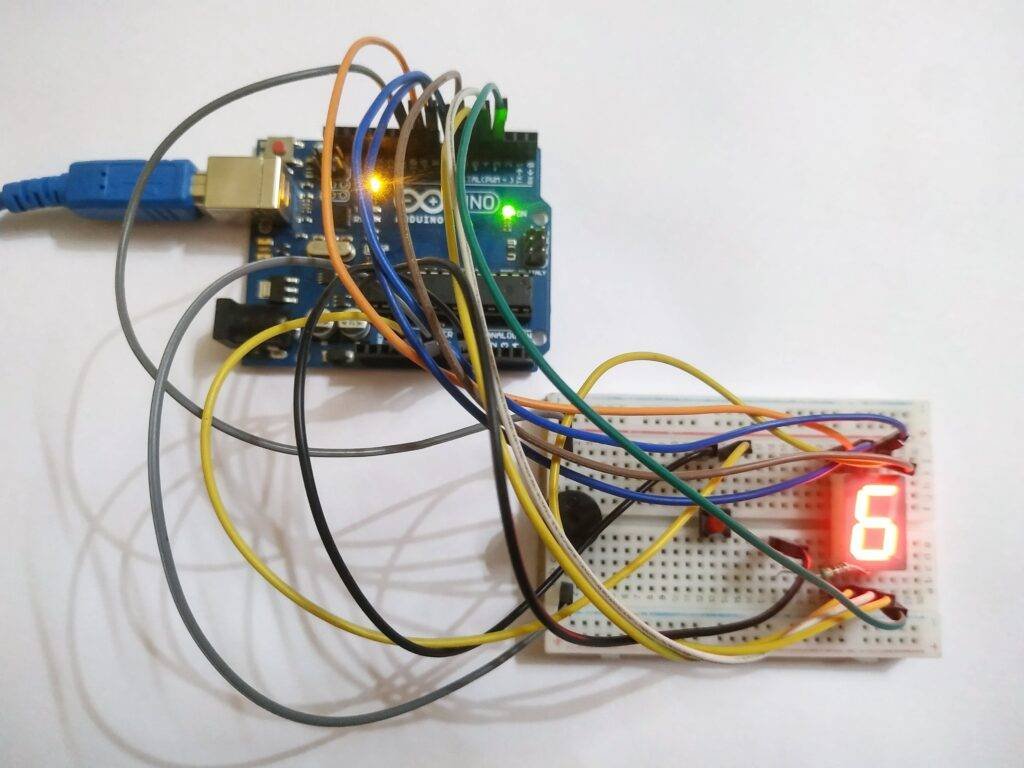
Hey guys, in this article we will learn how to make Electronic Dice With Seven Segment Display Using Arduino. I’m sure you know about Dice and its applications. Basically, it is in the shape of a cube with dots printed on each face. The dots represent numbers between one to six. In this project, we make electronic dice that perform the same task as real dice. If you are new to this field and want to explore more cool projects on Arduino, please click here. Arduino is a microcontroller that works on ATmega 328p IC. There are many variants of Arduino board available in the market but we use Arduino UNO for this project. We also use a seven-segment display for showing the numbers. You can also check how seven-segment display work with Arduino. You have to press the button so that the values of dice can shuffle and the final value is displayed shortly. Make the circuit according to the given diagram and then upload the provided code.
How Does it Work?
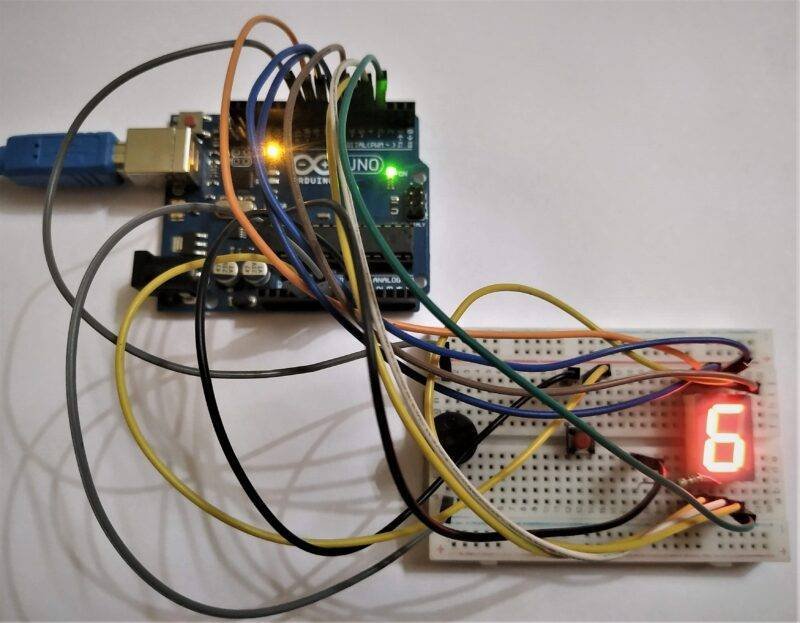
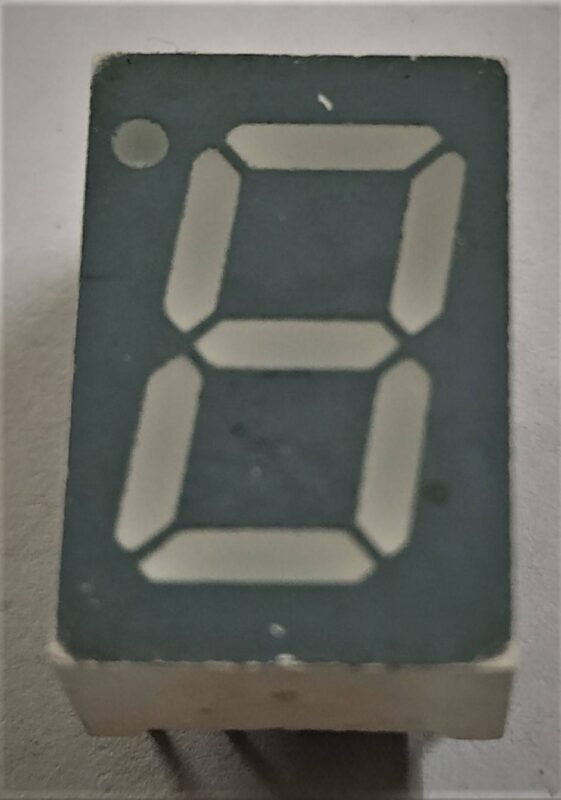
We use a seven-segment display module which gives the number between one to six. To obtain a number on the dice you have to roll it and throw but in this project, you have to push the button so that numbers on the display module start shuffling and then give the final number. Once we obtain the final random number the buzzer starts beeping. You can see the shuffling of numbers on the seven-segment display. A seven-segment is an electronic display device that can display the numbers between zero to nine and also all the alphabets. It is called so because of the seven segments used in it. This electronic dice gives the numbers between one to six in a random way like real dice.
Components Required
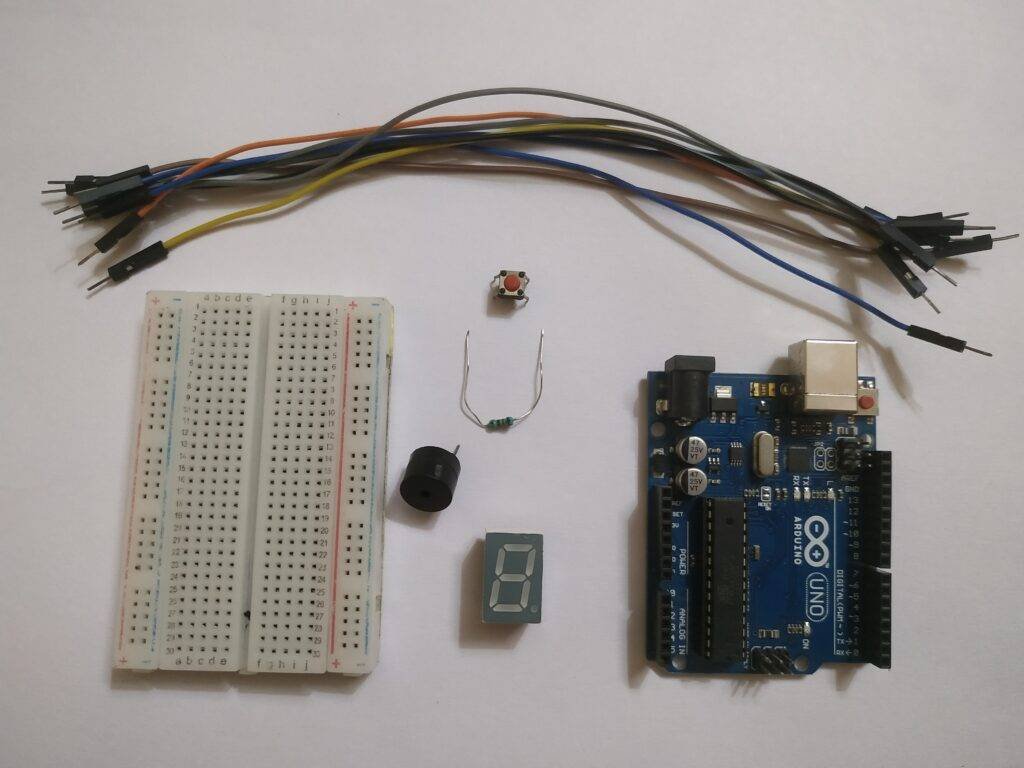
| Arduino UNO | BUY LINK |
| USB cable for uploading the code | BUY LINK |
| Jumper wires | BUY LINK |
| Buzzer | BUY LINK |
| Seven-segment display | BUY LINK |
| Push-button | BUY LINK |
| Resistors 220-ohm | BUY LINK |
| Breadboard | BUY LINK |
Circuit Diagram
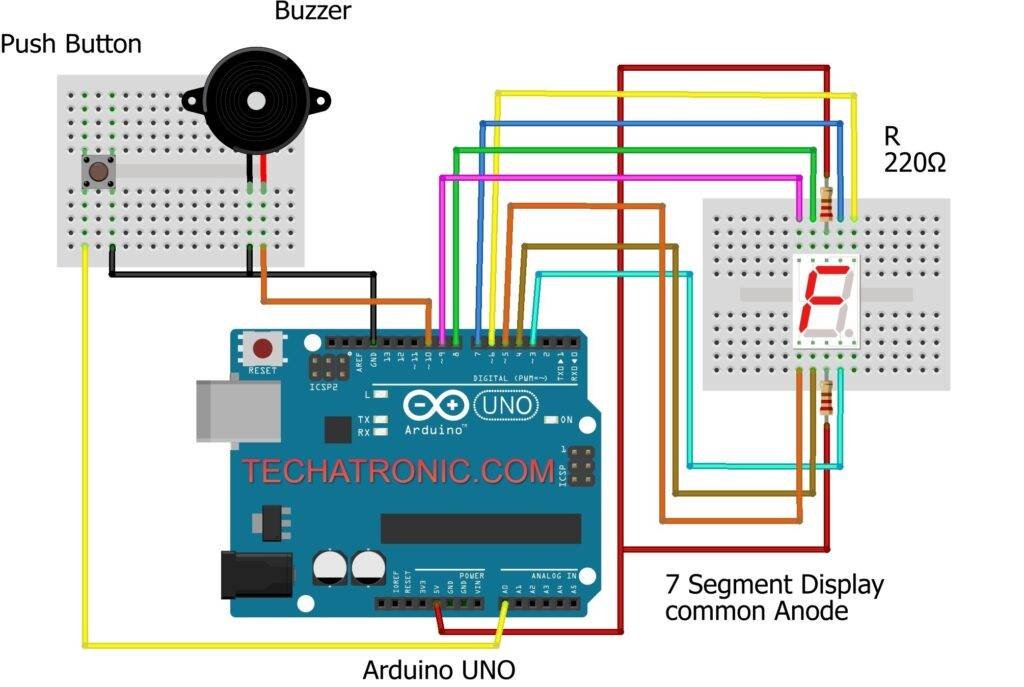
a. Circuit Diagram for common anode configuration
b. Circuit diagram for common cathode configuration
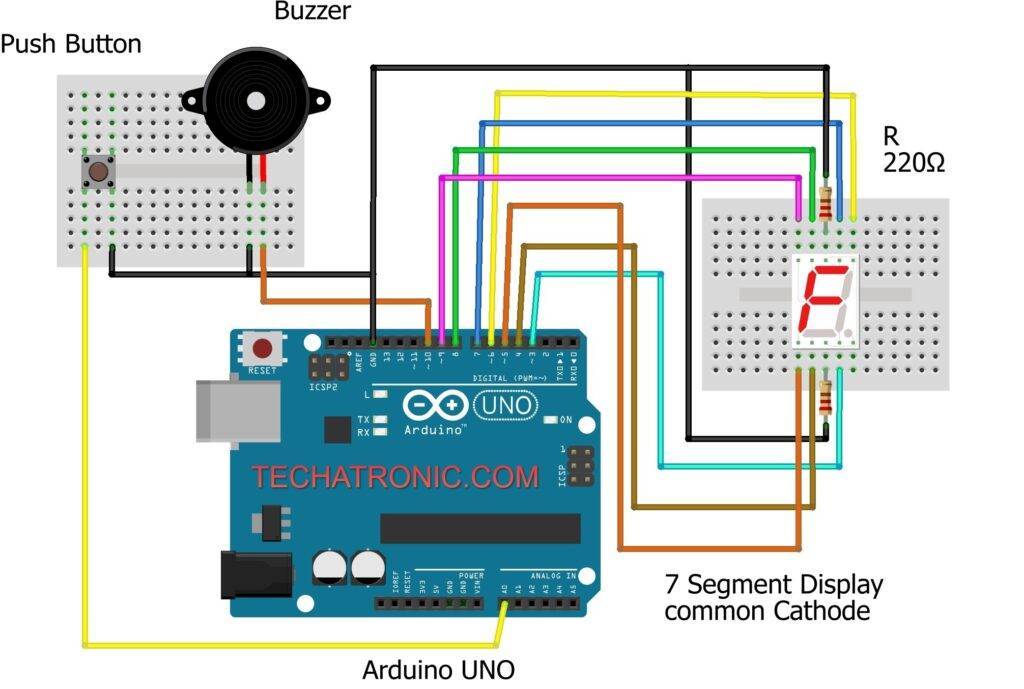
Make the connections according to the circuit diagram provided above. For the common anode configuration, connect the 5-volt pin of the Arduino to the display module through a 220-ohm resistor as shown. For the common cathode configuration, connect the GND to the same pins through 220-ohm resistors. Attach the one side pin of the push-button to the GND of the Arduino and another side pin to the analog 0 pin of the Arduino. Join the positive pin of the buzzer to the digital 10 pin and the negative to the GND pin of the Arduino. Connect the remaining pins of the display module with the digital 3 to digital 9 pins of the Arduino as shown in the figure. After completing the circuit please upload the code given below.
Code of the Project
NOTE: You can upload the code as per the circuit you made.
a. Code for common anode configuration
 // TECHATRONIC.COM
 // 7 Segment Common Anode
 #define aPin 7 //
 #define bPin 6 //        _____
 #define cPin 3 //       |  A  |
 #define dPin 4 //     F |_____| B
 #define ePin 5 //       |  G  |
 #define fPin 8 //     E |_____| C
 #define gPin 9 //          D    O dot
 // Pin configuration
 #define PIN_BUTTON A0
 #define PIN_BUZZER 10
 const byte PIN_CHAOS = A5; // Unconnected analog pin used to initialize RNG
 // Other configuration
 const unsigned int BEEP_FREQUENCY = 3000;
 int On=1; //<On=0; for Common anode><On=1; for Common cathode>
 int Off;
 void setup() {
  randomSeed(analogRead(PIN_CHAOS));
  pinMode(aPin, OUTPUT);
  pinMode(bPin, OUTPUT);
  pinMode(cPin, OUTPUT);
  pinMode(dPin, OUTPUT);
  pinMode(ePin, OUTPUT);
  pinMode(fPin, OUTPUT);
  pinMode(gPin, OUTPUT);
  pinMode(PIN_BUTTON, INPUT_PULLUP);  // On button pin as input with pullup
  pinMode(PIN_BUZZER, OUTPUT);   // On buzzer pin as output
  // Indicate that system is ready
  for (int i = 9; i >=0; i--) {
  showNumber(i);
  tone(PIN_BUZZER, BEEP_FREQUENCY, 100);
  delay(300);
  }
  tone(PIN_BUZZER, BEEP_FREQUENCY, 250); // Beep when done
  delay(1000);       // Wait for 1 second
 }
 void loop() {
  // Wait for button to be pressed, then run the test routine
  int buttonState = digitalRead(PIN_BUTTON);
  if (buttonState == LOW) {
   rollTheDice(10,100);     // Show the rolling animation
   rollTheDice(5, 200);
   rollTheDice(3, 300);
   rollTheDice(1, 100);
   tone(PIN_BUZZER, BEEP_FREQUENCY, 250); // Beep when done
  }
 }
 void rollTheDice(int count, int delayLength) {
  for (int i = 0; i < count; i++) {
   int number = random(1,7);   // Get random number from 1 to 6
   tone(PIN_BUZZER, BEEP_FREQUENCY, 5); // Beep very shortly ("click")
   showNumber(number);      // Show the number
   delay(delayLength);      // Wait
  }
 }
 void showNumber(int x){
 if(On==1){Off=0;}
    else{Off=1;}
   switch(x){
    case 1: one();  break;
    case 2: two();  break;
    case 3: three(); break;
    case 4: four(); break;
    case 5: five(); break;
    case 6: six();  break;
    case 7: seven(); break;
    case 8: eight(); break;
    case 9: nine(); break;
    default: zero(); break;
   }
 }
 void one()
 {
  digitalWrite( aPin, On);    //
  digitalWrite( bPin, Off);   //   |
  digitalWrite( cPin, Off);   //   |
  digitalWrite( dPin, On);    //   |
  digitalWrite( ePin, On);    //   |
  digitalWrite( fPin, On);
  digitalWrite( gPin, On);
 }
 void two(){
  digitalWrite( aPin, Off);   //    ____
  digitalWrite( bPin, Off);   //        |
  digitalWrite( cPin, On);    //    ____|
  digitalWrite( dPin, Off);   //   |
  digitalWrite( ePin, Off);   //   |____
  digitalWrite( fPin, On);
  digitalWrite( gPin, Off);
 }
 void three(){
  digitalWrite( aPin, Off);   //    ____
  digitalWrite( bPin, Off);   //        |
  digitalWrite( cPin, Off);   //    ____|
  digitalWrite( dPin, Off);   //        |
  digitalWrite( ePin, On);    //    ____|
  digitalWrite( fPin, On);
  digitalWrite( gPin, Off);
 }
 void four(){
  digitalWrite( aPin, On);    //
  digitalWrite( bPin, Off);   //    |    |
  digitalWrite( cPin, Off);   //    |____|
  digitalWrite( dPin, On);    //         |
  digitalWrite( ePin, On);    //         |
  digitalWrite( fPin, Off);
  digitalWrite( gPin, Off);
 }
 void five(){
  digitalWrite( aPin, Off);    //    ____
  digitalWrite( bPin, On);     //   |
  digitalWrite( cPin, Off);    //   |____
  digitalWrite( dPin, Off);    //        |
  digitalWrite( ePin, On);     //    ____|
  digitalWrite( fPin, Off);
  digitalWrite( gPin, Off);
 }
 void six(){
  digitalWrite( aPin, Off);    //    ____
  digitalWrite( bPin, On);     //   |
  digitalWrite( cPin, Off);    //   |____
  digitalWrite( dPin, Off);    //   |    |
  digitalWrite( ePin, Off);    //   |____|
  digitalWrite( fPin, Off);
  digitalWrite( gPin, Off);
 }
 void seven(){
  digitalWrite( aPin, Off);    //    ____
  digitalWrite( bPin, Off);    //        |
  digitalWrite( cPin, Off);    //        |
  digitalWrite( dPin, On);     //        |
  digitalWrite( ePin, On);     //        |
  digitalWrite( fPin, On);
  digitalWrite( gPin, On);
 }
 void eight(){
  digitalWrite( aPin, Off);    //    ____
  digitalWrite( bPin, Off);    //   |    |
  digitalWrite( cPin, Off);    //   |____|
  digitalWrite( dPin, Off);    //   |    |
  digitalWrite( ePin, Off);    //   |____|
  digitalWrite( fPin, Off);
  digitalWrite( gPin, Off);
 }
 void nine(){
  digitalWrite( aPin, Off);    //    ____
  digitalWrite( bPin, Off);    //   |    |
  digitalWrite( cPin, Off);    //   |____|
  digitalWrite( dPin, Off);    //        |
  digitalWrite( ePin, On);     //    ____|
  digitalWrite( fPin, Off);
  digitalWrite( gPin, Off);
 }
 void zero(){
  digitalWrite( aPin, Off);    //     ____
  digitalWrite( bPin, Off);    //    |    |
  digitalWrite( cPin, Off);    //    |    |
  digitalWrite( dPin, Off);    //    |    |
  digitalWrite( ePin, Off);    //    |____|
  digitalWrite( fPin, Off);
  digitalWrite( gPin, On);
 }
b. Code for common cathode configuration
 // TECHATRONIC.COM
 // 7 Segment Common Cathode
 #define aPin 7        //
 #define bPin 6        //      _____
 #define cPin 3        //     |  A  |
 #define dPin 4        //   F |_____| B
 #define ePin 5        //     |  G  |
 #define fPin 8        //   E |_____| C
 #define gPin 9        //        D     O dot
 // Pin configuration
 #define PIN_BUTTON A0
 #define PIN_BUZZER 10
 const byte PIN_CHAOS = A5; // Unconnected analog pin used to initialize RNG
 // Other configuration
 const unsigned int BEEP_FREQUENCY = 3000;
 int On=1; //<On=0; for Common anode><On=1; for Common cathode>
 int Off;
 void setup() {
  randomSeed(analogRead(PIN_CHAOS));
  pinMode(aPin, OUTPUT);
  pinMode(bPin, OUTPUT);
  pinMode(cPin, OUTPUT);
  pinMode(dPin, OUTPUT);
  pinMode(ePin, OUTPUT);
  pinMode(fPin, OUTPUT);
  pinMode(gPin, OUTPUT);
  pinMode(PIN_BUTTON, INPUT_PULLUP);  // On button pin as input with pullup
  pinMode(PIN_BUZZER, OUTPUT);   // On buzzer pin as output
  // Indicate that system is ready
  for (int i = 9; i >=0; i--) {
  showNumber(i);
  tone(PIN_BUZZER, BEEP_FREQUENCY, 100);
  delay(300);
  }
  tone(PIN_BUZZER, BEEP_FREQUENCY, 250); // Beep when done
  delay(1000);       // Wait for 1 second
 }
 void loop() {
  // Wait for button to be pressed, then run the test routine
  int buttonState = digitalRead(PIN_BUTTON);
  if (buttonState == LOW) {
   rollTheDice(10,100);     // Show the rolling animation
   rollTheDice(5, 200);
   rollTheDice(3, 300);
   rollTheDice(1, 100);
   tone(PIN_BUZZER, BEEP_FREQUENCY, 250); // Beep when done
  }
 }
 void rollTheDice(int count, int delayLength) {
  for (int i = 0; i < count; i++) {
   int number = random(1,7);   // Get random number from 1 to 6
   tone(PIN_BUZZER, BEEP_FREQUENCY, 5); // Beep very shortly ("click")
   showNumber(number);      // Show the number
   delay(delayLength);      // Wait
  }
 }
 void showNumber(int x){
 if(On==1){Off=0;}
    else{Off=1;}
   switch(x){
    case 1: one();  break;
    case 2: two();  break;
    case 3: three(); break;
    case 4: four(); break;
    case 5: five(); break;
    case 6: six();  break;
    case 7: seven(); break;
    case 8: eight(); break;
    case 9: nine(); break;
    default: zero(); break;
   }
 }
 void one(){
  digitalWrite( aPin, Off);   //
  digitalWrite( bPin, On);    //   |
  digitalWrite( cPin, On);    //   |
  digitalWrite( dPin, Off);   //   |
  digitalWrite( ePin, Off);   //   |
  digitalWrite( fPin, Off);
  digitalWrite( gPin, Off);
 }
 void two(){
  digitalWrite( aPin, On);    //    ____
  digitalWrite( bPin, On);    //        |
  digitalWrite( cPin, Off);   //    ____|
  digitalWrite( dPin, On);    //   |
  digitalWrite( ePin, On);    //   |____
  digitalWrite( fPin, Off);
  digitalWrite( gPin, On);
 }
 void three(){
  digitalWrite( aPin, On);    //    ____
  digitalWrite( bPin, On);    //        |
  digitalWrite( cPin, On);    //    ____|
  digitalWrite( dPin, On);    //        |
  digitalWrite( ePin, Off);   //    ____|
  digitalWrite( fPin, Off);
  digitalWrite( gPin, On);
 }
 void four(){
  digitalWrite( aPin, Off);   //
  digitalWrite( bPin, On);    //    |    |
  digitalWrite( cPin, On);    //    |____|
  digitalWrite( dPin, Off);   //         |
  digitalWrite( ePin, Off);   //         |
  digitalWrite( fPin, On);
  digitalWrite( gPin, On);
 }
 void five(){
  digitalWrite( aPin, On);    //     ____
  digitalWrite( bPin, Off);   //    |
  digitalWrite( cPin, On);    //    |____
  digitalWrite( dPin, On);    //         |
  digitalWrite( ePin, Off);   //     ____|
  digitalWrite( fPin, On);
  digitalWrite( gPin, On);
 }
 void six(){
  digitalWrite( aPin, On);    //    ____
  digitalWrite( bPin, Off);   //   |
  digitalWrite( cPin, On);    //   |____
  digitalWrite( dPin, On);    //   |    |
  digitalWrite( ePin, On);    //   |____|
  digitalWrite( fPin, On);
  digitalWrite( gPin, On);
 }
 void seven(){
  digitalWrite( aPin, On);    //    ____
  digitalWrite( bPin, On);    //        |
  digitalWrite( cPin, On);    //        |
  digitalWrite( dPin, Off);   //        |
  digitalWrite( ePin, Off);   //        |
  digitalWrite( fPin, Off);
  digitalWrite( gPin, Off);
 }
 void eight(){
  digitalWrite( aPin, On);    //    ____
  digitalWrite( bPin, On);    //   |    |
  digitalWrite( cPin, On);    //   |____|
  digitalWrite( dPin, On);    //   |    |
  digitalWrite( ePin, On);    //   |____|
  digitalWrite( fPin, On);
  digitalWrite( gPin, On);
 }
 void nine(){
  digitalWrite( aPin, On);    //    ____
  digitalWrite( bPin, On);    //   |    |
  digitalWrite( cPin, On);    //   |____|
  digitalWrite( dPin, On);    //        |
  digitalWrite( ePin, Off);   //    ____|
  digitalWrite( fPin, On);
  digitalWrite( gPin, On);
 }
 void zero(){
  digitalWrite( aPin, On);    //    ____
  digitalWrite( bPin, On);    //   |    |
  digitalWrite( cPin, On);    //   |    |
  digitalWrite( dPin, On);    //   |    |
  digitalWrite( ePin, On);    //   |____|
  digitalWrite( fPin, On);
  digitalWrite( gPin, Off);
 }
Final Project Look Like

Hope you understand the project well and in case if you are facing any errors please do inform us in the comment section below.
You can also check out more Tutorials on Arduino.
HAPPY LEARNING!
