Table of Contents
Introduction
Hey guys, welcome back to Our website again.
we have the latest IoT project for final year students. Final year students search for ideas on IoT projects for these guys we uploaded this video.
simple we are uploading the data on the server. the server is the storage where we store the data in real-time. before this,
we have uploaded a very good project for your IoT home automation. you should check all our IoT projects. This is only the way to monitor our activity over the internet from anywhere in the world.
IoT based project is in trending nowadays coz everything is controlled by the internet. we have mobile, pc and laptop to control the thing over the internet but on the other side, we need a system which can connect to the server or the internet.
What is iot project using ir sensor?
Here we are using an IR sensor with the esp 8266. if someone comes in front of the IR sensor then it will detect and send information to the server.
and notify you on your mobile phone. we will share all the information about the esp8266 ir remote. you need to follow all the given instruction
Here we are having an application named Blynk application. which we need to download from the play store. And afterward,
we need to make a few fastens according to the prerequisite. we will make the association as given underneath and afterward transfer the code into the ESP8266.
and afterward when we squeezed the catch in our IoT Based project on the portable screen then the application will send the information to the worker and as indicated by the code, the worker controls the gadget as per the information. this is how the entire framework functions?
Components Required
You can buy all components together-BUY LINK
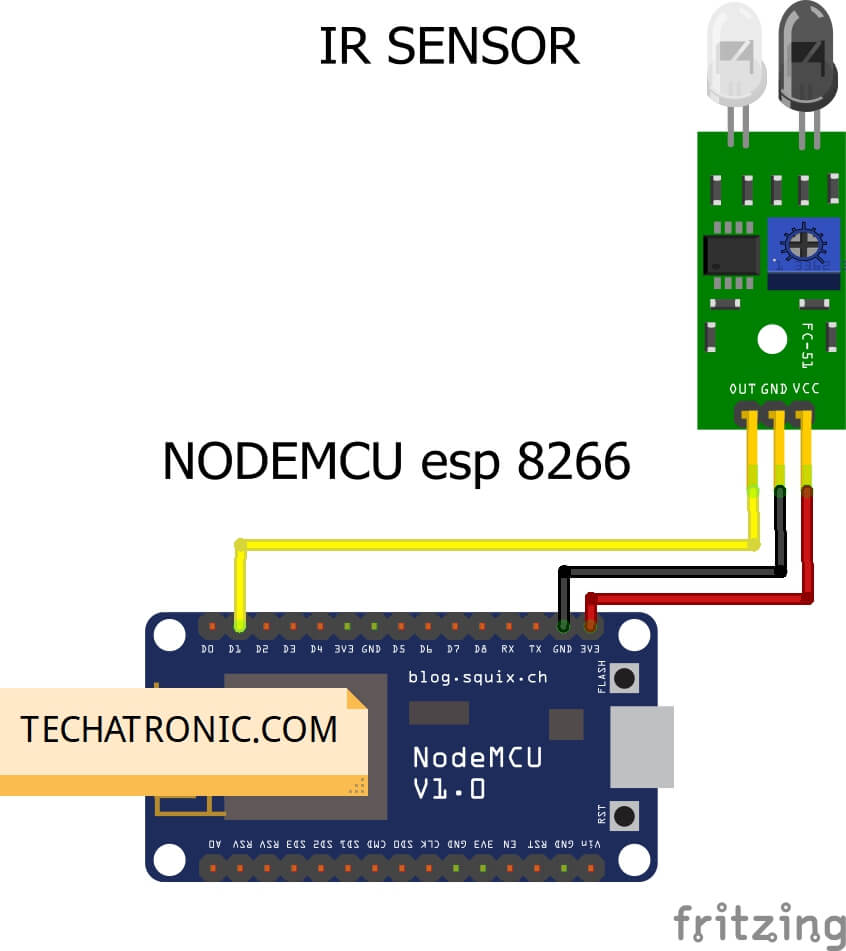
Ir IoT project Circuit Diagram:-

Connection Table
| Nodemcu esp8266 | IR Sensor |
| Vin, 3V3 | VCC |
| G, GND | GND |
| D1 Pin | OUT Pin |
Here we added an IR sensor with the nodemcu and will send this data to the server and the server will send this data to the mobile phone and show the value.
we will use the Blynk app in which the data shows. all the steps we will upload here. Following all the steps it’s pretty simple. This IoT project is the easiest and coolest project.
IR IoT Projects Code:-
 //TECHATRONIC.COM
 // BLYNK LIBRARY
 // https://github.com/blynkkk/blynk-library
 // ESP8266 LIBRARY
 // https://github.com/ekstrand/ESP8266wifi
 // IR Sensor Connect to D1 PIN
 #define BLYNK_PRINT Serial
 #include <ESP8266WiFi.h>
 #include <BlynkSimpleEsp8266.h>
 BlynkTimer timer;
 char auth[] = "6Stu2qds1ijIEsWTpt6NhDsQYnnXjAxt"; //Auth code sent via Email
 char ssid[] = "DESKTOP"; //Wifi name
 char pass[] = "asdfghjkl"; //Wifi Password
 int flag=0;
 void notifyOnIR()
 {
  int isButtonPressed = digitalRead(D1);
  if (isButtonPressed==1 && flag==0) {
   Serial.println("Some one inter in the room");
   Blynk.notify("Alert : Some one inter in the room");
   flag=1;
  }
  else if (isButtonPressed==0)
  {
   flag=0;
  }
 }
 void setup()
 {
 Serial.begin(9600);
 Blynk.begin(auth, ssid, pass);
 pinMode(D1,INPUT_PULLUP);
 timer.setInterval(1000L,notifyOnIR);
 }
 void loop()
 {
  Blynk.run();
  timer.run();
 }
Upload the given code into your esp8266. and if you have trouble with uploading see our latest esp code uploading tutorial
After uploading the code you need to follow the given instruction.
App installation & Setup
Step 1
Download the app from the play store.

Step 2
Login into the app

Step 3
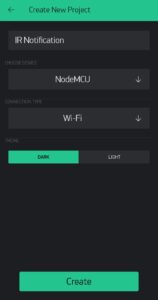
Create new project

Step 4
Select nodemcu from the given list

Step 5
Token send to your email, copy that toke and paste to your code.

Step 6
Add Ir notification button.


Step 1
Click on the play button in upper right corner.


