

Hey guys welcome back to the techatronic. today we are going to make a very useful project. The product is motion sensing light bulb using arduino so in this project we are using a bulb which is turn on an off using motion sensing. So whenever a motion occurs the bulb will turn on.
Introduction
A motion sensing light using Arduino and PIR sensor is one of the most useful and beginner-friendly electronics projects you can build at home. Whether you want automatic lighting for staircases, bathrooms, corridors, garages, or outdoor pathways, this project provides a smart, energy-efficient solution.
Instead of keeping lights ON all the time, a PIR motion sensor detects human movement and automatically turns the light ON only when motion is detected. After a fixed delay, the light turns OFF again, saving electricity and improving convenience.
In this detailed guide, you will learn:
- How a PIR sensor works
- How to connect a PIR sensor with Arduino
- Complete circuit explanation
- Arduino code for motion sensing light
- Real-world applications
- Troubleshooting tips
- Safety precautions
This Arduino PIR motion sensor light project is ideal for beginners, students, and DIY enthusiasts.
What Is a Motion Sensing Light using Arduino?
A motion sensing light is an automatic lighting system that turns ON when motion is detected and turns OFF when no movement is present. These lights are widely used in:
- Home security systems
- Automatic room lighting
- Energy-saving lighting solutions
- Smart homes
In this project, motion detection is done using a PIR (Passive Infrared) sensor, and the control logic is handled by an Arduino Uno.
Components Required
To build this Arduino motion sensor light, you will need the following components:
Hardware Components
- Arduino Uno
- PIR Motion Sensor (HC-SR501 or equivalent)
- Relay Module (5V)
- Bulb or LED (AC or DC load)
- Breadboard
- NPN Transistor (if not using relay module)
- Resistor (1kΩ – 10kΩ)
- External power supply (if required)
- Jumper wires
Software Required
- Arduino IDE
- USB cable for Arduino programming
Understanding the PIR Motion Sensor
What Is a PIR Sensor?
A PIR (Passive Infrared) sensor detects infrared radiation emitted by warm objects like humans and animals. When a person moves in front of the sensor, the infrared pattern changes, and the sensor outputs a HIGH signal.
PIR Sensor Pins
Most PIR sensors have three pins:
- VCC – Power supply (5V)
- OUT – Signal output
- GND – Ground
How PIR Sensor Works
- No motion → Output LOW
- Motion detected → Output HIGH
This HIGH signal is read by the Arduino, which then turns ON the light.
How Arduino Controls the Motion Sensing Light using Arduino
The Arduino Uno acts as the brain of the project. It continuously reads the output pin of the PIR sensor.
Working Logic:
- PIR detects motion
- PIR output goes HIGH
- Arduino reads the signal
- Arduino activates relay
- Light turns ON
- After delay → Light turns OFF
This logic makes the motion sensing light using Arduino fully automatic.
Circuit Diagram Explanation
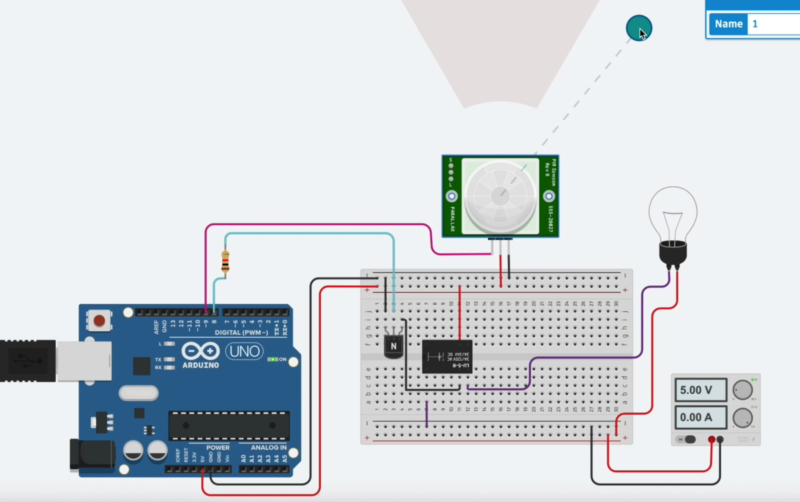
Based on the attached circuit diagram, let’s break it down simply.
Arduino Connections
- 5V pin → Breadboard positive rail
- GND pin → Breadboard ground rail
PIR Sensor Connections
- VCC → 5V
- GND → Ground
- OUT → Arduino digital pin (example: D8)
Relay Module Connections
- IN → Arduino digital pin (example: D7)
- VCC → 5V
- GND → Ground
Load (Bulb) Connections
- Bulb connected through relay NO (Normally Open) terminal
- External power supply used for the bulb
⚠️ Important Safety Note:
If you are using AC mains voltage, ensure proper insulation and safety precautions.
Arduino Code for Motion Sensing Light
Here is a simple and reliable Arduino code for the PIR motion sensor light project:
int pirPin = 8;     // PIR sensor output pin
int relayPin = 7;  // Relay control pin

void setup() {
  pinMode(pirPin, INPUT);
  pinMode(relayPin, OUTPUT);
  digitalWrite(relayPin, LOW);
  Serial.begin(9600);
}

void loop() {
  int motion = digitalRead(pirPin);

  if (motion == HIGH) {
    digitalWrite(relayPin, HIGH); // Turn ON light
    Serial.println("Motion detected - Light ON");
    delay(10000); // Light ON time (10 seconds)
  } else {
    digitalWrite(relayPin, LOW); // Turn OFF light
    Serial.println("No motion - Light OFF");
  }
}
How the Code Works
- Reads PIR sensor output
- If motion is detected → Relay turns ON
- Light stays ON for 10 seconds
- After delay → Light turns OFF
You can adjust the delay time as per your requirement.
Applications of Arduino PIR Motion Sensor Light
This motion sensing light project using Arduino has many real-world applications:
Home Automation
- Automatic room lights
- Bathroom and corridor lighting
Security Systems
- Intruder detection
- Automatic outdoor lights
Energy Saving
- Lights only turn ON when needed
- Reduces electricity bills
Smart DIY Projects
- Smart stair lighting
- Garage lighting
- Garden lights
Advantages of Motion Sensing Lights
- Saves electricity
- Fully automatic operation
- Easy to build and modify
- Low cost
- Improves safety and convenience
Common Problems and Troubleshooting
Light Always ON
- PIR sensitivity too high
- Incorrect wiring
- Floating input pin
Light Not Turning ON
- PIR sensor not powered
- Wrong Arduino pin selected
- Relay wiring issue
False Triggering
- Place PIR away from heat sources
- Adjust PIR sensitivity and delay
Tips for Better Performance
- Use a relay module with opto-isolation
- Adjust PIR potentiometers properly
- Use stable power supply
- Add delay logic in code
- Test with DC bulb before AC load
Safety Precautions
⚠️ Always follow these safety rules:
- Do not touch live AC wires
- Use proper insulation
- Keep Arduino isolated from high voltage
- Test with low voltage first
Future Improvements
You can enhance this Arduino motion sensor light by adding:
- LDR for day/night detection
- ESP8266 or ESP32 for IoT control
- Timer settings
- Buzzer or alarm
- Mobile app control
FAQs – Motion Sensing Light Using Arduino
Can I use LED instead of bulb?
Yes, you can use DC LEDs directly without relay.
What is the range of PIR sensor?
Typically 5–7 meters.
Can I power everything from Arduino?
Only for low-power loads. Use external power for bulbs.
Is this project beginner-friendly?
Absolutely! This is one of the best beginner Arduino projects.
Conclusion
Building a motion sensing light using Arduino and PIR sensor is a practical and rewarding DIY project. It helps you understand sensors, microcontrollers, automation, and energy-efficient design.
With simple components and basic Arduino programming, you can create a smart lighting system suitable for homes, offices, and security applications.
If you are learning Arduino or planning to explore home automation projects, this PIR motion sensor light is a perfect starting point.