

Hey guys, welcome back to Techatronic. Today’s project is “RFID Security Door Lock Using ESP32”. This project is one of the important projects on our website because it is related to your safety and security. This “RFID Security Door Lock Using ESP32” system should be mandatory in every households.
In our day to day lives we come to know at some instances that this house got robbed or that shop got robbed at that particular date. This is about our security and family protection. Recently a robbery happened in Michigan with an old lady. She lives alone with her cat.
She was at her son’s place that night, she was not home. At around 2 am two burglars easily broke into her house. They easily opened the lock and entered her house. Took everything that could be taken with both hands.
In USA on a average there are one million burglaries occur every year. It is a serious issue. This is very necessary for ourselves to have a high level of door lock security system. So, today we are making ESP32 based RFID security door lock system.
In “RFID security Door Lock project” our main components are RFID sensor and ESP32. We will attach a solenoid lock with ESP32 and write a program to make it functional. We will fix the solenoid lock in our door and fix the RFID sensor on the door.
And when we touch the RFID sensor with our particular card, then it will open the door. No one can open the door without that particular card. Only you can open the door. Isn’t it cool?
Check out another advanced project with ESP32 and RFID module
Components Required for RFID Security Door Lock
| RFID Module | BUY LINK |
| A RFID tag | BUY LINK |
| Arduino Uno | BUY LINK |
| Solenoid Door Lock | BUY LINK |
| Bread Board | BUY LINK |
| Jumper Wires | BUY LINK |
You can buy all components are together-BUY LINK
RFID(Radio Frequency Identification)
Radio Frequency Identification (RFID) is a form of wireless communication that incorporates the use of electromagnetic or electrostatic coupling in the radio frequency portion of the electromagnetic spectrum to uniquely identify an object or person. It uses radio frequency to identify, search, communicate, and track with items and people.
Radio Frequency Identification (RFID) is a technology that employs electromagnetic fields to facilitate the automatic identification and tracking of tags affixed to various objects. These tags house electronically stored data that can be accessed from a distance of several meters, eliminating the need for a direct line-of-sight.
RFID is widely utilized in inventory management, asset tracking, access control, and supply chain logistics, owing to its effectiveness and precision in monitoring and managing items.
Pinouts
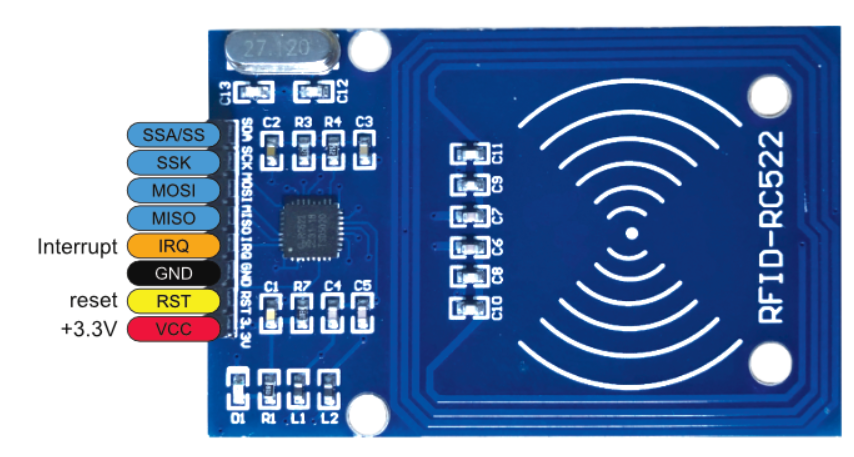
VCC – 2.5 volts to 3.3 volts. It can be connected to the 3.3V output of the Arduino board.
RST – works as an input for Reset or power down. Hard power-down is enabled when this pin goes low. This disconnects the input pins from the outside world and turns off all internal current sinks, including the oscillator. The module is reset on the ascending edge.
GND – is the Ground pin and needs to be connected to the ground of Arduino.
IRQ – An interrupt pin known as IRQ can notify the microcontroller of the presence of an RFID tag within its immediate vicinity.
MISO – pin acts as Master-In-Slave-Out when SPI interface is enabled.
MOSI – is SPI input to the RC522 module.
SSK – accepts clock pulses provided by the SPI bus Master i.e. Arduino.
SSA – pin acts as Signal input when SPI interface is enabled.
Specifications
- 13.56MHz RFID module
- Operating voltage: 2.5V to 3.3V
- Communication : SPI, I2C protocol, UART
- Maximum Data Rate: 10Mbps
- Read Range: 5cm
- Current Consumption: 13-26mA
- Power down mode consumption: 10uA (min)
RFID Security Door Lock Using ESP32 Diagram
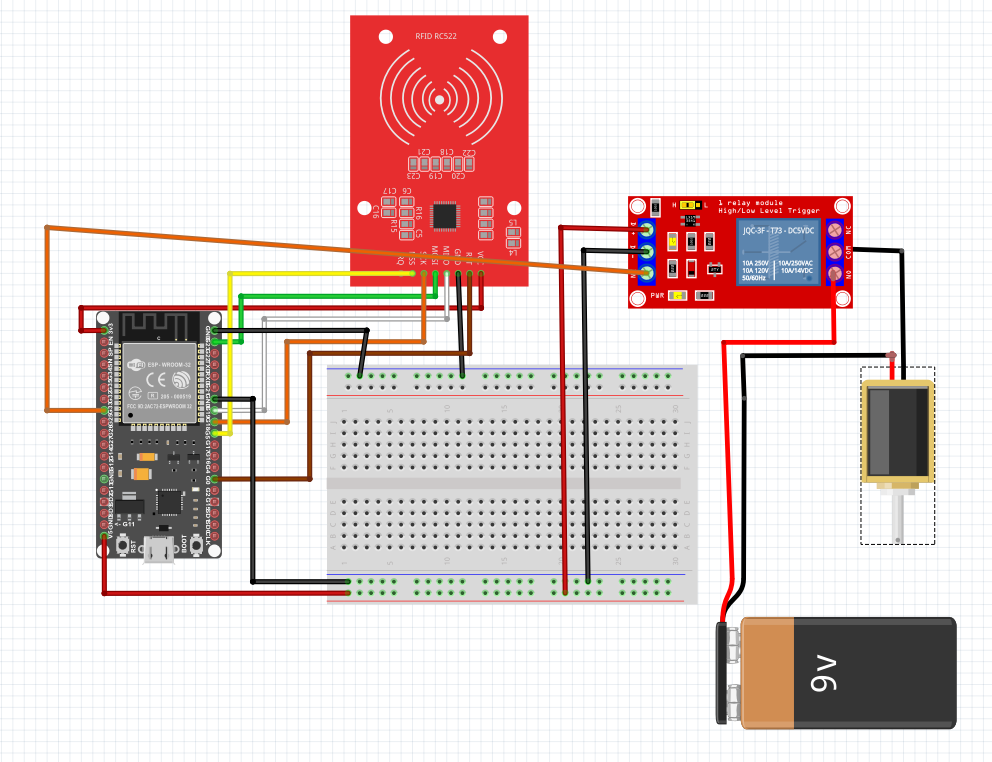
Circuit connections for Interfacing R307 Fingerprint Sensor with ESP32:-
The circuit interface of RFID Security Door Lock Using ESP32 is very simple.
- Pin 23 to MOSI
- Pin 19 to MISO
- Pin 18 to SCK
- Pin 5 to NSS
- Pin 0 to RST
- Pin 33 to relay
RFID Security Door Lock Using ESP32 code
Now, before you write your code and upload it on your ESP32, you need to download some libraries.
click this to download your libraries. Click here
Now, as you download this, you will get a zip folder in your download section then extract all your files.
Now, open your Arduino IDE and click on sketch > click on Include library > click add .ZIP library > click you extracted folder. Done!!
Copy this code, and paste in your IDE. Before uploading the code make sure you have selected the ESP32 board in your board manager. And you have selected the right COM in your computer.
#include <SPI.h>
#include <MFRC522.h>

#include <MFRC522v2.h>
#include <MFRC522DriverSPI.h>
#include <MFRC522DriverPinSimple.h>
#include <MFRC522Debug.h>

#define RST_PIN         23          // Configurable, see typical pin layout above
#define SS_PIN          10         // Configurable, see typical pin layout above

#define relay 33 // Configurable, set LED pin

MFRC522 mfrc522(SS_PIN, RST_PIN);  // Create MFRC522 instance

void setup() {
  // initialize digital pin LED_BUILTIN as an output.
  pinMode(relay, OUTPUT);

  Serial.begin(9600);   // Initialize serial communications with the PC
  while (!Serial);    // Do nothing if no serial port is opened (added for Arduinos based on ATMEGA32U4)
  SPI.begin();      // Init SPI bus
  mfrc522.PCD_Init();   // Init MFRC522
  delay(4);       // Optional delay. Some board do need more time after init to be ready, see Readme
  mfrc522.PCD_DumpVersionToSerial();  // Show details of PCD - MFRC522 Card Reader details
  Serial.println(F("Scan PICC to see UID, SAK, type, and data blocks..."));
}

void loop() {
  // Reset the loop if no new card present on the sensor/reader. This saves the entire process when idle.
  if ( ! mfrc522.PICC_IsNewCardPresent()) {
    return;
  }

  // Select one of the cards
  if ( ! mfrc522.PICC_ReadCardSerial()) {
    return;
  }

  digitalWrite(relay, HIGH);   // turn the LED on (HIGH is the voltage level)
  delay(1000);                       // wait for a second
  digitalWrite(relay, LOW);    // turn the LED off by making the voltage LOW
  delay(1000);                       // wait for a second

  // Dump debug info about the card; PICC_HaltA() is automatically called
  mfrc522.PICC_DumpToSerial(&(mfrc522.uid));
}
FAQ(Frequently Asked Questions)
Q.1) How do download libraries?
Ans. click the link given above and download the libraries. After downloading the libraries extract them in your computer. Open your Arduino IDE click sketch > click library manager > click add .ZIP library.
Q.2) My solenoid door lock is closing instead of opening?
Ans. It’s due to relay, try to interchange the relay wires then it will definitely work.