

Hello Guys, Welcome to Techatronic. Today we are going to make a cool project that is home security system using IOT, that means we are going to use PIR sensor and ESP32. The MOTO of this IOT project is when someone intrude in your house in your absence or at night then PIR sensor will detect it and send you the notification to you via E-Mail.
In this home security system using IOT project our main hero is ESP32. We gonna configure ESP32 to send E-Mail to your desired E-Mail address. We gonna use the Wi-Fi feature of the ESP32 to send the E-Mail. The best part of this project is that the ESP32 can send you E-Mail in any part of the world.
If you live in USA and you are in Australia to travel and in you absence someone intrude in your house then the PIR sensor detect the intruder’s motion and the ESP32 will send you the notification on your E-Mail.
Table of Contents
Components Required for Home Security System Using IOT
- ESP32
- PIR sensor
- breadboard
- battery
ESP32S
Our main controller for this project is ESP32. ESP32 is a compact but a powerful machine for making complex IOT projects. ESP32 microcontroller is very popular among electronic hobbyist and enthusiast. You can make anything with it, I mean anything.
ESP32 consist of total 38 pins. This much of pins makes it a more flexible and popular microcontroller. It consists onboard 448 KByte ROM, 520 KByte SRAM, 16 KByte SRAM in RTC, Internal 8 MHz oscillator with calibration, 10 × touch sensors, 12-bit SAR ADC up to 18 channels, 2 × 8-bit D/A converters, 3 × UART, 2 × I2C, 2 × I2S, 4 × SPI and much more.
ESP32 is very compatible to breadboard. The board includes inbuilt Wi-Fi and Bluetooth which makes to work wirelessly and this also one of the reasons why people prefer ESP32 over other boards in the market.
PIR sensor that means “Passive Infrared” sensor allows you to sense motion in a particular range of field like your room, hall, or garage etc. They are used to detect whether a human has moved in or out. PIR sensors are inexpensive and easy to use and install and are very compatible with any micro-controller.
Everything around us emits a level of radiation whether low or high. The PIR sensors detects the change in radiation. Here is the diagram of the PIR sensor.
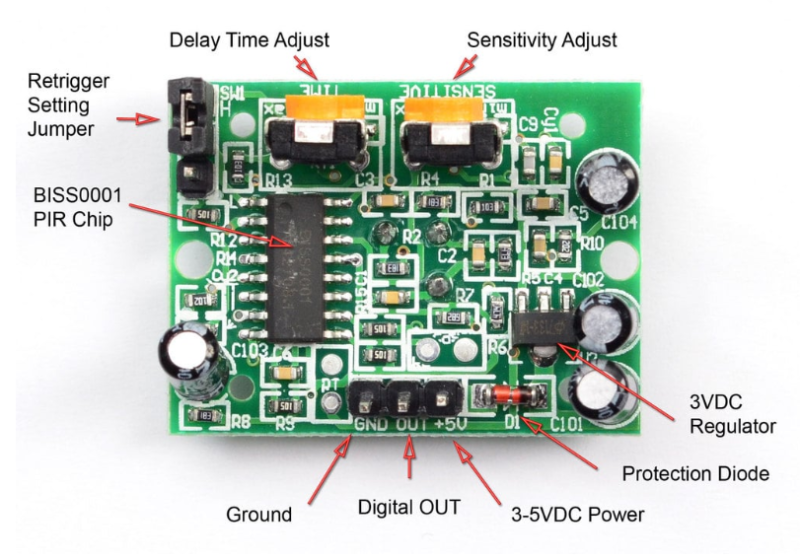
At many places we need to know whether someone has entered or left the place, like washroom, basement, garage, etc. so we need PIR sensor to work a function on detection of a human like, turn on the lights etc.
PIR sensor could be very useful for security purposes like in your absence someone intrude in your house or private property or in your garden. It can also detect the presence of your pets. PIR sensor would send you a notification on your phone if it detects someone.
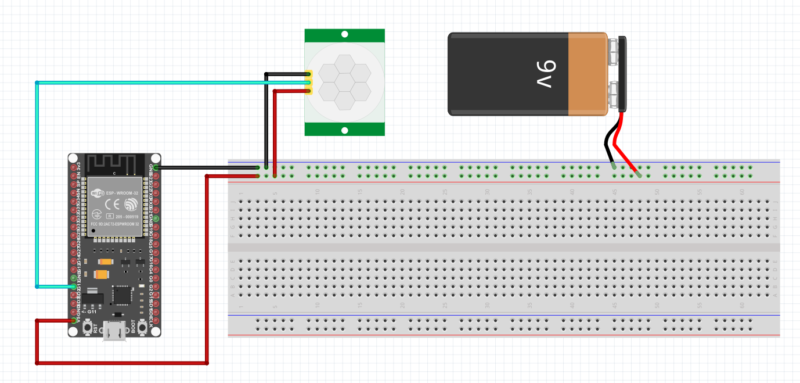
Schematic for Home Security System Using IOT
code for Home Security System Using IOT/PIR sensor and ESP32
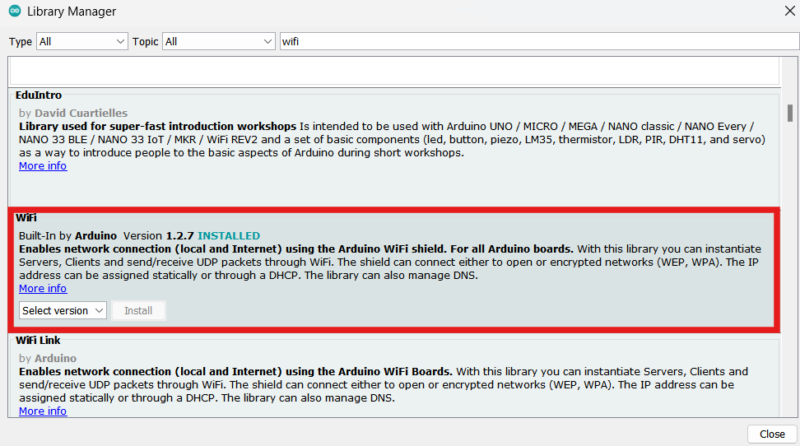
First of all download some libraries to make the code work.
click on sketch > Include libraries > Manage libraries and search in the search bar Arduino, WiFi and ESP_MAIL_Client and download them.

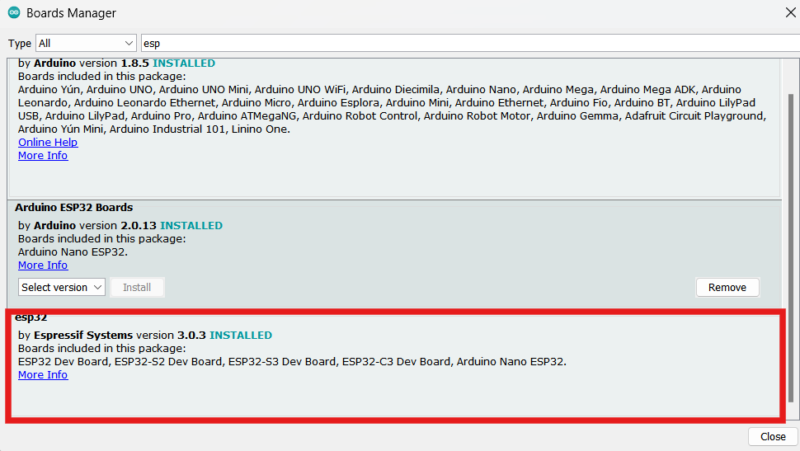
Now, download a board type, click on tools > Board > Board Manger and search in search bar ESP32.
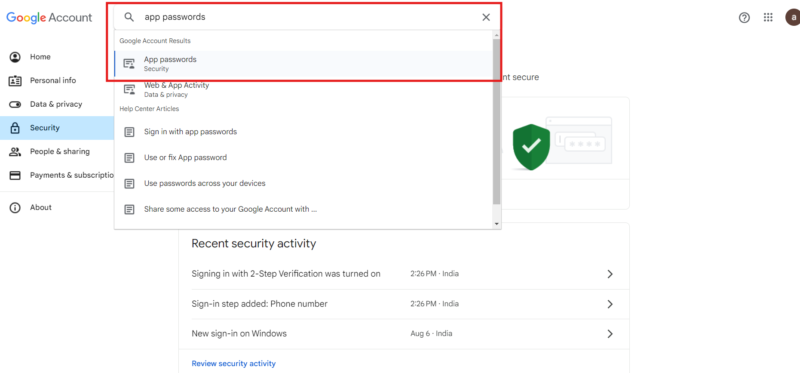
To send an Email this step is necessary. Follow this process only on sender Email. Now, search on google “google accounts” and then click security and search “app passwords”.
Then Give it a name like we did it “ESP32”. Then click create.

Now, you’ll have a pop-up representing you password, write down the password, its very important.
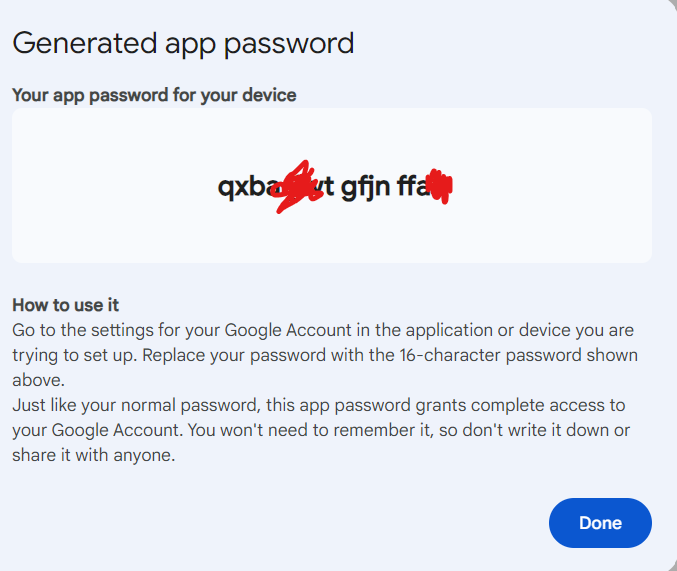
Now, you are good to go to send and receiver your email.
Upload this Home Security System Using IOT code to ESP32.
#include <Arduino.h>
#if defined(ESP32)
#include <WiFi.h>
#elif defined(ESP8266)
#include <ESP8266WiFi.h>
#endif
#include <ESP_Mail_Client.h>

#define WIFI_SSID "Your Wi-Fi"   /*Your WiFi Name*/
#define WIFI_PASSWORD "Your password"     /*Your password */

const int PIN_TO_SENSOR = 13; // GPIO19 pin connected to OUTPUT pin of sensor
const int led = 14;
int pinStateCurrent   = LOW;  // current state of pin
int pinStatePrevious  = LOW;  // previous state of pin

#define SMTP_HOST "smtp.gmail.com"
#define SMTP_PORT 465

/* The sign in credentials */
#define AUTHOR_EMAIL "sendingEmai@gmail.com"      /*Sending Email*/
#define AUTHOR_PASSWORD "your google password"     /*Your google password*/

/* Recipient's email*/
#define RECIPIENT_EMAIL "receiver email"      /*receiver email*/

/* Declare the global used SMTPSession object for SMTP transport */
SMTPSession smtp;

/* Callback function to get the Email sending status */
void smtpCallback(SMTP_Status status);


void setup() {
  pinMode(PIN_TO_SENSOR, INPUT); // set ESP32 pin to input mode to read value from OUTPUT pin of sensor
  pinMode(led, OUTPUT);

  Serial.begin(115200);

  Serial.println();
  WiFi.begin(WIFI_SSID, WIFI_PASSWORD);
  Serial.print("Connecting to Wi-Fi");
  while (WiFi.status() != WL_CONNECTED) {
    Serial.print(".");
    delay(300);
  }
  Serial.println();
  Serial.print("Connected with IP: ");
  Serial.println(WiFi.localIP());
  Serial.println();
}

void loop() {
  pinStatePrevious = pinStateCurrent; // store old state
  pinStateCurrent = digitalRead(PIN_TO_SENSOR);   // read new state

  if (pinStatePrevious == LOW && pinStateCurrent == HIGH) {   // pin state change: LOW -> HIGH
    Serial.println("Motion detected!");
    digitalWrite(led, HIGH);
    delay(2000);

      MailClient.networkReconnect(true);
    smtp.debug(1);

    /* Set the callback function to get the sending results */
    smtp.callback(smtpCallback);

    /* Declare the Session_Config for user defined session credentials */
    Session_Config config;

    /* Set the session config */
    config.server.host_name = SMTP_HOST;
    config.server.port = SMTP_PORT;
    config.login.email = AUTHOR_EMAIL;
    config.login.password = AUTHOR_PASSWORD;
    config.login.user_domain = "";


    config.time.ntp_server = F("pool.ntp.org,time.nist.gov");
    config.time.gmt_offset = 3;
    config.time.day_light_offset = 0;

    /* Declare the message class */
    SMTP_Message message;

    /* Set the message headers */
    message.sender.name = F("ESP");
    message.sender.email = "senderEmail@gmail.com";       /*sender Email*/
    message.subject = F("Intrusion");
    message.addRecipient(F("Intrusion"), RECIPIENT_EMAIL);


    //Send raw text message
    String textMsg = "Attention!!!, Someone is in your house";
    message.text.content = textMsg.c_str();
    message.text.charSet = "us-ascii";
    message.text.transfer_encoding = Content_Transfer_Encoding::enc_7bit;

    message.priority = esp_mail_smtp_priority::esp_mail_smtp_priority_low;
    message.response.notify = esp_mail_smtp_notify_success | esp_mail_smtp_notify_failure | esp_mail_smtp_notify_delay;


    /* Connect to the server */
    if (!smtp.connect(&config)) {
      ESP_MAIL_PRINTF("Connection error, Status Code: %d, Error Code: %d, Reason: %s", smtp.statusCode(), smtp.errorCode(), smtp.errorReason().c_str());
      return;
    }

    if (!smtp.isLoggedIn()) {
      Serial.println("\nNot yet logged in.");
    }
    else {
      if (smtp.isAuthenticated())
        Serial.println("\nSuccessfully logged in.");
      else
        Serial.println("\nConnected with no Auth.");
    }

    /* Start sending Email and close the session */
    if (!MailClient.sendMail(&smtp, &message))
      ESP_MAIL_PRINTF("Error, Status Code: %d, Error Code: %d, Reason: %s", smtp.statusCode(), smtp.errorCode(), smtp.errorReason().c_str());


    // TODO: turn on alarm, light or activate a device ... here
  }

  else
  if (pinStatePrevious == HIGH && pinStateCurrent == LOW) {   // pin state change: HIGH -> LOW
    Serial.println("Motion stopped!");
    digitalWrite(led, LOW);
    // TODO: turn off alarm, light or deactivate a device ... here
  }
}


void smtpCallback(SMTP_Status status) {
  /* Print the current status */
  Serial.println(status.info());

  /* Print the sending result */
  if (status.success()) {
    // ESP_MAIL_PRINTF used in the examples is for format printing via debug Serial port
    // that works for all supported Arduino platform SDKs e.g. AVR, SAMD, ESP32 and ESP8266.
    // In ESP8266 and ESP32, you can use Serial.printf directly.

    Serial.println("----------------");
    ESP_MAIL_PRINTF("Message sent success: %d\n", status.completedCount());
    ESP_MAIL_PRINTF("Message sent failed: %d\n", status.failedCount());
    Serial.println("----------------\n");

    for (size_t i = 0; i < smtp.sendingResult.size(); i++)
    {
      /* Get the result item */
      SMTP_Result result = smtp.sendingResult.getItem(i);

      // In case, ESP32, ESP8266 and SAMD device, the timestamp get from result.timestamp should be valid if
      // your device time was synched with NTP server.
      // Other devices may show invalid timestamp as the device time was not set i.e. it will show Jan 1, 1970.
      // You can call smtp.setSystemTime(xxx) to set device time manually. Where xxx is timestamp (seconds since Jan 1, 1970)

      ESP_MAIL_PRINTF("Message No: %d\n", i + 1);
      ESP_MAIL_PRINTF("Status: %s\n", result.completed ? "success" : "failed");
      ESP_MAIL_PRINTF("Date/Time: %s\n", MailClient.Time.getDateTimeString(result.timestamp, "%B %d, %Y %H:%M:%S").c_str());
      ESP_MAIL_PRINTF("Recipient: %s\n", result.recipients.c_str());
      ESP_MAIL_PRINTF("Subject: %s\n", result.subject.c_str());
    }
    Serial.println("----------------\n");

    // You need to clear sending result as the memory usage will grow up.
    smtp.sendingResult.clear();
  }


}
FAQ(Frequently Asked Questions) FOR Home Security System Using IOT
Q.1) Why my code is not working?
Ans. Download the specific libraries which we mentioned in above that is ‘arduino.h’, ESP_Mail_Client.h and WiFi.h.
Q.2) Why my code is not uploading on ESP32?
Ans. Check that your device(ESP32) is connected to the right port(COM2, COM4 etc.).
Q.3) Why am I not receiving any Email from ESP32?
Ans. Check that you have mentioned the right Email address to send and receive the Email. Check the password you have given in the program. The given password should match the password which you have got form google accounts.
If you don’t know how to get this password, we have mentioned the process above.
Q.4) My PIR sensor not detecting anything.
Ans. Check the connection of PIR sensor to the board and try to adjust the sensitivity of the PIR sensor. A potentiometer is available on the PIR board, adjust it with your requirement.