

Hello Guys, Welcome back to Techatronic. Today we are going to build an another interesting project which is called ‘Home Security Alarm’ with the help of Arduino Mega. Around 4.46 million thefts happened in the United States in 2022. Home security is a major concern nowadays. We have to do something about it.
Some common problems which we had faced were – My friends bike was stolen in a broad day light from his garden. My tools got stolen from my garage. My uncle’s laptop got stolen from his office. There are many incidents which I can count and I’m sure you also might have experience this once in a life.
Around 12,000+ people killed every year in burglary. We need something which can alert us from burglars while we are inside home. The device should be compact and should be cheap. So, today we are making this unique and easy to build project called “Home Security Alarm”.
Let’s see how this project works. By pressing the A button, the alarm will sound in ten seconds. Ultrasonic sensors are used to detect objects, and a buzzer is activated by the alarm once something is detected. Entering a four-digit password is required to silence the alarm.
We access the password change menu by pressing the B button, and in order to proceed, we must first enter our current password there. Our new four-digit password must then be entered. Entering the new password is the only way to stop the alarm from sounding after it has been changed. if we enter the incorrect password, the message “You need to try again” will show up.
Table of Contents
Components Required for Home Security Alarm System
Let’s see the components we need to make this project work.
- Arduino Mega
- Ultrasonic Sensor
- 16×2 LCD Display
- Buzzer
- 4×4 keypad
4×4 Keypad Module
Reading and processing the key pressed by the use is the keypad’s main function. An 8 by 8 keypad has 8 rows and 8 columns. Switches are used to divide the columns and rows. By pressing a key, the switch connects the row and column that it is positioned between.
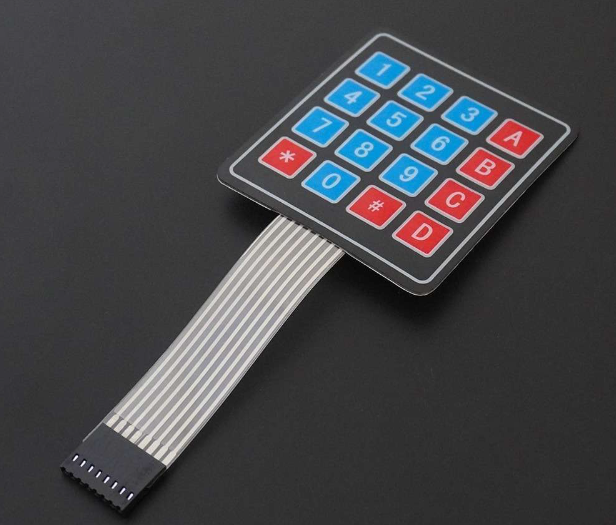
To interface a single key with the microcontroller, we need one GPIO pin. That being said, if we want to interface more than one key, for example, 9, 12, 16, etc., every GPIO pin on the microcontroller could be obtained. Parts of the microcontroller’s GPIO pins can be retained by using a matrix keypad. Click here to learn more.
Rows and columns of keys make up a matrix keypad’s sole component.
Specification of 4×4 Keypad
- Key layout: 4 rows x 4 columns (16 keys total)
- Key Type: Membrane
- Interface: 8 digital pins
- Operating voltage: 3V – 5V DC
LCD Display
LCD character displays are the only type of display capable of producing a single ASCII character at a set size. With these individual characters, we can then compose a text. Some tiny rectangular regions consisting of a five by eight pixel grid are visible upon close examination of the display. We are able to construct characters inside of each grid because each pixel has the capacity to light up on its own. Click here to read more
16×2 LCD Pinout
There are sixteen pins in total, the first being the Ground pin, which is arranged left to right. We connect the VCC, the second pin, to the 5 volt pin on the Arduino Board. The Vo pin, which is next, can be connected to a potentiometer to change the contrast of the display. The next step involves selecting whether to send commands or data to LCD using the register select pin, or RS pin.
When we set the RS pin to low state, or zero volts, the LCD receives commands from us, like moving the cursor to a specific location, clearing the screen, turning the display off, and so on. Furthermore, when the RS pin is set to the high state, or 5 volts, we are sending characters or data to the LCD.
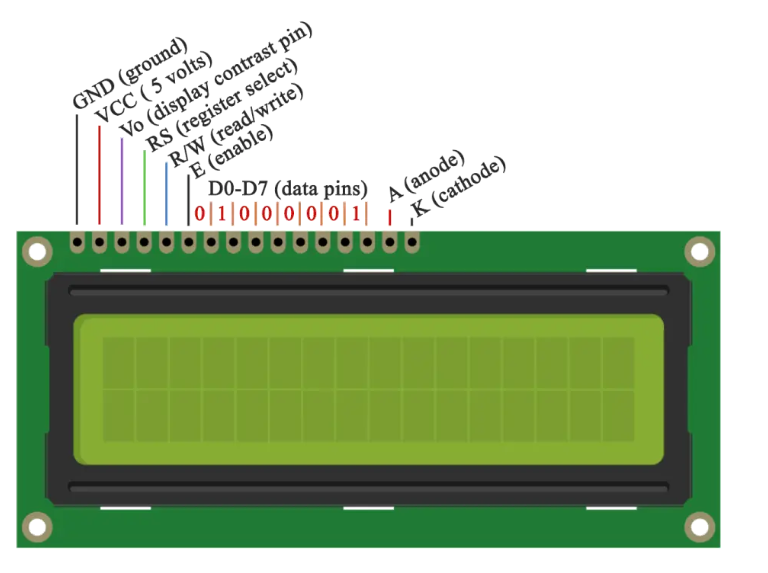
The R/W pin, the next pin, selects which mode to use when reading or writing to the LCD. Here, the clearly visible write mode is used to write or transmit data and commands to the LCD. The E pin, which allows writing to the registers, is the eighth data pin, after D0 through D7. Utilizing these pins, we transmit the 8-bit data to the registers for writing.
Sending 0100 0001 to the registers in accordance with the ASCII map, for example, would enable us to see the uppercase A on the display. A and K, which stand for anode and cathode, are the last two pins that supply power to the LED rear light.
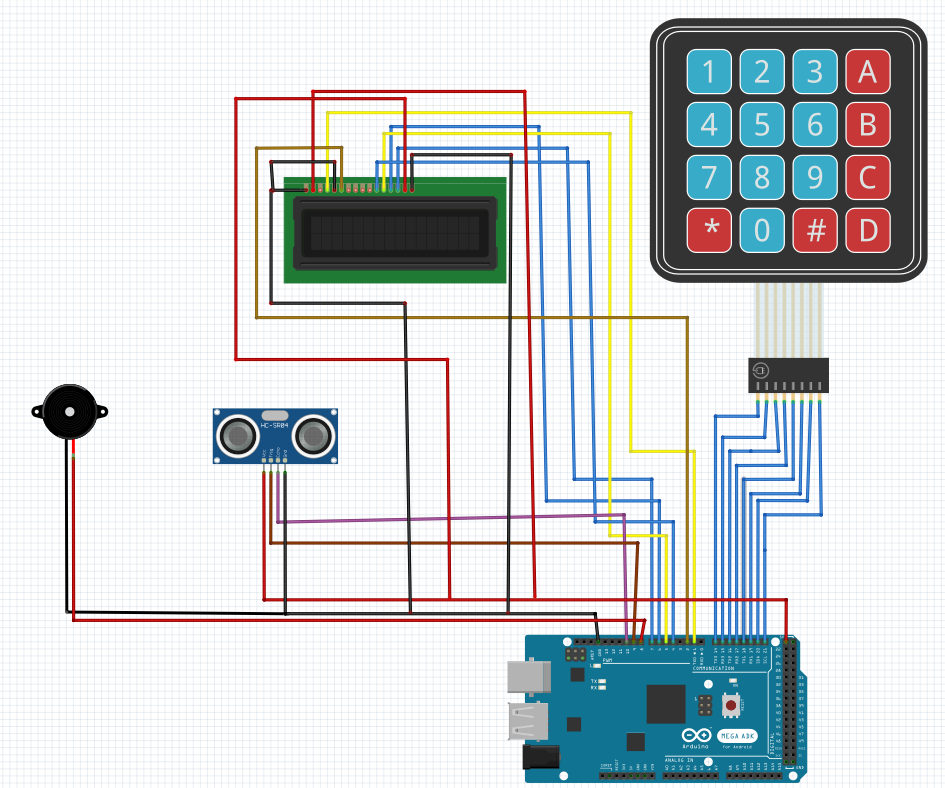
Diagram of Home Security Alarm
Now, Lets see the wiring of our project. Many people do mistakes in wiring and then they blame the code. Be careful, you will lots of your time and unwanted headache. Trust me.
Code for Home Security Alarm
#include <LiquidCrystal.h> // includes the LiquidCrystal Library
#include <Keypad.h>

#define buzzer 8
#define trigPin 9
#define echoPin 10

long duration;
int distance, initialDistance, currentDistance, i;
int screenOffMsg =0;
String password="1234";
String tempPassword;
boolean activated = false; // State of the alarm
boolean isActivated;
boolean activateAlarm = false;
boolean alarmActivated = false;
boolean enteredPassword; // State of the entered password to stop the alarm
boolean passChangeMode = false;
boolean passChanged = false;

const byte ROWS = 4; //four rows
const byte COLS = 4; //four columns
char keypressed;
//define the cymbols on the buttons of the keypads
char keyMap[ROWS][COLS] = {
  {'1','2','3','A'},
  {'4','5','6','B'},
  {'7','8','9','C'},
  {'*','0','#','D'}
};
byte rowPins[ROWS] = {14, 15, 16, 17}; //Row pinouts of the keypad
byte colPins[COLS] = {18, 19, 20, 21}; //Column pinouts of the keypad

Keypad myKeypad = Keypad( makeKeymap(keyMap), rowPins, colPins, ROWS, COLS);
LiquidCrystal lcd(1, 2, 4, 5, 6, 7); // Creates an LC object. Parameters: (rs, enable, d4, d5, d6, d7)

void setup() {
  lcd.begin(16,2);
  pinMode(buzzer, OUTPUT); // Set buzzer as an output
  pinMode(trigPin, OUTPUT); // Sets the trigPin as an Output
  pinMode(echoPin, INPUT); // Sets the echoPin as an Input
}

void loop() {
  if (activateAlarm) {
    lcd.clear();
    lcd.setCursor(0,0);
    lcd.print("Alarm will be");
    lcd.setCursor(0,1);
    lcd.print("activated in");

    int countdown = 9; // 9 seconds count down before activating the alarm
    while (countdown != 0) {
      lcd.setCursor(13,1);
      lcd.print(countdown);
      countdown--;
      tone(buzzer, 700, 100);
      delay(1000);
    }
    lcd.clear();
    lcd.setCursor(0,0);
    lcd.print("Alarm Activated!");
    initialDistance = getDistance();
    activateAlarm = false;
    alarmActivated = true;
  }

  if (alarmActivated == true){
      currentDistance = getDistance() + 10;
      if ( currentDistance < initialDistance) {
        tone(buzzer, 1000); // Send 1KHz sound signal
        lcd.clear();
        enterPassword();
      }
    }

  if (!alarmActivated) {
    if (screenOffMsg == 0 ){
      lcd.clear();
      lcd.setCursor(0,0);
      lcd.print("A - Activate");
      lcd.setCursor(0,1);
      lcd.print("B - Change Pass");
      screenOffMsg = 1;
    }
    keypressed = myKeypad.getKey();
     if (keypressed =='A'){        //If A is pressed, activate the alarm
      tone(buzzer, 1000, 200);
      activateAlarm = true;
    }
    else if (keypressed =='B') {
      lcd.clear();
      int i=1;
      tone(buzzer, 2000, 100);
      tempPassword = "";
      lcd.setCursor(0,0);
      lcd.print("Current Password");
      lcd.setCursor(0,1);
      lcd.print(">");
      passChangeMode = true;
      passChanged = true;
      while(passChanged) {
      keypressed = myKeypad.getKey();
      if (keypressed != NO_KEY){
        if (keypressed == '0' || keypressed == '1' || keypressed == '2' || keypressed == '3' ||
            keypressed == '4' || keypressed == '5' || keypressed == '6' || keypressed == '7' ||
            keypressed == '8' || keypressed == '9' ) {
         tempPassword += keypressed;
         lcd.setCursor(i,1);
         lcd.print("*");
         i++;
         tone(buzzer, 2000, 100);
        }
      }
      if (i > 5 || keypressed == '#') {
        tempPassword = "";
        i=1;
        lcd.clear();
        lcd.setCursor(0,0);
        lcd.print("Current Password");
        lcd.setCursor(0,1);
        lcd.print(">");
      }
      if ( keypressed == '*') {
        i=1;
        tone(buzzer, 2000, 100);
        if (password == tempPassword) {
          tempPassword="";
          lcd.clear();
          lcd.setCursor(0,0);
          lcd.print("Set New Password");
          lcd.setCursor(0,1);
          lcd.print(">");
          while(passChangeMode) {
            keypressed = myKeypad.getKey();
            if (keypressed != NO_KEY){
              if (keypressed == '0' || keypressed == '1' || keypressed == '2' || keypressed == '3' ||
                  keypressed == '4' || keypressed == '5' || keypressed == '6' || keypressed == '7' ||
                  keypressed == '8' || keypressed == '9' ) {
                tempPassword += keypressed;
                lcd.setCursor(i,1);
                lcd.print("*");
                i++;
                tone(buzzer, 2000, 100);
              }
            }
            if (i > 5 || keypressed == '#') {
              tempPassword = "";
              i=1;
              tone(buzzer, 2000, 100);
              lcd.clear();
              lcd.setCursor(0,0);
              lcd.print("Set New Password");
              lcd.setCursor(0,1);
              lcd.print(">");
            }
            if ( keypressed == '*') {
              i=1;
              tone(buzzer, 2000, 100);
              password = tempPassword;
              passChangeMode = false;
              passChanged = false;
              screenOffMsg = 0;
            }
          }
        }
      }
    }
   }
 }
}

void enterPassword() {
  int k=5;
  tempPassword = "";
  activated = true;
  lcd.clear();
  lcd.setCursor(0,0);
  lcd.print(" *** ALARM *** ");
  lcd.setCursor(0,1);
  lcd.print("Pass>");
      while(activated) {
      keypressed = myKeypad.getKey();
      if (keypressed != NO_KEY){
        if (keypressed == '0' || keypressed == '1' || keypressed == '2' || keypressed == '3' ||
            keypressed == '4' || keypressed == '5' || keypressed == '6' || keypressed == '7' ||
            keypressed == '8' || keypressed == '9' ) {
          tempPassword += keypressed;
          lcd.setCursor(k,1);
          lcd.print("*");
          k++;
        }
      }
      if (k > 9 || keypressed == '#') {
        tempPassword = "";
        k=5;
        lcd.clear();
        lcd.setCursor(0,0);
        lcd.print(" *** ALARM *** ");
        lcd.setCursor(0,1);
        lcd.print("Pass>");
      }
      if ( keypressed == '*') {
        if ( tempPassword == password ) {
          activated = false;
          alarmActivated = false;
          noTone(buzzer);
          screenOffMsg = 0;
        }
        else if (tempPassword != password) {
          lcd.setCursor(0,1);
          lcd.print("Wrong! Try Again");
          delay(2000);
          lcd.clear();
          lcd.setCursor(0,0);
          lcd.print(" *** ALARM *** ");
          lcd.setCursor(0,1);
          lcd.print("Pass>");
        }
      }
    }
}
// Custom function for the Ultrasonic sensor
long getDistance(){
  //int i=10;

  //while( i<=10 ) {
  // Clears the trigPin
  digitalWrite(trigPin, LOW);
  delayMicroseconds(2);

  // Sets the trigPin on HIGH state for 10 micro seconds
  digitalWrite(trigPin, HIGH);
  delayMicroseconds(10);
  digitalWrite(trigPin, LOW);

  // Reads the echoPin, returns the sound wave travel time in microseconds
  duration = pulseIn(echoPin, HIGH);

  // Calculating the distance
  distance = duration*0.034/2;
  //sumDistance += distance;
  //}
  //int averageDistance= sumDistance/10;
  return distance;

}
FAQ(Frequently Asked Questions)
Q.1) Nothing is showing on my LCD display. Why?
Ans. You have to add a 330 ohm of resistor to make it bright enough to display the characters on screen. If it still does not work properly add another 330 ohm resistor in parallel with the first 330 ohm resistor.
Q.2) Is it need libraries to run the code?
Ans. Yes, it needs to library to make the code work, otherwise Arduino will give error. Open your Arduino IDE and click sketch > click Include library > click manage libraries > search in the search box ‘liquidcrystal’ then download the first one. Similarly search ‘keypad’ and download the first one. Now, you are good to go.