

Hey guys, welcome back to the techatronic. In this article I am interfacing Arduino mega with multiple push button, we have made push button interfacing with the Arduino. we have used the Arduino uno and nano. but this time we are using the Arduino mega and many push button. So, this activity will help you to learn how to code the Arduino. and this will help you to learn how to attach a multiple digital sensor with the Arduino. the logic will be the same.
We have also made an activity on how to interface the push button with Arduino. there we have attached only one push button with Arduino. So now we are going to make the activity work. There we have shared all the steps which help you to make and learn this activity. in this activity we will covered the Input and output logic of the arduino and if condition in code.
So, we will the If condition in this article using electronics. To make this activity we need some electronics components.
Table of Contents
Required components
| Arduino Mega | BUY LINK |
| Push Button – 3 | BUY LINK |
| Led 3 | BUY LINK |
| Jumper wire | BUY LINK |
| Breadboard | BUY LINK |
| 9v Battery | BUY LINK |
| 10K Resister | BUY LINK |
| 330 ohm Resistor | BUY LINK |
Arduino Mega
Arduino mega is the powerful , big in size and maximum number of GPIO pins. It allow we to use the INPUT, OUTPUT, DIGITAL, ANALOG, (RX, TX- Serial Communication), I2C communication, SPI Communication, etc. we always use the Arduino mega when we need more GPIO pins. So in this Arduino mega with multiple push button Activity we can use this activity and code with the 20 push button and LED.
What we will learn?
We will learn how to connect the led and push button with the Arduino
how to code Arduino for led and push button
we will learn implementation of if condition
we will learn how to make the pull-up resistor circuit.
Now we need to make the Circuit first.
Arduino Mega with multiple push button Circuit diagram
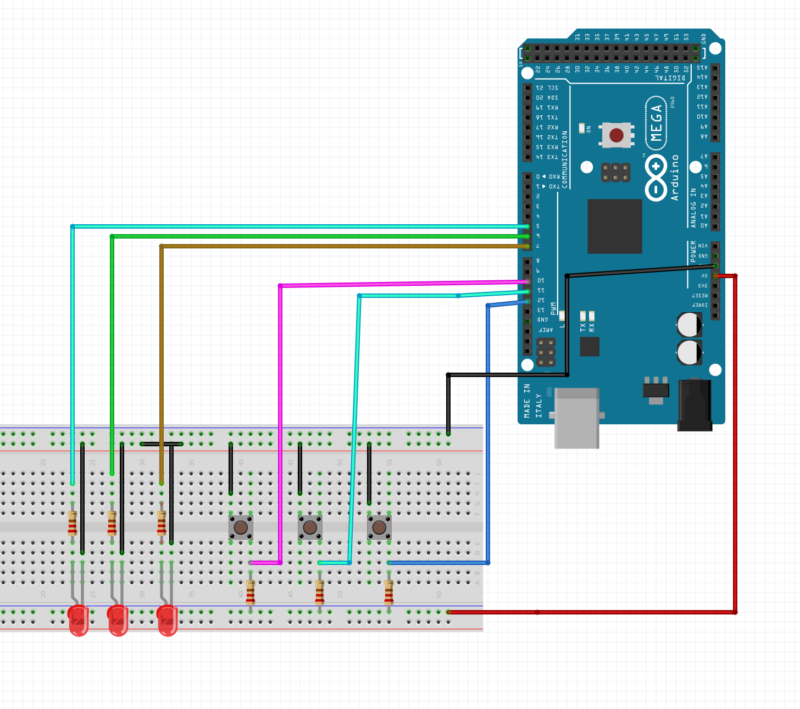
So, here the connections are given. and how to connect each components given below.
- Connect all the LED ground to the Arduino Gnd pin.
- Connect All the positive pin of LED with the 330 Ohm resistor terminal 1
- Connect 330 ohm Resistor terminal 2 with the Arduino pin 5,6,7 respectively.
- Now connect all the push button terminal 1 with the Gnd pins
- Connect Push button Terminal 2 with the Arduino pin 11, 12, 13 Respectively
- Connect push button Terminal 2 with the 10k ohm resistor terminal 1
- Connect all 10k resistor terminal T2 with the ground.
Make sure all the connection should be right and tight
Make sure the power is turn off during the connection.
next download Arduino ide for code.
Arduino Mega with multiple push button Code
// constants won't change. They're used here to
// set pin numbers:
const int buttonPina = 11;     // the number of the pushbutton pin
const int buttonPinb = 12;
const int buttonPinc = 13;
const int ledPina =  5;      // the number of the LED pin
const int ledPinb =  6;
const int ledPinc =  7;


void setup() {
  // initialize the LED pin as an output:
  pinMode(ledPina, OUTPUT);
pinMode(ledPinb, OUTPUT);
pinMode(ledPinc, OUTPUT);
  // initialize the pushbutton pin as an input:
  pinMode(buttonPina, INPUT);
pinMode(buttonPinb, INPUT);
pinMode(buttonPinc, INPUT);
}


void loop() {

  int m = digitalRead(buttonPina);
int n = digitalRead(buttonPinb);
int o = digitalRead(buttonPinc);


if(m==0)
{
digtalWrite(ledpina, HIGH);

}

else
{
digtalWrite(ledpina, LOW);
}


if(n==0)
{
digtalWrite(ledpina, HIGH);
}
else
{
digtalWrite(ledpina, LOW);
}


if(o==0)
{
digtalWrite(ledpina, HIGH);
}
else
{
digtalWrite(ledpina, LOW);
}
}
Here is the code given for the activity Arduino Mega with multiple push button. and let understand the code.
const int buttonPina = 11; // the number of the pushbutton pin
const int buttonPinb = 12;
const int buttonPinc = 13;
Here we are assigning the pin number in some variable like buttonpin
const int ledPina = 5; // the number of the LED pin
const int ledPinb = 6;
const int ledPinc = 7;
Here we are assigning the pin number in some variable like ledpin
next in the void setup we are assigning the pins 11,12 and 13 as the input pin of arduino
and then assigning the pin 5,6,7 as the output pin of the Arduino
now, in void loop we are storing the push button output in
int m = digitalRead(buttonPina);
int n = digitalRead(buttonPinb);
int o = digitalRead(buttonPinc);
these statements.
Now we are comparing the value with the 0.
if the storing value at the inputs is equal to the 0 the c condition will be true and led will be start glow.
If you have any difficulties with
How to Connect Led with Arduino or push button.
you an visit these pages or ask us in the comment section.