
Us welcome back to the ticket Ronak, so today we are going to make a very special project which is trending now a days so we decided to make this great voice control robot which have the ability to avoid the obstacle. Recently we have made many projects with robots we have made different kinds kinds of robots like firefighting robot RC car robots s robot and today we are going to make and upgrade of this robot in which we can control the voice. So we will write some commands which can control this robot. Also we required and application which can the text a speech and convert this speech to text and send this information to the robot.
So in this project we will talk about how does the robot work and where we can use this robot and how we can make this robot how can we make the circuit diagram and code and how can we assemble this robot all these things will be entertaind in this project so this can help you to make this robots by yourself. So if we are going to share all the details and all the instruction here and if you want to make or learn how to make this robot you need to read all full article.
So here we will talk about how the robot will work. So there is an application name Android bluetooth controller which have all the options like voice control and remote control so we will use this application to send our voice data so this application use the text conversion and then send the converted text to the robot and all these transmission will be done by the wireless communication and here where using Bluetooth in this wireless communication. To use Bluetooth we need a Bluetooth module which is as hc-05 which will be connect to the arduino and transmit the data which is transmitted by the application.
Now, Arduino have all the data like voice command like if we have send the voice command move forward so we will insert this keyword move forward into the code. We are using four keyword share for four direction like forward backward right and left and the four keywords are move forwards move backward turn left and turn right so these are the four keywords which we are using into the code like if bluetooth received more forward then the robot will have to move forward correction and if the Bluetooth then the robot will have to move direction and right and left follow the same process.
arduino bluetooth controller send the command through the bluetooth wireless communication and the Bluetooth we have a test to our robot which is bluetooth module HC 05 will receive the data and this data will have to move towards you and here the arduino is like a brain which process all the things so here according to the command instruction to the Motors which are going to move in respective direction.
So now we required components detail circuit diagram and code to complete this project so first of all we would like to share the component list
Required component for Voice Control Robot
- Arduino Uno
- Motor Shield
- 4- BO Motors
- Chassis
- Servo motor
- Ultrasonic sensor
- HC-0
- Bluetooth Module
- Jumper wire
- Breadboard
Now we have all the component so the next step is to connect all the component together to connect all the component together we required a circuit diagram which can help us to connect all the component can a right manner. So to connect the component with the motor driver sheet is very easy do you have to put your motor driver Shield over the early and you will get the option to connect other component with the motor driver Shield which will be directly connected to the Arduino uno make sure to use the Arduino.
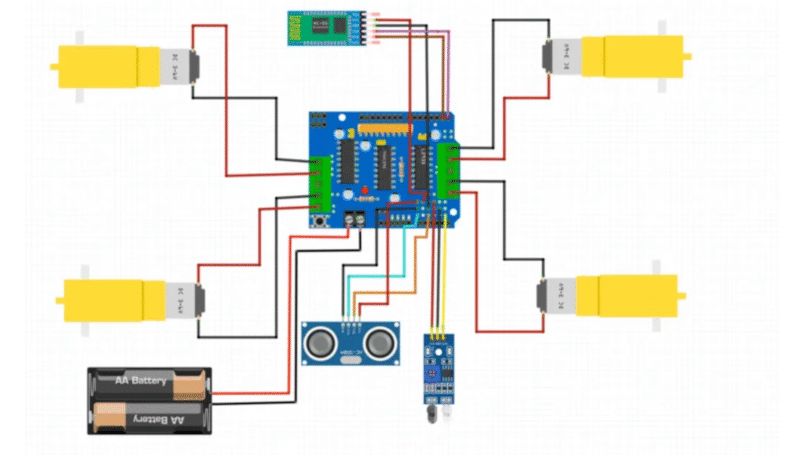
Voice control Robot Circuit Diagram
. Motors (DC Gear Motors)
- There are 4 motors (2 for each side of the robot).
- These are connected to the Motor A and Motor B ports on the L298N motor driver shield:
- Front Left Motor → M1
- Back Left Motor → M2
- Front Right Motor → M3
- Back Right Motor → M4
- The red and black wires denote motor power (positive and ground).
2. Bluetooth Module (HC-05)
- VCC → 5V on the motor driver shield (powers the module)
- GND → GND on the shield
- TXD → RX of Arduino (likely pin 0)
- RXD → TX of Arduino (likely pin 1)
This allows the robot to receive commands via Bluetooth from a phone app (like BT Controller).
3. Ultrasonic Sensor (HC-SR04)
- VCC → 5V
- GND → GND
- Trig → Digital Pin (e.g., D9)
- Echo → Digital Pin (e.g., D8)
This sensor measures distance to detect obstacles.
4. IR Sensor (Line Tracker)
- VCC → 5V
- GND → GND
- OUT → Digital Pin (e.g., D7)
Used for line following. It detects the color contrast (black/white).
5. Battery Pack
- Powers the motor driver shield and hence the motors.
- The AA battery pack’s positive terminal is connected to the VCC input of the motor shield.
- The negative terminal is connected to GND.
Make sure the voltage doesn’t exceed the limit of the motor driver.
Now, we need the Arduino code to make this project work.
Voice Control Robot Arduino Code
// Arduino Obstacle Avoidance + Voice Control Robot
// Created by DIY Builder
//Contact me here https://www.instagram.com/diy.builder/
//You need to install the AFMotor and NewPing Libraries before uplodaing the sketch

#include <AFMotor.h>
#include <NewPing.h>
#include<Servo.h>
#define TRIGGER_PIN A1
#define ECHO_PIN A0
#define MAX_DISTANCE 300
#define IR A5

AF_DCMotor motor1(1, MOTOR12_1KHZ);
AF_DCMotor motor2(2, MOTOR12_1KHZ);
AF_DCMotor motor3(3, MOTOR34_1KHZ);
AF_DCMotor motor4(4, MOTOR34_1KHZ);


NewPing sonar(TRIGGER_PIN, ECHO_PIN, MAX_DISTANCE);

Servo myservo;

String voice;

void setup() {
Serial.begin(9600);
myservo.attach(10);
myservo.write(90);
pinMode(IR, INPUT_PULLUP);

}

void loop() {
  int distance = sonar.ping_cm();
  int IR1 = digitalRead(IR);
  Serial.print(IR1);
  Serial.print("    ");
  Serial.print(distance);
  Serial.println("    ");
if(Serial.available()>0) {
  voice="";
  delay(2);
  voice = Serial.readString();
  delay(2);
  Serial.println(voice);


if (voice == "turn left") {
  left();
}else if (voice == "left") {
  left();
}else if(voice == "turn right") {
  right();
}else if(voice == "right") {
  right();
}

}
while(voice == "move forward") {
  forward();
}
while(voice == "move backward") {
  backward();
}
}


void forward() {
  int distance = sonar.ping_cm();

 if(distance < 10){
  Stop();
  voice="";
 }else {
  motor1.setSpeed(255);
  motor1.run(FORWARD);

  motor2.setSpeed(255);
  motor2.run(FORWARD);

  motor3.setSpeed(255);
  motor3.run(FORWARD);

  motor4.setSpeed(255);
  motor4.run(FORWARD);
}
}
void backward() {
  int IR_Sensor = digitalRead(IR);
  if(IR_Sensor == 0) {
  Stop();
    voice="";
  }else {
  motor1.setSpeed(255);
  motor1.run(BACKWARD);

  motor2.setSpeed(255);
  motor2.run(BACKWARD);

  motor3.setSpeed(255);
  motor3.run(BACKWARD);

  motor4.setSpeed(255);
  motor4.run(BACKWARD);

}
}
void left() {
  myservo.write(180);
  delay(500);
  myservo.write(90);
  delay(500);
  motor1.run(BACKWARD);
  motor1.setSpeed(255);
  motor2.run(BACKWARD);
  motor2.setSpeed(255);
  motor3.run(FORWARD);
  motor3.setSpeed(255);
  motor4.run(FORWARD);
  motor4.setSpeed(255);
  delay(700);
  motor1.run(RELEASE);
  motor2.run(RELEASE);
  motor3.run(RELEASE);
  motor4.run(RELEASE);
}

void right() {
  myservo.write(0);
  delay(500);
  myservo.write(90);
  delay(500);
  motor1.run(FORWARD);
  motor1.setSpeed(255);
  motor2.run(FORWARD);
  motor2.setSpeed(255);
  motor3.run(BACKWARD);
  motor3.setSpeed(255);
  motor4.run(BACKWARD);
  motor4.setSpeed(255);
  delay(700);
  motor1.run(RELEASE);
  motor2.run(RELEASE);
  motor3.run(RELEASE);
  motor4.run(RELEASE);
}

void Stop() {
  motor1.run(RELEASE);
  motor2.run(RELEASE);
  motor3.run(RELEASE);
  motor4.run(RELEASE);
}
So we have shared all the detail with code now you have to upload this code in your arduino using arduino IDE software first of all you have to connect your arduino using USB cable. Now open the software and click on the upload so for more detail on how to upload the program in a day room you can repair our latest article on how to upload the program in Arduino.
After uploading the program we need an application which is Android bluetooth controller. Will it to download this application from Play Store or if we not get the application from Play Store you can download it from the web browser Chrome also we are giving you the downloadable link from where you can download this application. So after download the application you have to follow some step to connect your robot with the application.
First of all you have to go to your bluetooth setting here tap on the pair new device and select the hc-05. Is required the password will 1234 in the password colum and then select the connect option.
Now open the application Android bluetooth controller click on the upper right side there is a icon of circle and select from there HC-05. Now select the voice control from the application menu and now you have to say move forward move backward turn right and turn left so this will control your voice control robot. Where using the ultrasonic sensor and IR sensor in this robot to detect the obstacle in front of the robot and in the back side of the robot. So if there is any object in front of the robot the ultrasonic sensor will stop the robot. And if there is a is an object in backward direction to the robot then it will detected by the IR sensor and if there is an obstacle then the robot will stop so this is the working of this robot. I hope all of you make your robot easily problem we will revert there all the best.