
Hey guys welcome back to the Techatronic. So today we have a very good science project which can help us in the rainy days. In rainy season we encounter the problem of Water logging on roads mainly. To overcome that problem we have made this Awesome Water logging solution Science project. I hope this project will be very helpful to the people. As all we know whenever the rain or other source of water collected on the road. that water filled the road which affect the transportation. The reason of this water logging are mainly the no drainage solution system , blockage in gutters and other small holes.

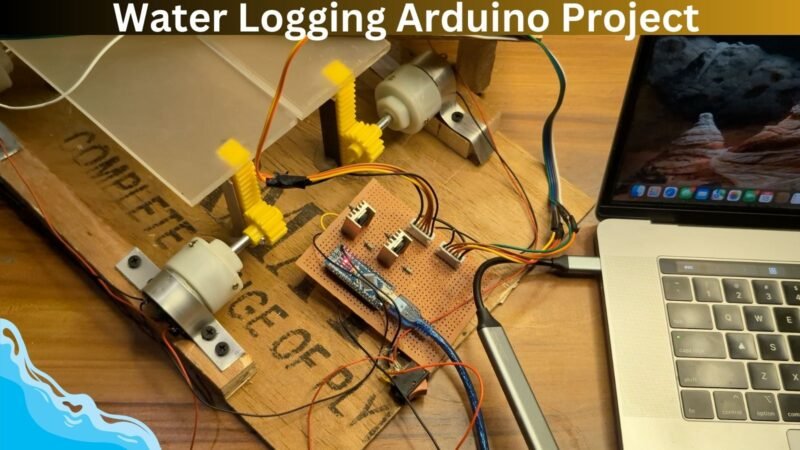
To prevent from this problem we made this project. there is the moving part at the road which move verticle which pass the water inside the road. there is a big drainage tub which can pass the gallon of water at one time. At you can see at the image given above there is two moving part and some ultrasonic sensor and a water sensor.
when the water drop sensor sense the water on it then the two big piece deployed on the road start moving up and down which can allow to pass the water inside it. Water logging solution these two piece goes up the water go inside these parts and reach to the drainage behind the land. this process allow more water in less time.

So the water logging will not happened with this project. Also we are using two ultrasonic sensor both the sides if there is any vehicle comes near to the sensor then slides in our project will go at the road level and stop movement same working for the second ultrasonic sensor.
So, i am going to share all the details here. how i made it. Code, circuit and other detail i am sharing in this article. So, keep your eyes on full article and learn the electronics and other things used for this project.

We required 3 kinds of material here. Electronic material , Hardware like wooden , plastic and Software Required.
Required Material
Arduino Nano –Buy Link
L298N Motor Driver –Buy Link
Ultrasonic Sensor -2 –Buy Link
Water level sensor –Buy Link
DC motors -Buy Link
Plastic gears (linear + circular). -Buy Link
Wires -Buy Link
On-Off Switch -Buy Link
12v Battery –Buy Link
All these material combined make this Water logging solution
In the given image you can see how i manage the geared and placement of the motors. i used the acrylic which is directly attch to the linear gear at the both end. which can do the up and down movement. these linear gear convert the rotational motion of motor into the linear motion of that acrylic sheet. we used two acrylic sheet with 4 small gear attach at the both ends.
all the four DC geared motor have circular gear in their shaft which connect to the linear gear and help to convert the motion. So, there we have attch some support which can hold the linear gear in upward location. Now we have to make the circuit diagram to make this project.
Water Logging Solution Circuit Diagram

| Arduino | Ultrasonic 1 | Ultrasonic 2 | Water sensor |
| VCC | VCC | VCC | |
| GND | GND | GND | GND |
| A0 | S | ||
| 7 | TRIG | Motor Deiver L298N | |
| 8 | ECHO | ||
| 11 | TRIG | ||
| 12 | ECHO | ||
| 2 | IN1 | ||
| 3 | IN2 | ||
| 4 | IN3 | ||
| 5 | IN4 |

here we have given the table also, now the next part is to upload the code. so, we have completed the code and given below.
Water Logging Solution Arduino Code
// Motor control pins
const int motorPin1 = 2;  // Motor 1 IN1
const int motorPin2 = 3;  // Motor 1 IN2
const int motorPin3 = 4;  // Motor 2 IN1
const int motorPin4 = 5;  // Motor 2 IN2
const int enablePin = 10; // Shared enable pin

// Analog input
const int analogInput = A0;
int previousState = 0; // 0: neutral, 1: clockwise, -1: anti-clockwise

// Ultrasonic Sensor 1 (for Motor 1)
const int trigPin1 = 7;
const int echoPin1 = 8;

// Ultrasonic Sensor 2 (for Motor 2)
const int trigPin2 = 11;
const int echoPin2 = 12;

// Distance threshold (in cm)
const int distanceThreshold = 15;

// Direction tracking for Motor 2
int motor2Direction = 1; // 1 = clockwise, -1 = anticlockwise
unsigned long lastToggleTime = 0;
const unsigned long toggleDelay = 1000; // 1 second cooldown

void setup() {
  pinMode(motorPin1, OUTPUT);
  pinMode(motorPin2, OUTPUT);
  pinMode(motorPin3, OUTPUT);
  pinMode(motorPin4, OUTPUT);
  pinMode(enablePin, OUTPUT);

  pinMode(trigPin1, OUTPUT);
  pinMode(echoPin1, INPUT);
  pinMode(trigPin2, OUTPUT);
  pinMode(echoPin2, INPUT);

  digitalWrite(motorPin1, LOW);
  digitalWrite(motorPin2, LOW);
  digitalWrite(motorPin3, LOW);
  digitalWrite(motorPin4, LOW);
  analogWrite(enablePin, 0);

  Serial.begin(9600);
}

void loop() {
  int sensorValue = analogRead(analogInput);
  Serial.print("Analog: ");
  Serial.println(sensorValue);

  long distance1 = getDistance(trigPin1, echoPin1);
  long distance2 = getDistance(trigPin2, echoPin2);

  // Check analog input logic
  if (sensorValue > 200 && previousState != 1) {
    rotateMotor(1);  // Clockwise
    previousState = 1;
  } else if (sensorValue < 100 && previousState != -1) {
    rotateMotor(-1); // Anticlockwise
    previousState = -1;
  }

  // Check ultrasonic 1 for Motor 1 in Water logging solution
  if (distance1 > 0 && distance1 < distanceThreshold) {
    Serial.println("Obstacle detected by Sensor 1 → Motor 1 anticlockwise");
    rotateSingleMotor(motorPin1, motorPin2, -1);
  }

  // Check ultrasonic 2 for Motor 2 and toggle direction
  if (distance2 > 0 && distance2 < distanceThreshold) {
    unsigned long currentTime = millis();
    if (currentTime - lastToggleTime > toggleDelay) {
      motor2Direction *= -1; // Toggle direction
      Serial.print("Obstacle Sensor 2 → Motor 2 changing direction to: ");
      Serial.println(motor2Direction == 1 ? "Clockwise" : "Anticlockwise");
      rotateSingleMotor(motorPin3, motorPin4, motor2Direction);
      lastToggleTime = currentTime;
    }
  }

  delay(100);
}

void rotateMotor(int direction) {
  if (direction == 1) {
    // Clockwise
    digitalWrite(motorPin1, HIGH);
    digitalWrite(motorPin2, LOW);
    digitalWrite(motorPin3, LOW);
    digitalWrite(motorPin4, HIGH);
  } else if (direction == -1) {
    // Anticlockwise
    digitalWrite(motorPin1, LOW);
    digitalWrite(motorPin2, HIGH);
    digitalWrite(motorPin3, HIGH);
    digitalWrite(motorPin4, LOW);
  }

  analogWrite(enablePin, 200);
  delay(500);
  stopMotors();
}

void rotateSingleMotor(int in1, int in2, int direction) {
  if (direction == 1) {
    digitalWrite(in1, HIGH);
    digitalWrite(in2, LOW);
  } else {
    digitalWrite(in1, LOW);
    digitalWrite(in2, HIGH);
  }

  analogWrite(enablePin, 200);
  delay(500);
  digitalWrite(in1, LOW);
  digitalWrite(in2, LOW);
  analogWrite(enablePin, 0);
}

void stopMotors() {
  digitalWrite(motorPin1, LOW);
  digitalWrite(motorPin2, LOW);
  digitalWrite(motorPin3, LOW);
  digitalWrite(motorPin4, LOW);
  analogWrite(enablePin, 0);
}

long getDistance(int trigPin, int echoPin) {
  digitalWrite(trigPin, LOW);
  delayMicroseconds(2);
  digitalWrite(trigPin, HIGH);
  delayMicroseconds(10);
  digitalWrite(trigPin, LOW);

  long duration = pulseIn(echoPin, HIGH, 30000); // Timeout after 30ms
  long distance = duration * 0.034 / 2;
  return distance;
}
So, Here the code given and upoad this code into your arduino with the help of Arduno Ide. if you have any problem in uploading the code into arduino then you can see our article on it. still if you have any problem or doubt then you can ask us in the comment section.
For this project I uses the Services from JLCMC which provide a huge variety of Solenoid, Bolt, drill Buzzer, Acutators, Bearing and Gears. They are having all kind of parts which can help in your all types of mechatronic and mechanial projects. I recomded you to Visit their website and explore the project. you may find your Requirement there.

JLCMC rpoviding the $70 coupon to the new resistration. so go and sign up there and get the $70 USD coupon. JLCMC.COM
You are controlling two DC motors using an L298N motor driver, based on:
- Analog input on A0 (e.g., a sensor or potentiometer).
- Two ultrasonic sensors – each one controls a specific motor.
- Sensor 1 → Motor 1 (always rotates anticlockwise if something comes close).
- Sensor 2 → Motor 2 (alternates direction each time something comes close).
const int motorPin1 = 2;  // Motor 1 IN1
const int motorPin2 = 3;  // Motor 1 IN2
const int motorPin3 = 4;  // Motor 2 IN1
const int motorPin4 = 5;  // Motor 2 IN2
const int enablePin = 10; // Enables both motors (can use PWM)
These are the pins that connect to the L298N inputs.
cppCopyEditconst int analogInput = A0;
This pin reads an analog signal to decide motor rotation direction.
// Ultrasonic sensor pins
const int trigPin1 = 7, echoPin1 = 8;
const int trigPin2 = 11, echoPin2 = 12;
These pins are connected to two ultrasonic sensors.
int previousState = 0; // Tracks last analog direction (0, 1, -1)
int motor2Direction = 1; // Current direction of Motor 2
unsigned long lastToggleTime = 0; // To prevent fast toggles
const unsigned long toggleDelay = 1000; // 1-second delay
These help manage motor logic:
previousState: Prevents repeating the same rotation unnecessarily.motor2Direction: Stores which way Motor 2 should spin next.lastToggleTime: Prevents Sensor 2 from triggering too often.
void setup() {
  // Set all motor and sensor pins as input/output
  pinMode(...)
  // Initialize all motors as OFF
  digitalWrite(... LOW);
  analogWrite(enablePin, 0); // Stop motor

  Serial.begin(9600); // Enables debugging messages
}
1. Read Analog Input
cppCopyEditint sensorValue = analogRead(analogInput);
If the value is:
- > 200 → rotate both motors clockwise
- < 100 → rotate both motors anticlockwise
- In between → do nothing
It uses rotateMotor(direction) to spin both motors.
2. Ultrasonic Sensor 1
cppCopyEditif (distance1 < threshold) {
  rotateSingleMotor(motorPin1, motorPin2, -1);
}
If an object is close to Sensor 1, rotate Motor 1 anticlockwise.
3. Ultrasonic Sensor 2
cppCopyEditif (distance2 < threshold && enough time passed) {
  motor2Direction *= -1;
  rotateSingleMotor(motorPin3, motorPin4, motor2Direction);
}
If an object is close to Sensor 2:
- It toggles the direction of Motor 2 each time it’s triggered.
- The
motor2Directionflips between1and-1.
Controls both motors:
direction == 1→ clockwisedirection == -1→ anticlockwise- Then stops motors after 0.5 seconds
rotateSingleMotor(int in1, int in2, int direction)
Controls just one motor:
- Takes two input pins and rotates in the
direction(1 or -1). - Stops the motor after 0.5 seconds.
Simply sets all pins LOW and stops both motors.
This function sends a pulse from the ultrasonic sensor and:
- Measures how long it takes for the echo to return.
- Converts that time into distance in cm.
Great Learning