
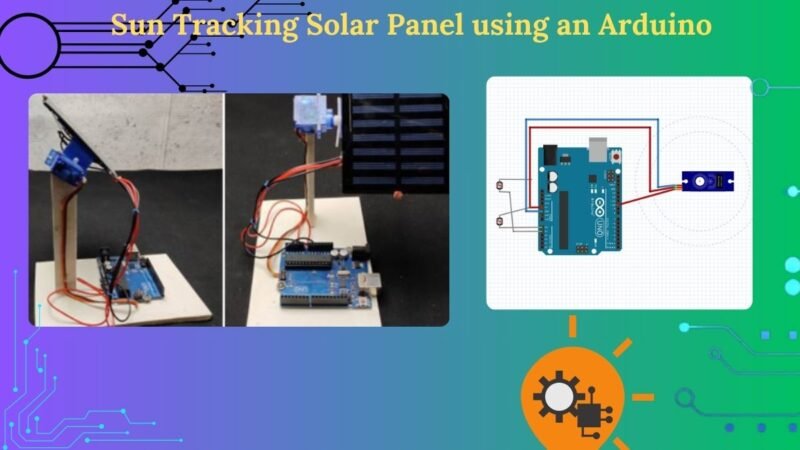
An energy source that is obtained from nature without harming the environment is called renewable energy. Solar energy is one of the most well-known forms of renewable energy. The solar panels gather solar radiation from the sun and transform it into electrical energy. The amount of sunlight that strikes the solar panel determines how much electrical energy is produced. Project – Sun Tracking Solar Panel
Solar panels are typically stationary, which means that they don’t always collect all of the sun’s energy as it sets. To get the most power out of the solar panel, it should always be facing the sun. Constructing a sun tracking system to optimize the solar panels’ power output is the aim of this project.
The solar panels generate the most electricity when the incoming light is perpendicular to them. A solar tracker rotates the panel along one or both axes (height and azimuth) to maintain it facing directly toward the sun. This can add up to 25% more energy when compared to a fixed panel. Trackers are also required in order for collectors to focus or concentrate, which are useless unless exactly aligned with the sun.
A focusing collector could be used to rotate the lens or reflector around the focal point. Since the rotating axis of this particular design is pointed in the direction of the North Star, it is known as an equatorial mount. This design will make one full rotation of the sun, from east to west.
Table of Contents
How does a Solar Tracker Works?
I’m sure you’re wondering how it operates. As was previously mentioned, for optimal power harvesting, the solar panel needs to be facing the sun. Therefore, our system consists of two steps: a) detecting the sun’s position and b) following it.
We compare the light intensity falling on each LDR after measuring the light intensity with an Arduino. The LDRs are arranged around the edges of the solar panel, as seen in the figure below. Depending on the light intensity that the LDR detects, we send a signal to the servo motor to start it moving. When the light intensity on the right LDR is higher, the panel tilts slowly toward the left; conversely, when the light intensity is higher on the left, the panel tilts slowly toward the right.
Picture a beautiful winter morning when the sun rises in the east, bringing with it a greater intensity of light than it does in the west. The panel turns to face east as a result. The panel will face west because it will track the sun throughout the day and become more intense in the evening after moving to the west.
Components Required for sun tracking solar panel
- 1 x Arduino Uno
- 1 x Servo motor
- 1 x Solar panel
- 2 x LDR
- 2 x 10k Resistor
- Jumper wires
- 1 x MDF board
| Arduino Uno | BUY LINK |
| Servo motor | BUY LINK |
| Solar panel | BUY LINK |
| LDR SENSOR | BUY LINK |
| 10k Resistor | BUY LINK |
| Jumper wires | BUY LINK |
| MDF board |
Arduino Uno
An ATmega328P-based microcontroller board is the Arduino UNO. It features a 16 MHz ceramic resonator, 6 analog inputs, 14 digital input/output pins (six of which can be used as PWM outputs), a USB port, a power jack, an ICSP header, and a reset button.
It comes with everything needed to support the microcontroller; all you need to do is power it with a battery or an AC-to-DC adapter or connect it to a computer via a USB cable to get going. You can experiment with your UNO without too much fear of making a mistake; in the worst case, you can replace the chip and restart for a few bucks. Click here for more Arduino Projects.
LDR (Light Dependent Resistor)
An LDR (light dependent resistor), as its name implies, is a special kind of resistor that functions according to the photoconductivity principle, which states that resistance changes with light intensity. Light resistance decreases with increasing intensity. It is widely used as a light meter, a light sensor, an automatic street light, and in other applications where light sensitivity is necessary. An LDR is also known as a light sensor.
Servo
Have you ever thought about how a robotic vehicle commonly used in military applications with bomb detention is controlled, or how precise motion is provided for milling, lathes, and bending in metal fabrication? Servo motor applications most commonly use closed loop systems, which are widely used in commercial and industrial applications requiring precise position control. Servo motor applications most commonly use closed loop systems, which are widely used in commercial and industrial applications requiring precise position control.
The solar panel is rotated by a servo motor. We chose to use a servo motor because it allows us to precisely control the position of our solar panels and covers the entire path of the sun. A servo motor that runs on five volts is what we have here.
Circuit Diagram of Sun Tracking Solar Panel

Code for Sun Tracking Solar Panel
#include <Servo.h>

Servo servo ;

int eastLDR = 0;

int westLDR = 1;

int east = 0;

int west = 0;

int error = 0;

int calibration = 600;

int servoposition = 90;

void setup()

{

  servo.attach(9);

}

void loop()

{

  east = calibration + analogRead(eastLDR);

  west = analogRead(westLDR);

  if (east < 350 && west < 350)

  {

    while (servoposition <= 150)

    {

      servoposition++;

      servo.write(servoposition);

      delay(100);

    }

  }

  error = east - west;

  if (error > 15)

  {

    if (servoposition <= 150)

    {

      servoposition++;

      servo.write(servoposition);

    }

  }

  else if (error < -15)

  {

    if (servoposition > 20)

    {

      servoposition--;

      servo.write(servoposition);

    }

  }

  delay(100);

}
I hope this sun tracking solar panel project was enjoyable for you. It is widely used in both individual solar harnessing setups and solar farms due to its numerous practical applications. By swapping out the 5V servo motor for a high torque servo motor, connecting it via a relay, and powering the servo externally, you can expand the project’s scope.