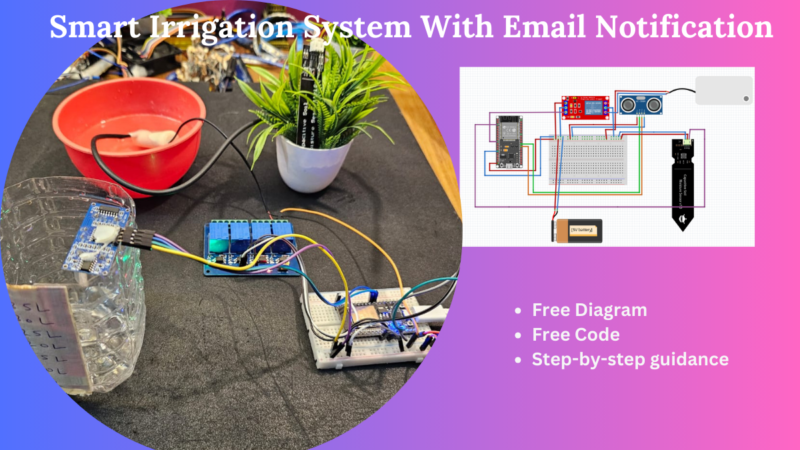
Hello everyone, welcome back to Techatronic. Many people love plants and flowers, many must have small plants in their houses and they also need care for being healthy. In this busy lifestyle we couldn’t get time to water them on right time and due to lack of water eventually they die. We need smart irrigation system with email facility.
Today we are going to learn about how can you make an automatic smart irrigation system with email at your home for your plants. And with this small project you gonna learn many things and use some new modules and learn some new concepts. So, stay tuned.

Table of Contents
Introduction
In this smart Irrigation System with email with ESP32 we are going to use ESP32, A pump, A relay, An ultrasonic sensor and a Moisture Sensor v1.2. We gonna explain every component in detail and their working. The program which we gonna write would behave like, as the moisture of the soil went down from a particular threshold, the ESP32 gonna detect that and turn on the water pump for a couple of seconds.
To water our favorite plants we also need a water storage container. The special thing about this project is we gonna write a program which will send you an Email when recognizes the water level has went down from a certain point. Isn’t it the cool feature?
Components Required
| ESP32 | BUY LINK |
| Breadboard | BUY LINK |
| 5v relay | BUY LINK |
| Ultrasonic sensor | BUY LINK |
| Moisture Sensor | BUY LINK |
| Water pump | BUY LINK |
ESP32
In the field of IOT, ESP32 is superman. Because of its high functionality at cheap price, low power consumption and small size it became the go to choice of almost every IOT enthusiast and hobbyist. It can do any kind of IOT task while being at any corner of the face of the earth. ESP32 is also used in industrial and home automation processes.
ESP32 is a only chip which provides Wi-Fi and Bluetooth connectivity in the same hood. ESP32 has a 240MHz of clock rate and because of that ESP32 is capable of doing high speed processing. ESP32 also supports mostly used communication protocols UART, I2C, SPI.
Every kind of sensor can work with it seamlessly because to its high compatibility and communication protocols. ESP32 can do parallel processing because it has two core which makes it very fast and with the peak clock speed of 240MHz it becomes a beast in the budget segment of microcontrollers.
It supports TCP/IP, HTTP, MQTT, HTTPS etc. You can operate your web servers smoothly and can communicate with them securely. ESP32 can be programmer easily with the Arduino IDE which makes it very easy to use and operate.
In Smart Irrigation System with email, ESP32 is a must, there is not better microcontroller better than this for our requirement.
5V RELAY
A relay is actually a mechanical switch which functions on the electromagnetic property. Relays were developed to work on high voltages. DC voltage pass through the coil and that makes relay to behave like a switch.
The purpose of using a relay is that you can pass a low current in the relay to complete the flow of high current circuits. The input voltage of relays are 0.5V to 5V.

This relay module would take signal from Arduino at 5V and could work as a switch at 240V.
The pin configuration-:
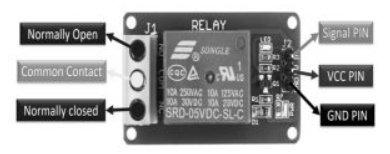
- Normally Open(NO):- This pin is normally open and could only complete the circuit when we give signal through the Arduino. When we pass signal to it through the Arduino the common link breaks form the NO and get attached to the NO.
- Common Contact:- This pin connects to the load which we use want to switch using relay.
- Normally Closed(NC):- This is the default behavior of the relay, the common and NC are connected internally. If we pass any low signal from the Arduino then only it breaks.
- Signal PIN:- This signal pin is used to control the relay. This pin provide only two cases pin LOW or pin HIGH.
- VCC PIN:- This relay works on 5V input voltage.
- GND PIN:- Connect this pin to the GND terminal of the power supply.
Ultrasonic Sensor
Ultrasonic Sensor, you may have heard of it before and maybe you have seen it in obstacle avoidance robots. This is the one of the best distance measuring tool with a precision of 300cm or 3m. This is the sensor which is also used in cars for parking purposes.
- Operating Voltage:- 5V DC
- Operating Current:- 15mA
- Min Range:- 2cm
- Max Range:- 300cm
- Measuring Angle:- <15 degrees
Ultrasonic sensor has 4 pinouts VCC, GND, Trig and Echo. Trig and Echo pins connects to the Arduino pins. Trig pin transmits the ultrasound waves and Echo pin listens the reflected ultrasound signals.
Moisture Sensor v1.2
The soil moisture sensor is used to monitor the moisture of the soil. The health of plants is really dependent on the moisture of the soil. Moisture Sensor v1.2 is majorly used in agriculture and plants related operations.
The Moisture Sensor v1.2 recognizes the changes in moisture through the changes in capacitance of the sensor due to disturbance in electron flow of the soil. This sensor generates a voltage between 1.2V to 3V proportional to the capacitance of the sensor and we can get that voltage difference via analog pin from the Arduino and can measure the change in capacitance.
This sensor operates on 3.2V to 5V. The Moisture Sensor v1.2 is made of corrosion-resistant material and can be left in the soil for days without damaging the sensor.
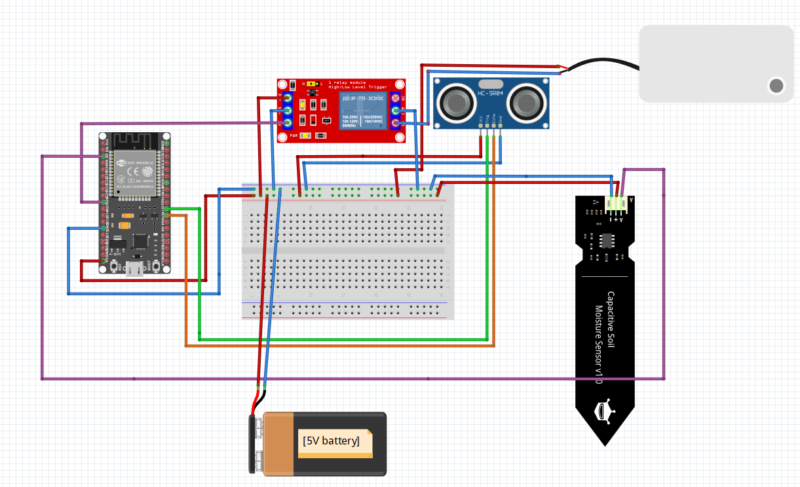
Circuit Diagram of Smart Irrigation System With Email Notification

Code for Smart Irrigation System with email
Lets make smart irrigation system with email. Before writing code download some libraries to run your code from Arduino. The libraries are WiFi.h and Arduino.h.
Go in Sketch > Include Libraries > Manage Libraries > search in search bar WiFi, arduino.h.


Now, set your board to work with Arduino:-
go to Tools > Board and Install these in your Arduino environment.

#include <Arduino.h>
#if defined(ESP32)
#include <WiFi.h>
#elif defined(ESP8266)
#include <ESP8266WiFi.h>
#endif
#include <ESP_Mail_Client.h>

#define WIFI_SSID "Your_WiFi_Name"
#define WIFI_PASSWORD "your_password"

int echo = 16;
int trig = 17;
long duration;
int distance = 0;
int moisture = A0;
int soilMoistureValue = 0;
int RelayPin = 26;

/** The smtp host name e.g. smtp.gmail.com for GMail or smtp.office365.com for Outlook or smtp.mail.yahoo.com */
#define SMTP_HOST "smtp.gmail.com"
#define SMTP_PORT 465

/* The sign in credentials */
#define AUTHOR_EMAIL "exampleEmail@gmail.com"      /*sender Email*/
#define AUTHOR_PASSWORD "ufob xljx yhoz jgxo"          /*your password which was created
                                                                                                     in google account*/

/* Recipient's email*/
#define RECIPIENT_EMAIL "examplereceiver@gmail.com"     /*receiver email*/

/* Declare the global used SMTPSession object for SMTP transport */
SMTPSession smtp;

/* Callback function to get the Email sending status */
void smtpCallback(SMTP_Status status);

void setup() {
  pinMode(trig, OUTPUT);
  pinMode(echo, INPUT);
  pinMode(RelayPin, OUTPUT);
  pinMode(moisture, INPUT);
  Serial.begin(115200);

  Serial.println();
  WiFi.begin(WIFI_SSID, WIFI_PASSWORD);
  Serial.print("Connecting to Wi-Fi");
  while (WiFi.status() != WL_CONNECTED) {
    Serial.print(".");
    delay(300);
  }
  Serial.println();
  Serial.print("Connected with IP: ");
  Serial.println(WiFi.localIP());
  Serial.println();

}

void loop() {
  digitalWrite(RelayPin, HIGH);
  digitalWrite(trig, LOW);
  delayMicroseconds(2);
  digitalWrite(trig, HIGH);
  delayMicroseconds(10);
  digitalWrite(trig, LOW);

  duration = pulseIn(echo, HIGH);
  distance = duration * 0.034 / 2;

  if (distance > 10) {
    MailClient.networkReconnect(true);
    smtp.debug(1);

    /* Set the callback function to get the sending results */
    smtp.callback(smtpCallback);

    /* Declare the Session_Config for user defined session credentials */
    Session_Config config;

    /* Set the session config */
    config.server.host_name = SMTP_HOST;
    config.server.port = SMTP_PORT;
    config.login.email = AUTHOR_EMAIL;
    config.login.password = AUTHOR_PASSWORD;
    config.login.user_domain = "";


    config.time.ntp_server = F("pool.ntp.org,time.nist.gov");
    config.time.gmt_offset = 3;
    config.time.day_light_offset = 0;

    /* Declare the message class */
    SMTP_Message message;

    /* Set the message headers */
    message.sender.name = F("ESP");
    message.sender.email = "exampleEmail@gmail.com";     /*sender Email*/
    message.subject = F("Home Automation Irrigation");
    message.addRecipient(F("receiver name"), RECIPIENT_EMAIL);


    //Send raw text message
    String textMsg = "Your Water Tank is Empty";
    message.text.content = textMsg.c_str();
    message.text.charSet = "us-ascii";
    message.text.transfer_encoding = Content_Transfer_Encoding::enc_7bit;

    message.priority = esp_mail_smtp_priority::esp_mail_smtp_priority_low;
    message.response.notify = esp_mail_smtp_notify_success | esp_mail_smtp_notify_failure | esp_mail_smtp_notify_delay;


    /* Connect to the server */
    if (!smtp.connect(&config)) {
      ESP_MAIL_PRINTF("Connection error, Status Code: %d, Error Code: %d, Reason: %s", smtp.statusCode(), smtp.errorCode(), smtp.errorReason().c_str());
      return;
    }

    if (!smtp.isLoggedIn()) {
      Serial.println("\nNot yet logged in.");
    }
    else {
      if (smtp.isAuthenticated())
        Serial.println("\nSuccessfully logged in.");
      else
        Serial.println("\nConnected with no Auth.");
    }

    /* Start sending Email and close the session */
    if (!MailClient.sendMail(&smtp, &message))
      ESP_MAIL_PRINTF("Error, Status Code: %d, Error Code: %d, Reason: %s", smtp.statusCode(), smtp.errorCode(), smtp.errorReason().c_str());

  } else {
    soilMoistureValue = analogRead(moisture);
    Serial.println(soilMoistureValue);
    if (soilMoistureValue >= 2400) {
      digitalWrite(RelayPin, LOW);
      delay(3000);
    }
    else {
      digitalWrite(RelayPin, HIGH);
      delay(2000);
    }
  }
}


/* Callback function to get the Email sending status */
void smtpCallback(SMTP_Status status) {
  /* Print the current status */
  Serial.println(status.info());

  /* Print the sending result */
  if (status.success()) {
    // ESP_MAIL_PRINTF used in the examples is for format printing via debug Serial port
    // that works for all supported Arduino platform SDKs e.g. AVR, SAMD, ESP32 and ESP8266.
    // In ESP8266 and ESP32, you can use Serial.printf directly.

    Serial.println("----------------");
    ESP_MAIL_PRINTF("Message sent success: %d\n", status.completedCount());
    ESP_MAIL_PRINTF("Message sent failed: %d\n", status.failedCount());
    Serial.println("----------------\n");

    for (size_t i = 0; i < smtp.sendingResult.size(); i++)
    {
      /* Get the result item */
      SMTP_Result result = smtp.sendingResult.getItem(i);

      // In case, ESP32, ESP8266 and SAMD device, the timestamp get from result.timestamp should be valid if
      // your device time was synched with NTP server.
      // Other devices may show invalid timestamp as the device time was not set i.e. it will show Jan 1, 1970.
      // You can call smtp.setSystemTime(xxx) to set device time manually. Where xxx is timestamp (seconds since Jan 1, 1970)

      ESP_MAIL_PRINTF("Message No: %d\n", i + 1);
      ESP_MAIL_PRINTF("Status: %s\n", result.completed ? "success" : "failed");
      ESP_MAIL_PRINTF("Date/Time: %s\n", MailClient.Time.getDateTimeString(result.timestamp, "%B %d, %Y %H:%M:%S").c_str());
      ESP_MAIL_PRINTF("Recipient: %s\n", result.recipients.c_str());
      ESP_MAIL_PRINTF("Subject: %s\n", result.subject.c_str());
    }
    Serial.println("----------------\n");

    // You need to clear sending result as the memory usage will grow up.
    smtp.sendingResult.clear();
  }


}
Output
When ESP32 reading Moisture Sensor value and relay is active in this stage.

When ESP32 reading value from ultrasonic sensor and sending the warning message via Email.

FAQ(Frequently Asked Question)
Q1.) Why I’m not receiving my Email?
Ans.  #define AUTHOR_EMAIL "senderemail@gmail.com"
        #define AUTHOR_PASSWORD "vyma wsqp jisy hxjq"   /*put your password here*/

       #define RECIPIENT_EMAIL "receiverEmail@gmail.com"
Make you sure you have provided the correct Email in AUTHOR_EMAIL, then only ESP32 can send you Email and also check you have provided the AUTHOR_PASSWORD correct which you got in google Account.
Make sure you provide the correct RECIPIEN_EMAIL, it is the receiver email.
Q2.) Why am i not getting output on serial monitor?
Ans. set the Serial.begin(115200) and open the serial monitor and set the baud rate to 115200.
Q3.) Ultrasonic sensor giving wrong measurements.
Ans. In this project we have assumed the height of the water container is 12 inches and when the water level is just 4 cm then the ultrasonic sensor gives the warning. If you have a different size of container then modify the code according to your requirement.
Q4.) Why do we need smart irrigation system with email?
Ans. We need smart irrigation system with email to take care of our plant in our absence.
Q5.) How to create my google account password?
Ans. search on google Google Accounts > click on security on the left side > click on 2-step verification > Click on 2-ste verification > Add your number > come back to homer page then do the following steps show in below images
Search app passwords in search bar and click the first show as shown below.

Then give a name to it.

Then after clicking create button you’ll see a password and not it down, because its gonna be crucial and then click done. You are done to go.
