Hey guys, welcome to TechaTronic. Before moving forward in this “Prevention Of Railway Accidents” project lets first discuss about the history of railways. Railways are very common and one of the most used mode of transportation.
It is the oldest and fastest mode of transport on the face of the Earth. The development of railways were started between 1750 to 1840 for industrial use. Later on railways were open for public transport and only rich people could afford the railways.
Railway accidents are very common across the globe. It is estimated that on an average 40+ accidents happens every year in the world. Due to these unwanted accidents the railways looses millions of dollars and precious lives. On an average 900 people loose their lives in rail accidents.
Recently, a train has been crashed with the SUV on crossing point in Florida, the SUV driver didn’t look both ways before crossing the rail track and got hit by the train, 6 people died and 17 injured. Many times train collides with each other because of human errors, many dies and hundreds get injured.
Train accidents could happen due to some reasons like human error, equipment failure, defective tracks etc. Train head to head collision is one of the human error and in this project which we call “Prevention of Railway Accidents”, we are going to make a project which can reduce the human interactions with the machine, and machine can decide on itself when and in which condition should apply the breaks.
Humans need rest, sleep, food etc. and humans could be distracted from their works but machines does not need such of a things and machines could not get distracted from their assigned work. This is why we need such devices to operate in critical conditions.

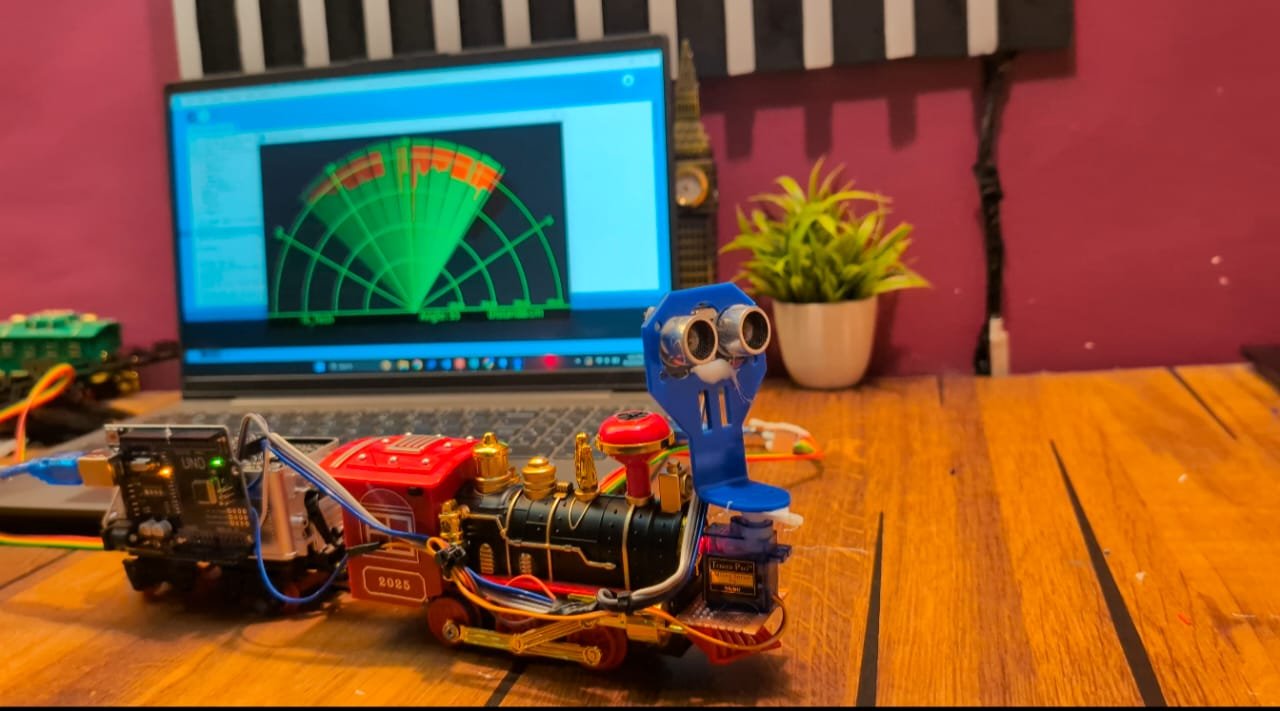
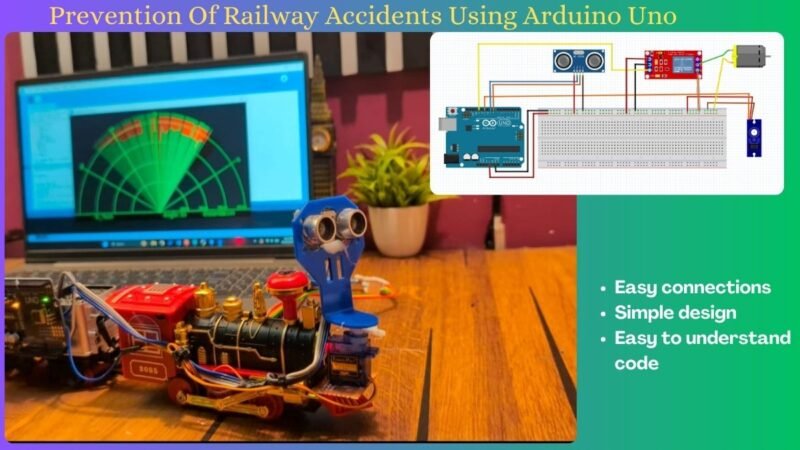
The idea behind “Prevention Of Railway Accidents” project is to prevent those type of accidents which happens due to collision. In this “Prevention Of Railway Accidents” project we are using ultrasonic sensor, servo motors, a 5V relay with Arduino Uno. The ultrasonic sensor would show the objects in front of it on the computer monitor. In short, it would work as a radar.
We will attach the servo motor and ultrasonic sensor together and put it on the engine. We will attach a relay with the main switch of the engine and when the ultrasonic sensor detects something in front of the train, then the Arduino Uno turn on the relay which will cut the power of the engine and eventually the train will come to rest in very short period of time.
In this “Prevention Of Railway Accidents” we are using a one more software adjacent to Arduino IDE and that is processing. Processing is the software on which we will map the output of the ultrasonic sensor and it will be shown as the radar. Don’t worry we will share the code with you too.
Components Required
| Arduino UNO | BUY LINK |
| Ultrasonic Sensor | BUY LINK |
| 5V Relay | BUY LINK |
| Servo Motor | BUY LINK |
| Jumper Wires | BUY LINK |
| Bread Board | BUY LINK |
Circuit Diagram of Prevention Of Railway Accidents

Code for Prevention Of Railway Accidents
Here is the code give below. But, before uploading the code make sure to download the Servo.h library from library manager. Otherwise, your code would not run. Click on sketch > click on include libraries > click manage libraries > now search servo.h, now download and include servo.h in the code.
#include <Servo.h>
const int trigPin = 9;
const int echoPin = 8;
const int relay = 13;
// defining time and distance
long duration;
int distance;
Servo myServo; // Object servo

void setup() {
  pinMode(trigPin, OUTPUT); // trigPin as an Output
  pinMode(echoPin, INPUT); // echoPin as an Input
   pinMode(relay, OUTPUT);
  Serial.begin(9600);
  myServo.attach(11); // Pin Connected To Servo
}
void loop() {
  // rotating servo i++ depicts increment of one degree
  for(int i=45;i<=135;i++){
  myServo.write(i);
  delay(10);
  distance = calculateDistance();
  digitalWrite(relay, LOW);

  if(distance < 15){
      digitalWrite(relay, HIGH);
      delay(2000);
    }

  Serial.print(i);
  Serial.print(",");
  Serial.print(distance);
  Serial.print(".");
  }
  // Repeats the previous lines from 165 to 15 degrees
  for(int i=135;i>45;i--){
  myServo.write(i);
  delay(10);
  distance = calculateDistance();
  Serial.print(i);
  Serial.print(",");
  Serial.print(distance);
  Serial.print(".");
  }
}
int calculateDistance(){

  digitalWrite(trigPin, LOW);
  delayMicroseconds(2);
  // Sets the trigPin on HIGH state for 10 micro seconds
  digitalWrite(trigPin, HIGH);
  delayMicroseconds(10);
  digitalWrite(trigPin, LOW);
  duration = pulseIn(echoPin, HIGH);
  distance= duration*0.034/2;
  return distance;
}
Code of Processing for Prevention Of Railway Accidents
At line number 19, there written “COM3”, change this COM3 with your own COM port where Arduino Uno is connected. Now run the code, it will run smoothly. Before clicking the run code in processing, make sure you had not left the serial port open, otherwise processing throw error.
Close the Arduino serial port and then click the Run button in the processing software. Now you will see the Radar window of ultrasonic sensor. Paste the given code as it is in your processing software and choose the write “COM” at line number 19.
import processing.serial.*; // imports library for serial communication
import java.awt.event.KeyEvent; // imports library for reading the data from the serial port
import java.io.IOException;
Serial myPort; // defines Object Serial
// defubes variables
String angle="";
String distance="";
String data="";
String noObject;
float pixsDistance;
int iAngle, iDistance;
int index1=0;
int index2=0;
PFont orcFont;
void setup() {

  size (1200, 700); // ***CHANGE THIS TO YOUR SCREEN RESOLUTION***
  smooth();
  myPort = new Serial(this, "COM3", 9600); // starts the serial communication
  myPort.bufferUntil('.'); // reads the data from the serial port up to the character '.'. So actually it reads this: angle,distance.
}
void draw() {

  fill(98, 245, 31);
  // simulating motion blur and slow fade of the moving line
  noStroke();
  fill(0, 4);
  rect(0, 0, width, height-height*0.065);

  fill(98, 245, 31); // green color
  // calls the functions for drawing the radar
  drawRadar();
  drawLine();
  drawObject();
  drawText();
}
void serialEvent (Serial myPort) { // starts reading data from the Serial Port
  // reads the data from the Serial Port up to the character '.' and puts it into the String variable "data".
  data = myPort.readStringUntil('.');
  data = data.substring(0, data.length()-1);

  index1 = data.indexOf(","); // find the character ',' and puts it into the variable "index1"
  angle= data.substring(0, index1); // read the data from position "0" to position of the variable index1 or thats the value of the angle the Arduino Board sent into the Serial Port
  distance= data.substring(index1+1, data.length()); // read the data from position "index1" to the end of the data pr thats the value of the distance

  // converts the String variables into Integer
  iAngle = int(angle);
  iDistance = int(distance);
}
void drawRadar() {
  pushMatrix();
  translate(width/2, height-height*0.074); // moves the starting coordinats to new location
  noFill();
  strokeWeight(2);
  stroke(98, 245, 31);
  // draws the arc lines
  arc(0, 0, (width-width*0.0625), (width-width*0.0625), PI, TWO_PI);
  arc(0, 0, (width-width*0.27), (width-width*0.27), PI, TWO_PI);
  arc(0, 0, (width-width*0.479), (width-width*0.479), PI, TWO_PI);
  arc(0, 0, (width-width*0.687), (width-width*0.687), PI, TWO_PI);
  // draws the angle lines
  line(-width/2, 0, width/2, 0);
  line(0, 0, (-width/2)*cos(radians(30)), (-width/2)*sin(radians(30)));
  line(0, 0, (-width/2)*cos(radians(60)), (-width/2)*sin(radians(60)));
  line(0, 0, (-width/2)*cos(radians(90)), (-width/2)*sin(radians(90)));
  line(0, 0, (-width/2)*cos(radians(120)), (-width/2)*sin(radians(120)));
  line(0, 0, (-width/2)*cos(radians(150)), (-width/2)*sin(radians(150)));
  line((-width/2)*cos(radians(30)), 0, width/2, 0);
  popMatrix();
}
void drawObject() {
  pushMatrix();
  translate(width/2, height-height*0.074); // moves the starting coordinats to new location
  strokeWeight(9);
  stroke(255, 10, 10); // red color
  pixsDistance = iDistance*((height-height*0.1666)*0.025); // covers the distance from the sensor from cm to pixels
  // limiting the range to 40 cms
  if (iDistance<40) {
    // draws the object according to the angle and the distance
    line(pixsDistance*cos(radians(iAngle)), -pixsDistance*sin(radians(iAngle)), (width-width*0.505)*cos(radians(iAngle)), -(width-width*0.505)*sin(radians(iAngle)));
  }
  popMatrix();
}
void drawLine() {
  pushMatrix();
  strokeWeight(9);
  stroke(30, 250, 60);
  translate(width/2, height-height*0.074); // moves the starting coordinats to new location
  line(0, 0, (height-height*0.12)*cos(radians(iAngle)), -(height-height*0.12)*sin(radians(iAngle))); // draws the line according to the angle
  popMatrix();
}
void drawText() { // draws the texts on the screen

  pushMatrix();
  if (iDistance>40) {
    noObject = "Out of Range";
  } else {
    noObject = "In Range";
  }
  fill(0, 0, 0);
  noStroke();
  rect(0, height-height*0.0648, width, height);
  fill(98, 245, 31);
  textSize(25);

  text("10cm", width-width*0.3854, height-height*0.0833);
  text("20cm", width-width*0.281, height-height*0.0833);
  text("30cm", width-width*0.177, height-height*0.0833);
  text("40cm", width-width*0.0729, height-height*0.0833);
  textSize(40);
  text("N_Tech ", width-width*0.875, height-height*0.0277);
  text("Angle: " + iAngle +" ", width-width*0.48, height-height*0.0277);
  text("Distance: ", width-width*0.26, height-height*0.0277);
  if (iDistance<40) {
    text("        " + iDistance +" cm", width-width*0.225, height-height*0.0277);
  }
  textSize(25);
  fill(98, 245, 60);
  translate((width-width*0.4994)+width/2*cos(radians(30)), (height-height*0.0907)-width/2*sin(radians(30)));
  rotate(-radians(-60));
  text("30", 0, 0);
  resetMatrix();
  translate((width-width*0.503)+width/2*cos(radians(60)), (height-height*0.0888)-width/2*sin(radians(60)));
  rotate(-radians(-30));
  text("60", 0, 0);
  resetMatrix();
  translate((width-width*0.507)+width/2*cos(radians(90)), (height-height*0.0833)-width/2*sin(radians(90)));
  rotate(radians(0));
  text("90", 0, 0);
  resetMatrix();
  translate(width-width*0.513+width/2*cos(radians(120)), (height-height*0.07129)-width/2*sin(radians(120)));
  rotate(radians(-30));
  text("120", 0, 0);
  resetMatrix();
  translate((width-width*0.5104)+width/2*cos(radians(150)), (height-height*0.0574)-width/2*sin(radians(150)));
  rotate(radians(-60));
  text("150", 0, 0);
  popMatrix();
}
FAQ(Frequently Asked Question) for Prevention Of Railway Accidents
Q1.) Why my code isn’t working?
Ans. Check your wiring, wiring might be loose. Make sure you have added the Servo.h library. If not then download it from library manager. click on sketch > include libraries > Manage library > then search in search bar servo library. Then download.
Q2.) Why that radar not showing on my screen?
Ans. In processing, at line no. 19 it is written “COM3”, now replace it with you own COM where you have plugged in your Arduino Uno. Then it will definitely work.
Q.3) My Motors are not working properly?
Ans. May be you have connected the relays wrong. Try to interchange the wires.
Q.4) Why Serial port is throwing errors?
Ans. If you have opened the serial port in Arduino then you can not open it again in processing software. You can open it only at one place at a time. Sometimes people forget to close the Arduino serial port that is why they get error in processing and radar window doesn’t open.
