
Introduction
In this section, introduce the project by explaining what an Arduino Bluetooth Controlled Car is. Highlight that it’s a smart car built using an Arduino microcontroller and controlled wirelessly via Bluetooth from a smartphone. Mention the popularity of DIY tech and robotics among beginners and enthusiasts. Emphasize that by following this tutorial, readers will be able to create their very own Bluetooth Controlled Car at home using affordable components.

We have made one same project before too but this time we have added some more feature. like horn and led bulb which can also control by the mobile app. We are going to share all the detail like code, circuit and application. if you wanna learn we are sharing all the detail here.
What You’ll Need
List all the necessary hardware and tools needed to build the Bluetooth Controlled Car. Include detailed descriptions of each component to help beginners understand their purpose.
Required Components Bluetooth Controlled Car
- Arduino Uno or Nano (acts as the brain of the car)
- HC-05 or HC-06 Bluetooth Module (enables wireless communication).
- L298N Motor Driver Module (controls the motors)
- 4 DC motors with wheels
- Car chassis (the frame of the car)
- Power supply (12v lipo battery)
- Jumper wires and breadboard (for connections)
HC-05 Bluetooth Module
We are using here the bluetooth module HC-05 here and this module enable the facility to control the car with the wireless communication. It is easy to connect the bluetooth module with the Arduino. In this project the hC-05 is work as the receiver which paired with the mobile phone bluetooth. and receive the data at RC car.
L298N Motor Driver Module
L298N motor driver is widely used motor driver among all the motor driver. It can work upto 24v motors. it does have the pwm control which can control the motor speed too. and also it will not damage from the back emf generated by the motors
4 DC Motors with Wheels
We are using here the 4 DC geared motor which offer the ediquate amount of torque that help the motor to drive RC car. we are using 4 bo motor and 4 wheels which are very easy to use. these motor can run upto 12v which are getting from the l298N module.
Car Chassis
This the the metal sheet chasis which are bented for the wheel attachment. this chasis is very reliable and strong and easy to use. also non breakable.
Power Supply 12V LiPo Battery
We are using here the 12v Lipo battery here which is rechargeable too. it can run all the device our Bluetooth control RC car. t
Mention where to buy these components and tips for choosing compatible parts.
- Arduino UNO –BUY LINK
- Arduino UNO cable –BUY LINK
- Bluetooth Module HC-05 –BUY LINK
- Jumper Wires –BUY LINK
- Chassis –BUY LINK
- L298N Motor Driver –BUY LINK
- 12V Battery –BUY LINK
- Wheel –BUY LINK
- BO motor –BUY LINK
- you can buy full components kit for this projects
Bluetooth Controlled Car Circuit
This part walks through how to assemble the Arduino Bluetooth Controlled Car step by step. Include a wiring diagram showing how the motors connect to the L298N motor driver, and how both the motor driver and Bluetooth module connect to the Arduino.

Provide detailed, numbered instructions with helpful tips to ensure proper connections. Discuss the importance of proper power supply and wire management.
Connection Table
| Arduino UNO | L298N Motor Driver | |
| 12 Pin | IN 1 | |
| 11 Pin | IN 2 | |
| 10 Pin | IN 3 | |
| 9 Pin | IN 4 | |
| Arduino UNO | HC-05 Bluetooth | |
| ( +5V ) | VCC | |
| GND | GND ( | |
| TX Pin | RX Pin | |
| RX Pin | TX Pin | |
| Arduino UNO | 9 V Battery | L298N Motor Driver |
| ( +5V ) | +5 Volt | |
| 9 Volt | +12 Volt | |
| GND | GND | GND |
| Motor 1, 2 | Motor 3, 4 | L298N Motor Driver |
| Terminal 1 | Out 1 | |
| Terminal 2 | Out 2 | |
| Terminal 1 | Out 3 | |
| Terminal 2 | Out 4 |
Section 3: Programming the Arduino
Guide readers through uploading the Arduino code that will allow the car to respond to Bluetooth commands. Provide clean, beginner-friendly code with comments explaining each part — particularly how the Arduino reads signals from the Bluetooth module and activates the motors.
Include a download link or GitHub repository for the full code. Mention the use of the Arduino IDE and how to connect the board via USB for uploading.
I have assembled the whole circuit on a breadboard. As you know breadboard assembly is not effective for this type of project. So, PCBWay offers Rapid PCB Prototyping for Your Research Work. I personally, recommend PCBWay because you can get your first-try boards right in 24 hours!
The prototyping stage is the most critical period of time for engineers, students, and hobbyists. PCBWay not only makes your boards quick but also makes your job right as well as cost-effective. This greatly reduces your cost and shortens the time for developing your electronic
PCBWay can provide 2 Layer PCBs to highly advanced HDI and flex boards. Even though the PCBs they produce differ a lot regarding functionality and areas of use. I am impressed with the quality of the boards, the delivery time, and the cost-effectiveness
Bluetooth Controlled Car Code
//Techatronic.com
char m=0;
void setup()
{
pinMode(9, OUTPUT);
pinMode(10, OUTPUT);
pinMode(11, OUTPUT);
pinMode(12, OUTPUT);
pinMode(5, OUTPUT);
pinMode(6, OUTPUT);
pinMode(7, OUTPUT);
Serial.begin(9600);
}
void loop()
{
if (Serial.available()>0)
{
m=Serial.read();
Serial.println(m);
}
if (m=='R')
{digitalWrite(5, HIGH);
digitalWrite(9, HIGH);
digitalWrite(10, LOW);
digitalWrite(11, HIGH);
digitalWrite(12, LOW);
}
else if (m=='L')
{
digitalWrite(5, HIGH);
digitalWrite(9, LOW);
digitalWrite(10, HIGH);
digitalWrite(11, LOW);
digitalWrite(12, HIGH);
}
else if (m=='F')
{
digitalWrite(6, HIGH);
digitalWrite(7, HIGH);
digitalWrite(9, HIGH);
digitalWrite(10, LOW);
digitalWrite(11, LOW);
digitalWrite(12, HIGH);
}
else if (m=='B')
{
digitalWrite(6, HIGH);
digitalWrite(7, HIGH);
digitalWrite(9, LOW);
digitalWrite(10, HIGH);
digitalWrite(11, HIGH);
digitalWrite(12, LOW);
}
else if (m=='S')
{
digitalWrite(5, LOW);
digitalWrite(6, LOW);
digitalWrite(7, LOW);
digitalWrite(9, LOW);
digitalWrite(10, LOW);
digitalWrite(11, LOW);
digitalWrite(12, LOW);
}
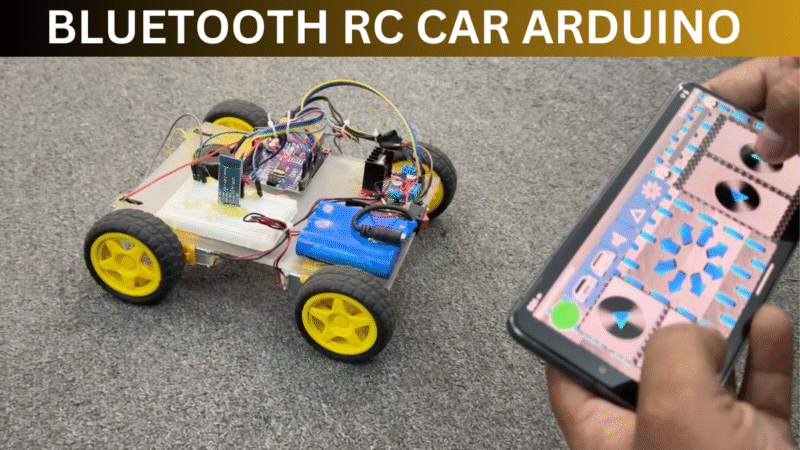
}How to use Application
- Download the application BT Controller apk file
- Intstall the software into your mobile phone
- Go to the bluetooth setting and pair new device
- select HC-05 and enter the password 1234
- Now open the application and click on the setting icon
- connect car to hc-05
- Now you can use the application
Section 4: Creating the Smartphone Control App
Show readers how to control the Bluetooth Controlled Car using a smartphone. Recommend free apps from the Play Store like:
- Bluetooth Terminal
- Arduino Bluetooth Controller
- MIT App Inventor (for custom apps)
Provide screenshots or examples of how to pair the phone with the HC-05 module (default PIN: 1234 or 0000), and demonstrate which commands to send (e.g., “F” for forward, “B” for backward).
Section 5: Testing and Troubleshooting
Explain how to test the finished Arduino Bluetooth Controlled Car. Break down each function to verify (e.g., does the car move forward when you press “F”?). Provide a checklist of common issues like:
- Motors not turning
- Bluetooth not pairing
- Wrong power connections
- Incorrect command recognition
Offer simple troubleshooting tips for each problem.
Section 6: Upgrades and Customization Ideas
Encourage readers to improve their Bluetooth Controlled Car project. Some ideas include:
- Adding obstacle detection with ultrasonic sensors (HC-SR04)
- Making a custom app with a joystick layout
- Integrating voice control or gesture recognition
- Using rechargeable Li-ion batteries with a charging module
This helps the blog stay relevant to both beginners and advanced users.
Conclusion
Summarize what was accomplished: building a functional Arduino Bluetooth Controlled Car from scratch. Reinforce that this is a beginner-friendly yet rewarding DIY project. Encourage readers to share their builds, post questions in the comments, and subscribe or follow for more tutorials