

Hey guys, welcome back to Techatronic. Today we are going to make an interesting and unique project which you might have never seen before. The name of this project is “Display Image On OLED With Arduino Mega”. We are going to use a little bit of deep concepts but it is very easy to make this project.
You may have used OLED display on multiple occasions but manly you have used it to display some text, to print some data on it coming from a sensor via Arduino or ESP32. This time we are going to print an image on this OLED. Yes, you have heard right. We are going to print the image of the Star Trek Hero “Yoda” on OLED display.
The microcontroller we are using to display image on OLED. for this project is Arduino Mega. Arduino Mega is very suitable for this project. And you will learn how to operate on Arduino Mega. Arduino Mega is the one of the best microcontroller to work upon.
Table of Contents
Arduino Mega
Electronics is the one of the fastest growing industry and more and more people are attracting towards it as a hobbyist, electronics give you free hand to imagine and create whatever you want. We can see on social medias the people are getting crazy on creating new and unique stuff, people are coming up with great new ideas, innovations and new projects.
The open source platforms like Arduino are supporting people with their unique and creative innovations. Arduino comes up with new technologies to support these creative innovators. And we can actually see the emerging of Arduino Mega. There are many interesting and cool projects available on our website. Make sure to checkout them too.
This Arduino Mega board is powered by Atmega2560 microcontroller. This microcontroller is more powerful than Arduino Uno and has more input/output and Analog pins. Higher processing power than Arduino Uno. This microcontroller is an 8- bit Microcontroller.
Features it has-
- 54 digital input/ output pins out of which 14 pins can be used as PWM output.
- A 16 MHz crystal oscillator
- 4 UARTs (hardware serial ports)
- 16 analog pins
- A USB connection
- A power Jack
- An ICSP Header
- A reset button
Digital Input/Output Pins- These pins are used to transmit and receive digital signals.
PWM Outputs- PWM(Pulse Width Modulation) is used to control the intensity of signals like, controlling the speed of motor, brightness of LED etc.
Analog Pins- This pin reads the analog Signals, like reading the sensor data. It also serves the Input/Output functions.
UART (Universal Asynchronous Receiver/Transmitter): It is used for serial communication purpose.
Power Jack: It is used to supply power to the board externally.
SDA (Serial Data): It is used for exchanging data between Master and Slave device.
SCl (Serial clock): It is used as synchronous clock between master and slave devices.
Some Technical Features-
It Operates on 5V voltage and we can apply 7V to 12V external voltage. It has 16 Analog Input pins and 54 digital Input/Output pins. Flash memory of 256KB, SRAM of 8KB and EEPROM of 4KB. Clock Speed is 16 MHz.
OLED Display
In our project display image on OLED. The 0.96-inch, monochrome, 128×64-pixel organic light-emitting diode (OLED) display that we’ll be using in this tutorial is the SSD1306 model, as seen in the accompanying figure.
The OLED display doesn’t require backlight, which results in a very nice contrast in dark environments. Additionally, its pixels consume energy only when they are on, so the OLED display consumes less power when compared with other displays.
Check out our lates pong game. Click here
Component Required to Display Image on OLED
Circuit Diagram to Display Image on OLED
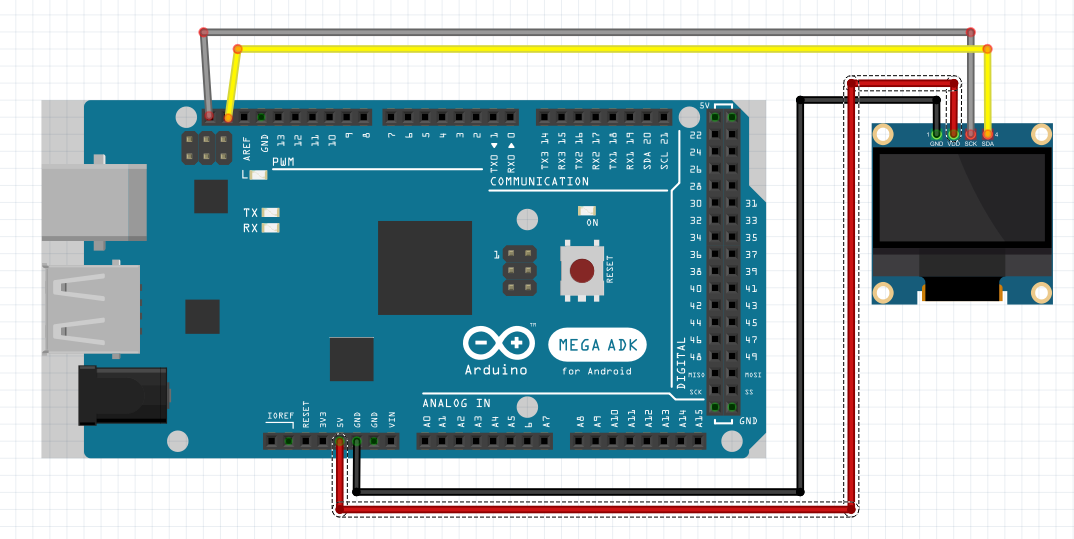
Connections Explained for Display Image On OLED
- connect GND of OLED to GND of Arduino
- connect VDD of OLED to VDD of Arduino
- connect SCK/SCL of OLED to SCK/SCL of Arduino
- connect SDA of OLED to SDA of Arduino
Convert Image to Bitmap
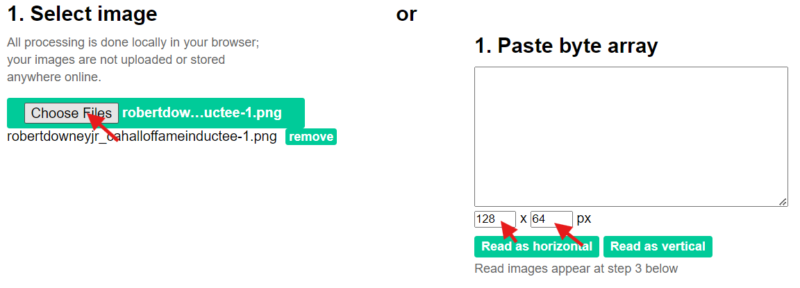
To display image on OLED we need to first convert it into bitmap. Without this conversion our image wouldn’t display anything on the OLED. To convert this image into bitmap we have to use image2cpp website. Click here
Now follow the give steps below-
Click on Choose Files to upload your desired image to display image on OLED.
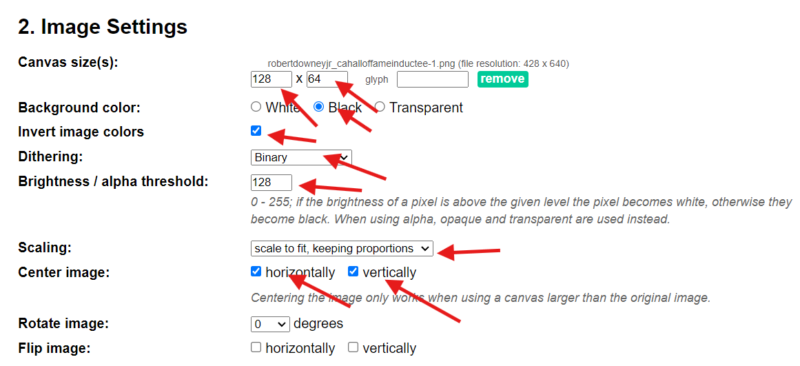
Select everything as mentioned below.
In Code Output format select “Arduino code”. Then click Generate code. Then you will get the code in the box given below. copy that code.

Code for Display Image on OLED
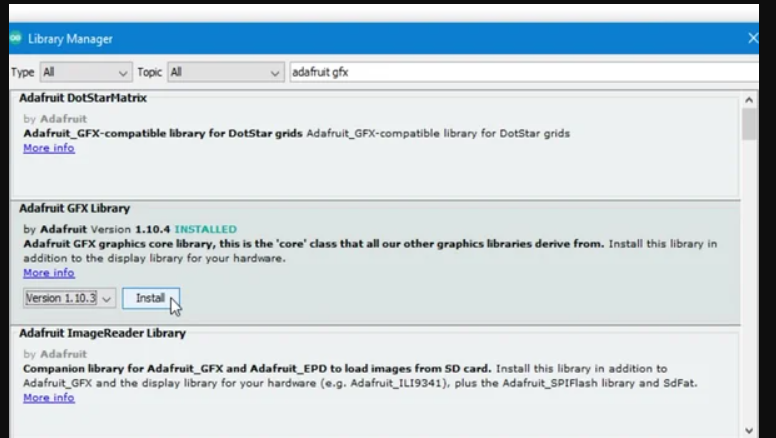
If you are using OLED for the first time or don’t have necessary libraries, go to sketch, include library and manage library option. Now you can search for SSD1306 and Adafruit GFX, if you don’t have these libraries, install them by clicking on install button. Now, you can display image on OLED.
#include <SPI.h>
#include <Wire.h>
#include <Adafruit_GFX.h>
#include <Adafruit_SSD1306.h>
#define SCREEN_WIDTH 128 // OLED display width, in pixels
#define SCREEN_HEIGHT 64 // OLED display height, in pixels
#define OLED_RESET -1 // Reset pin # (or -1 if sharing Arduino reset pin)
#define SCREEN_ADDRESS 0x3C /
Adafruit_SSD1306 display(SCREEN_WIDTH, SCREEN_HEIGHT, &Wire, OLED_RESET);

// this is the bitmap, change this variable for your specification.
const unsigned char myBitmap [] PROGMEM = {
  0x00, 0x00, 0x00, 0x00, 0x00, 0x00, 0x00, 0x00, 0x00, 0x00, 0x00, 0x00, 0x00, 0x00, 0x00, 0x00,
  0x00, 0x00, 0x00, 0x00, 0x00, 0x00, 0x00, 0x00, 0x00, 0x00, 0x00, 0x00, 0x00, 0x00, 0x00, 0x00,
  0x00, 0x00, 0x00, 0x00, 0x00, 0x00, 0x00, 0x00, 0x00, 0x00, 0x00, 0x00, 0x00, 0x00, 0x00, 0x00,
  0x00, 0x00, 0x00, 0x00, 0x00, 0x00, 0x00, 0x00, 0x00, 0x00, 0x00, 0x00, 0x00, 0x00, 0x00, 0x00,
  0x00, 0x00, 0x00, 0x00, 0x00, 0x00, 0x00, 0x00, 0x00, 0x00, 0x00, 0x00, 0x00, 0x00, 0x00, 0x00,
  0x00, 0x00, 0x00, 0x00, 0x00, 0x00, 0x00, 0x00, 0x00, 0x00, 0x00, 0x00, 0x00, 0x00, 0x00, 0x00,
  0x00, 0x00, 0x00, 0x00, 0x00, 0x00, 0x00, 0x00, 0x00, 0x00, 0x00, 0x00, 0x00, 0x00, 0x00, 0x00,
  0x00, 0x00, 0x00, 0x00, 0x00, 0x00, 0x00, 0x00, 0x00, 0x00, 0x00, 0x00, 0x00, 0x00, 0x00, 0x00,
  0x00, 0x00, 0x00, 0x00, 0x00, 0x00, 0x00, 0x00, 0x00, 0x00, 0x00, 0x00, 0x00, 0x00, 0x00, 0x00,
  0x00, 0x00, 0x00, 0x00, 0x00, 0x00, 0x00, 0x00, 0x00, 0x00, 0x00, 0x00, 0x00, 0x00, 0x00, 0x00,
  0x00, 0x00, 0x00, 0x00, 0x00, 0x00, 0x00, 0x00, 0x00, 0x00, 0x00, 0x00, 0x00, 0x00, 0x00, 0x00,
  0x00, 0x00, 0x00, 0x00, 0x00, 0x00, 0x00, 0x00, 0x00, 0x00, 0x00, 0x00, 0x00, 0x00, 0x00, 0x00,
  0x00, 0x00, 0x00, 0x00, 0x00, 0x00, 0x00, 0x00, 0x00, 0x00, 0x00, 0x00, 0x00, 0x00, 0x00, 0x00,
  0x00, 0x00, 0x00, 0x00, 0xff, 0x80, 0x00, 0x00, 0x00, 0x00, 0x00, 0x00, 0x00, 0x00, 0x00, 0x00,
  0x00, 0xf0, 0x00, 0x07, 0xc1, 0xf0, 0x00, 0x00, 0x00, 0x00, 0x00, 0x00, 0x00, 0x00, 0x00, 0x00,
  0x01, 0x8f, 0xf0, 0x1c, 0x00, 0x1c, 0x00, 0x00, 0x00, 0x00, 0x00, 0x00, 0x00, 0x00, 0x00, 0x00,
  0x01, 0x80, 0x7f, 0x70, 0x00, 0x06, 0x00, 0x03, 0x80, 0x00, 0x00, 0x00, 0x00, 0x00, 0x00, 0x00,
  0x00, 0xc2, 0x07, 0xe0, 0x00, 0x03, 0xff, 0xff, 0xc0, 0x00, 0x00, 0x00, 0x00, 0x00, 0x00, 0x00,
  0x00, 0x60, 0x60, 0x00, 0x80, 0x00, 0x00, 0x00, 0x40, 0x00, 0x00, 0x00, 0x00, 0x00, 0x00, 0x00,
  0x00, 0x30, 0x1c, 0x00, 0x49, 0x00, 0x00, 0x70, 0xc0, 0x00, 0x00, 0x00, 0x00, 0x00, 0x00, 0x00,
  0x00, 0x18, 0x06, 0x00, 0x08, 0x00, 0x0f, 0x81, 0x80, 0x00, 0x00, 0x00, 0x00, 0x00, 0x00, 0x00,
  0x00, 0x08, 0x03, 0x01, 0x00, 0x7c, 0x30, 0x03, 0x00, 0x00, 0x00, 0x00, 0x00, 0x00, 0x00, 0x00,
  0x00, 0x0c, 0x01, 0x3f, 0x00, 0x7e, 0x60, 0x06, 0x00, 0x00, 0x00, 0x00, 0x00, 0x00, 0x00, 0x00,
  0x00, 0x06, 0x01, 0x7f, 0x80, 0xfe, 0x40, 0x0c, 0x00, 0x00, 0x00, 0x00, 0x00, 0x00, 0x00, 0x00,
  0x00, 0x02, 0x01, 0x3f, 0x89, 0xfe, 0x40, 0x0c, 0x00, 0x00, 0x00, 0x00, 0x00, 0x00, 0x00, 0x00,
  0x00, 0x03, 0x00, 0x3f, 0x91, 0xfe, 0x00, 0x18, 0x00, 0x00, 0x00, 0x00, 0x00, 0x00, 0x00, 0x00,
  0x00, 0x01, 0xc0, 0x1f, 0x81, 0xf8, 0x00, 0x70, 0x00, 0x00, 0x00, 0x00, 0x00, 0x00, 0x00, 0x00,
  0x00, 0x00, 0x70, 0x00, 0x00, 0x00, 0x81, 0xc0, 0x00, 0x00, 0x00, 0x00, 0x00, 0x00, 0x00, 0x00,
  0x00, 0x00, 0x3c, 0x00, 0x00, 0x01, 0x9f, 0x00, 0x00, 0x00, 0x00, 0x00, 0x00, 0x00, 0x00, 0x00,
  0x00, 0x00, 0x03, 0xc0, 0x00, 0x3f, 0xf0, 0x00, 0x00, 0x00, 0x00, 0x00, 0x00, 0x00, 0x00, 0x00,
  0x00, 0x00, 0x01, 0x3f, 0xff, 0xf0, 0x78, 0x00, 0x00, 0x00, 0x00, 0x00, 0x00, 0x00, 0x00, 0x00,
  0x00, 0x00, 0x01, 0x1e, 0xe0, 0x00, 0xf8, 0x00, 0x00, 0x00, 0x00, 0x00, 0x00, 0x00, 0x00, 0x00,
  0x00, 0x00, 0x01, 0x80, 0x00, 0x01, 0x98, 0x00, 0x00, 0x00, 0x00, 0x00, 0x00, 0x00, 0x00, 0x00,
  0x00, 0x00, 0x00, 0xc0, 0x00, 0x07, 0x8c, 0x00, 0x00, 0x00, 0x00, 0x00, 0x00, 0x00, 0x00, 0x00,
  0x00, 0x00, 0x00, 0xe0, 0x00, 0x1d, 0x0c, 0x00, 0x00, 0x00, 0x00, 0x00, 0x00, 0x00, 0x00, 0x00,
  0x00, 0x00, 0x01, 0x98, 0x00, 0xcd, 0x3c, 0x00, 0x00, 0x00, 0x00, 0x00, 0x00, 0x00, 0x00, 0x00,
  0x00, 0x00, 0x03, 0x8f, 0x81, 0x99, 0xf0, 0x00, 0x00, 0x00, 0x00, 0x00, 0x00, 0x00, 0x00, 0x00,
  0x00, 0x00, 0x03, 0x4b, 0x9f, 0x19, 0x30, 0x00, 0x00, 0x00, 0x00, 0x00, 0x00, 0x00, 0x00, 0x00,
  0x00, 0x00, 0x03, 0x72, 0x68, 0x2c, 0x60, 0x00, 0x00, 0x00, 0x00, 0x00, 0x00, 0x00, 0x00, 0x00,
  0x00, 0x00, 0x03, 0x92, 0x48, 0x4c, 0xc0, 0x00, 0x00, 0x00, 0x00, 0x00, 0x00, 0x00, 0x00, 0x00,
  0x00, 0x00, 0x01, 0xd0, 0x48, 0xdf, 0xc0, 0x00, 0x00, 0x00, 0x00, 0x00, 0x00, 0x00, 0x00, 0x00,
  0x00, 0x00, 0x03, 0x7c, 0x09, 0x9e, 0x00, 0x00, 0x00, 0x00, 0x00, 0x00, 0x00, 0x00, 0x00, 0x00,
  0x00, 0x00, 0x01, 0xf8, 0x0b, 0x1c, 0x00, 0x00, 0x00, 0x00, 0x00, 0x00, 0x00, 0x00, 0x00, 0x00,
  0x00, 0x00, 0x00, 0x60, 0x88, 0x0c, 0x00, 0x00, 0x00, 0x00, 0x00, 0x00, 0x00, 0x00, 0x00, 0x00,
  0x00, 0x00, 0x00, 0x20, 0x88, 0x0c, 0x00, 0x00, 0x00, 0x00, 0x00, 0x00, 0x00, 0x00, 0x00, 0x00,
  0x00, 0x00, 0x00, 0x20, 0x88, 0x0e, 0x00, 0x00, 0x00, 0x00, 0x00, 0x00, 0x00, 0x00, 0x00, 0x00,
  0x00, 0x00, 0x00, 0x70, 0x88, 0x0e, 0x00, 0x00, 0x00, 0x00, 0x00, 0x00, 0x00, 0x00, 0x00, 0x00,
  0x00, 0x00, 0x00, 0x60, 0x88, 0x0e, 0x00, 0x00, 0x00, 0x00, 0x00, 0x00, 0x00, 0x00, 0x00, 0x00,
  0x00, 0x00, 0x00, 0x60, 0x88, 0x0e, 0x00, 0x00, 0x00, 0x00, 0x00, 0x00, 0x00, 0x00, 0x00, 0x00,
  0x00, 0x00, 0x00, 0x78, 0xc8, 0x1e, 0x00, 0x00, 0x00, 0x00, 0x00, 0x00, 0x00, 0x00, 0x00, 0x00,
  0x00, 0x00, 0x00, 0x3f, 0xff, 0xfc, 0x00, 0x00, 0x00, 0x00, 0x00, 0x00, 0x00, 0x00, 0x00, 0x00,
  0x00, 0x00, 0x00, 0x00, 0x00, 0x00, 0x00, 0x00, 0x00, 0x00, 0x00, 0x00, 0x00, 0x00, 0x00, 0x00,
  0x00, 0x00, 0x00, 0x00, 0x00, 0x00, 0x00, 0x00, 0x00, 0x00, 0x00, 0x00, 0x00, 0x00, 0x00, 0x00,
  0x00, 0x00, 0x00, 0x00, 0x00, 0x00, 0x00, 0x00, 0x00, 0x00, 0x00, 0x00, 0x00, 0x00, 0x00, 0x00,
  0x00, 0x00, 0x00, 0x00, 0x00, 0x00, 0x00, 0x00, 0x00, 0x00, 0x00, 0x00, 0x00, 0x00, 0x00, 0x00,
  0x00, 0x00, 0x00, 0x00, 0x00, 0x00, 0x00, 0x00, 0x00, 0x00, 0x00, 0x00, 0x00, 0x00, 0x00, 0x00,
  0x00, 0x00, 0x00, 0x00, 0x00, 0x00, 0x00, 0x00, 0x00, 0x00, 0x00, 0x00, 0x00, 0x00, 0x00, 0x00,
  0x00, 0x00, 0x00, 0x00, 0x00, 0x00, 0x00, 0x00, 0x00, 0x00, 0x00, 0x00, 0x00, 0x00, 0x00, 0x00,
  0x00, 0x00, 0x00, 0x00, 0x00, 0x00, 0x00, 0x00, 0x00, 0x00, 0x00, 0x00, 0x00, 0x00, 0x00, 0x00,
  0x00, 0x00, 0x00, 0x00, 0x00, 0x00, 0x00, 0x00, 0x00, 0x00, 0x00, 0x00, 0x00, 0x00, 0x00, 0x00,
  0x00, 0x00, 0x00, 0x00, 0x00, 0x00, 0x00, 0x00, 0x00, 0x00, 0x00, 0x00, 0x00, 0x00, 0x00, 0x00,
  0x00, 0x00, 0x00, 0x00, 0x00, 0x00, 0x00, 0x00, 0x00, 0x00, 0x00, 0x00, 0x00, 0x00, 0x00, 0x00,
  0x00, 0x00, 0x00, 0x00, 0x00, 0x00, 0x00, 0x00, 0x00, 0x00, 0x00, 0x00, 0x00, 0x00, 0x00, 0x00,
  0x00, 0x00, 0x00, 0x00, 0x00, 0x00, 0x00, 0x00, 0x00, 0x00, 0x00, 0x00, 0x00, 0x00, 0x00, 0x00
};


void setup()
{
  display.begin(SSD1306_SWITCHCAPVCC, 0x3C);  // here the 0x3c is the I2C address, check your i2c address if u have multiple devices.
  display.clearDisplay();
  delay(2000);

}

void loop()
{
  display.drawBitmap(0, 0, myBitmap, 128, 64, WHITE);
  display.display();
}
FAQ(Frequently Asked Questions)
Q.1) OLED screen showing nothing. why?
Ans. Check your wiring, sometimes it wiring fault. Check your pinouts, are they connected properly. Include the proper libraries as we have showed the step above of including the libraries.