Table of Contents
Introduction
Hello Techies, We brought the latest project for you this time.

Which we named smart parking system using IoT. this is a great system and project for techies, hobbyists,s and project makers.
what do you need to make this system and how you can make it we will share all the details. we have uploaded a lot of projects before from our smart irrigation system using Arduino.
so you can see our latest project if you are searching for the project. this project may also help you in your parking. when you will park your vehicle it will notify you of all the space near the car.

it inside the car you will receive the notification into your mobile phone which is needed to connect to the internet. this is IoT based smart parking system so you need to connect your system always with the internet and make sure about the internet connectivity. this is a very interesting project.
What is a smart parking system using IoT
In this Smart parking system, we need a mobile phone. on which the data from the sensor will be shown.
we will see the space when we parked our car on our mobile phone with a notification.
so, when we parked our car we will not collide because we know how much distance the object from our car is.
in this project, we use an app that will be shown all the data of the sensor. through this iot smart parking system, we can save our cars from damages.
there is a lot of projects available in the market which works similarly and they are very costly but with this project, you can make your own project which is smarter than theirs.
you can make this same project over the Arduino. which will not need internet connectivity. where you can use Bluetooth with Arduino or wire. we have uploaded all the projects you can check these from the category.
How does the IoT-based smart parking system work?
The project uses the server. there is a device known as the nodemcu and the scientific name is esp8266 helps to make this project. this is a wifi enable microcontroller. this device needs internet. so, first,
- we need to connect the device to the internet.
- and then we will connect the sensors with the device.
- when so the sensor sends the value to the nodemcu and this device sends the same data to the server,
- now we will use an app name blynk which is connected to the server.
- both devices need to be connected to the internet. nodemcu and the mobile phone.
- After uploading the code in esp8266. we open this app and make the button, led, and the gauge to make the IoT smart parking system.
- in this app we will receive all the data.
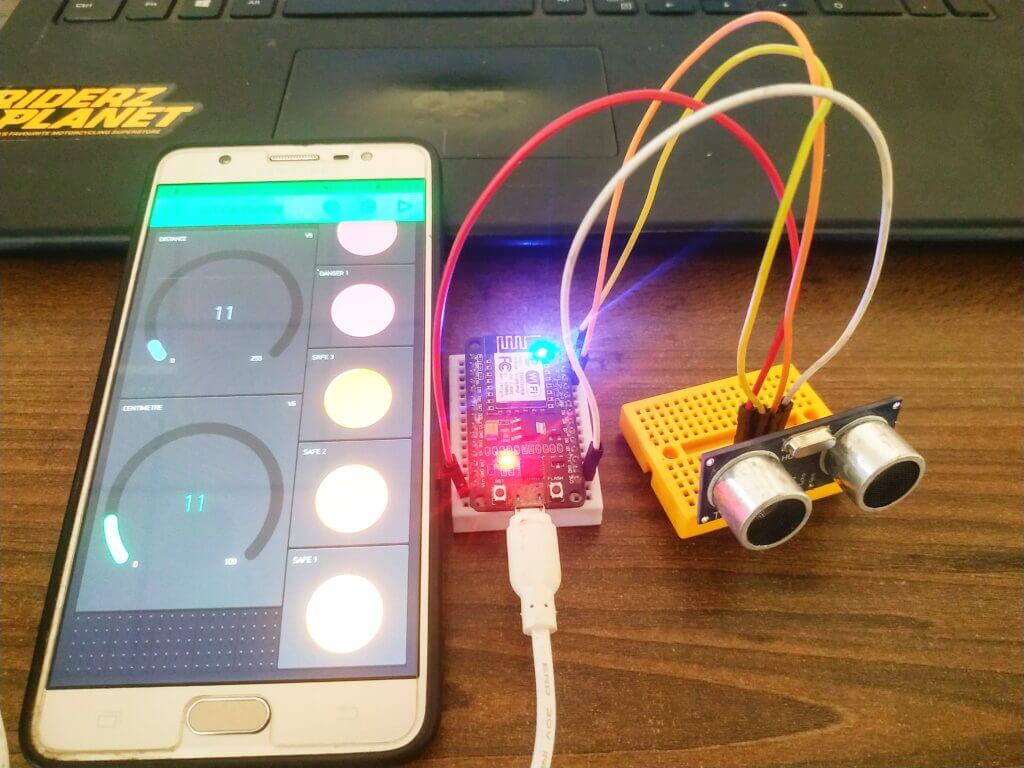
we can connect the sensor at the back of the car and the sensor will send the distance of the object near to the car on the server and the app we are using will receive all the data and showing us to the mobile phone.

How to make a smart parking system using IoT
We will make the system step by step. so you can make the system easily by yourself. you need only follow the given steps and components which we are sharing given below.
to make this awesome project you do not need to be an expert. only you need to know some basics of electronics and Programming.
if you are not aware of the electronic basic and Simple programming you can buy our Ebook at a very low price and you will surely learn a lot of things from this ebook. buy now
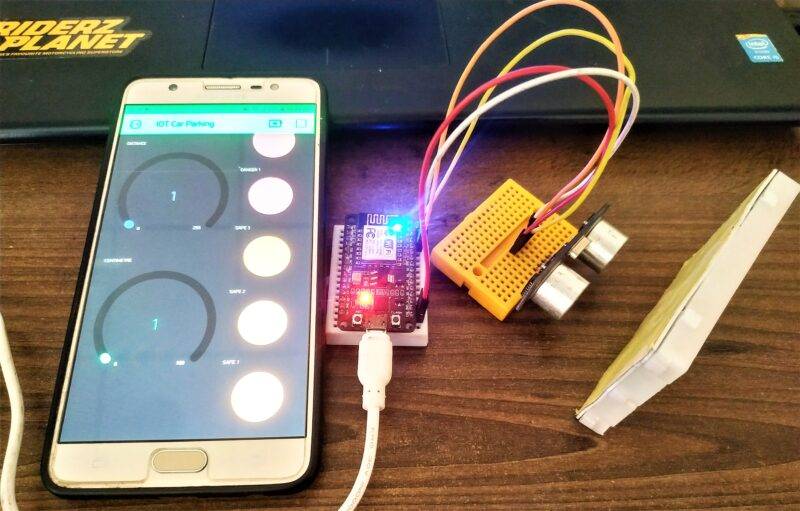
Components Required for Smart parking:-
- Nodemcu(esp8266)
- Jumper wire
- Breadboard
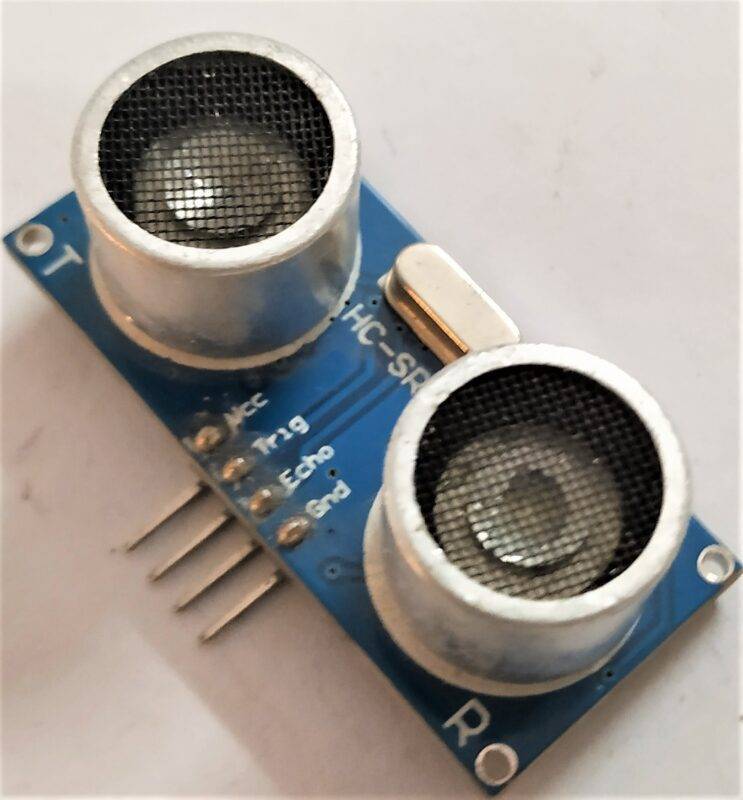
- Ultrasonic sensor
- Mobile phone

Smart parking system using IoT circuit diagram:-

Connection Table
| Nodemcu esp8266 | Ultrasonic Sensor |
| 3.3V, Vin | VCC |
| G, GND | GND |
| D0 Pin | Trig Pin |
| D2 Pin | Echo Pin |
Smart parking system using IoT Code
//TECHATRONIC.COM
// BLYNK LIBRARY
// https://github.com/blynkkk/blynk-library
// ESP8266 LIBRARY
// https://github.com/ekstrand/ESP8266wifi
#define TRIGGER D0
#define ECHO D2
// NodeMCU Pin D0 > TRIGGER | Pin D2 > ECHO
#define BLYNK_PRINT Serial // Comment this out to disable prints and save space
#include <ESP8266WiFi.h>
#include <BlynkSimpleEsp8266.h>
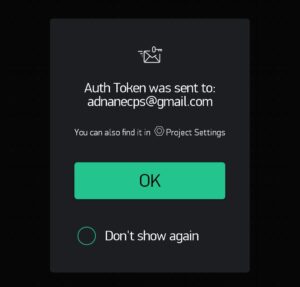
// You should get Auth Token in the Blynk App.
// Go to the Project Settings (nut icon).
char auth[] = "Whobi6tSCicbj4W654WdBeo7O4D6Ajw4"; //Auth code sent via Email
// Your WiFi credentials.
// Set password to "" for open networks.
char ssid[] = "DESKTOP"; //Wifi name
char pass[] = "asdfghjkl"; //Wifi Password
void setup() {
Serial.begin (9600);
Blynk.begin(auth, ssid, pass);
pinMode(TRIGGER, OUTPUT);
pinMode(ECHO, INPUT);
pinMode(BUILTIN_LED, OUTPUT);
}
void loop() {
long duration, distance;
digitalWrite(TRIGGER, LOW);
delayMicroseconds(2);
digitalWrite(TRIGGER, HIGH);
delayMicroseconds(10);
digitalWrite(TRIGGER, LOW);
duration = pulseIn(ECHO, HIGH);
distance = (duration/2) / 29.1;
if (distance <=200) {
Blynk.virtualWrite(V0, 255);
}
else {
Blynk.virtualWrite(V0, 0);
}
if (distance <= 35) {
Blynk.virtualWrite(V1, 255);
}
else {
Blynk.virtualWrite(V1, 0);
}
if (distance <= 30) {
Blynk.virtualWrite(V2, 255);
}
else {
Blynk.virtualWrite(V2, 0);
}
if (distance <= 25) {
Blynk.virtualWrite(V3, 255);
}
else {
Blynk.virtualWrite(V3, 0);
}
if (distance <= 20) {
Blynk.virtualWrite(V4, 255);
}
else {
Blynk.virtualWrite(V4, 0);
}
Serial.print(distance);
Serial.println("Centimeter:");
Blynk.virtualWrite(V5, distance);
delay(200);
Blynk.run();
Serial.print(distance);
Serial.println("Centimeter:");
Blynk.virtualWrite(V6, distance);
delay(100);
Blynk.run();
}
when your device will connect you will see the given text on your serial monitor.
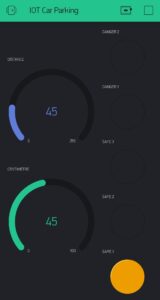
Simulation

Setup app
Step 1
Download the Blynk app from the play store.

Step 2
open the Blynk app & click on the new project.

Step 3
Select nodeMCU from the library

Step 4
Token will be sent to your Gmail id. copy that token from the Gmail id and paste it into the code which is given above.
Step 5
add new button
Click on the plus sign from the given screen in-app.

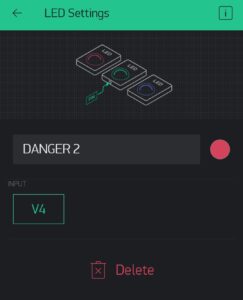
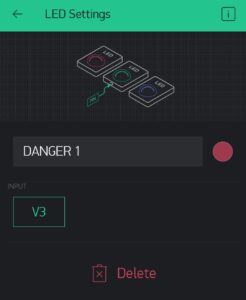
Step 6
add 5 led


Step 7
add 2 gauge


Step 8
Set led with the name of safe 1 to safe 5 and decide color


Step 9
Set gauge from 0 to 100, 255 value.


Now you can see this working in the phone screen.

Thanks to all, all the best for the project.