
Welcome back Guys 👋. I hope you are finding my posts on Raspberry PI interesting. Let’s continue with today’s topic: Raspberry Pi Soil-Moisture sensor. Like other sensors based on LM393 it is also same but working and reading are a bit different. To know more about it and to see how it is hooked to Pi. Let’s Begin !!!!!
Soil-Moisture Sensor:
Soil-Moisture sensor is a LM393 based sensor which is an Op-Amp IC. For more information on Op-Amps Google it. For now in simple words it amplifies the current value received by the probes dug into the soil for testing moisture content in soil. I strongly recommend you to first look at it’s arduino tutorial for better and easy understanding. As coding for arduino is much simpler as in Python. If you want its Schematic diagram then click here.

It’s value can be adjusted by using the Potentiometer provided on it. It has both type of output Analog and Digital. To know the difference between Google it. In short words Digital value is either 0 or 1. Whereas analog value ranges from 0 to 1024.
Material Required:
- Raspberry Pi with screen, keyboard and mouse (Raspberry Pi 4 | 4GB variant used in tutorial)
- Soil-moisture sensor
- Red and Green Led
Circuit Diagram:
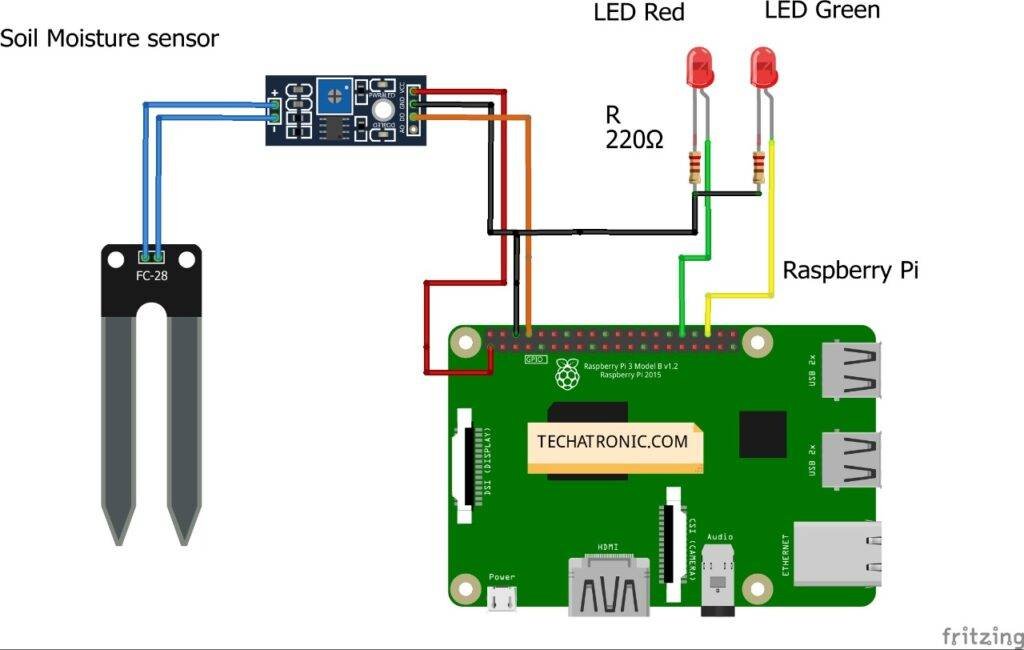
|
Raspberry PI |
Soil Moisture Sensor | |||
|
GPIO 14 |
D0 Pin | |||
|
+5 Volt |
VCC | |||
|
GND |
GND | |||
|
RPI |
LED 1 |
LED 2 |
220 ohm Rsistor1 |
220 ohm Resistor 2 |
|
GPIO 12 |
Anode Terminal |
|
|
|
|
GPIO 16 |
|
Anode Terminal |
|
|
|
GND |
|
|
Terminal 1 |
Terminal 1 |
|
|
Cathode Terminal |
|
Terminal 2 |
|
|
|
|
Cathode Terminal |
|
Terminal 2 |
NOTE: The pins connection areas:
- soil moisture sensor —> GPIO14 | PIN 8
- RGB Red —> GPIO12 | PIN 32
- RGB Green —> GPIO 16 | PIN 36
- Rest are Power connection VCC —> PIN 2 & 4, GND —> PIN 6
Programming Pi :
First, we import RPi.GPIO module. Then we set the mode to BOARD numbering.

After that, we define 3 pins 1 as input and rest as output with the initial state of Pins as low.
gp.setup(8,gp.IN)
 gp.setup(36,gp.OUT,initial=gp.LOW)
 gp.setup(32,gp.OUT,initial=gp.LOW)
Then in the While loop, we put the try and error concept to terminate the program by using the Ctrl+C command and gives the condition for output.
As in my previous article on IR Sensor, I have clearly defined the reverse output we are getting due to the non-inverting Op-Amp circuit using LM393. So, we have to reverse the output and input by using ‘not’ as a prefix.
print(not gp.input(8))
 gp.output(36,gp.input(8))
 gp.output(32,not gp.input(8))
Here is the complete code:
import RPi.GPIO as gp
 gp.setmode(gp.BOARD)
 gp.setup(8,gp.IN)
 gp.setup(36,gp.OUT,initial=gp.LOW)
 gp.setup(32,gp.OUT,initial=gp.LOW)
 while True:
   try:
     print(not gp.input(8))
     gp.output(36,gp.input(8))
     gp.output(32,not gp.input(8))
   except :
     gp.cleanup()
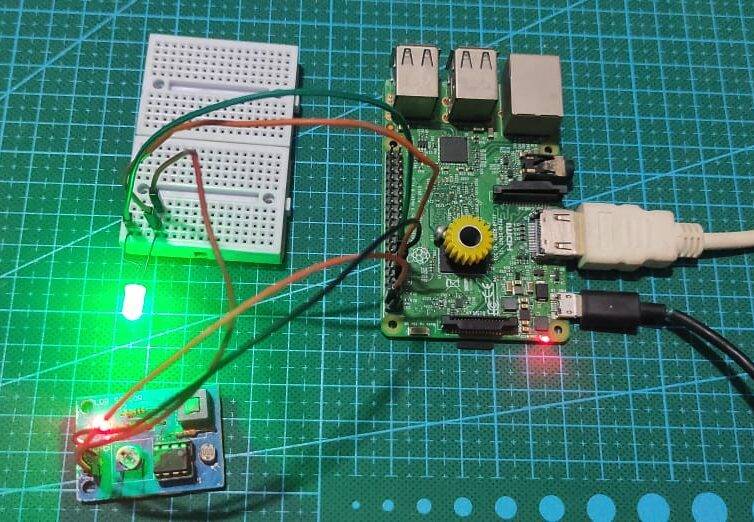
The working video of this is attached below. Have a look at it and see it’s working for better understanding.
With this, we end our today’s tutorial of Raspberry Pi soil moisture sensors. I hope you like it. For any queries, ask me below.
Sponsor:

Want to make a Pi HAT for your Project to make it into professional ones. Then take a look at NextPCB service, they provide awesome PCB manufacturing for 1,2,4, and more layer PCB at a reasonable price. Along with this, they also provide PCB Assembly service for SMD components, which you may find hard to solder on. Under such price, they provide multiple PCB continuity testing, AOI & X-Ray testing for PCB in different colors. So If you want a professional-looking PCB for your project, then just look up at NextPCB.

Hi.
I have a question.
I was just reading your articles about the Raspberry Pi soil moisture sensor and therefore I wanted to ask if I only need the file smart_irrigation.py or any other files as one file seems a bit less.
Thanks for answering
yes you can get